How To Fix Nintendo Switch 52131 Error Code | NEW in 2024
In this troubleshooting guide, we’ll show you the ways to fix the annoying Nintendo Switch error code 52131. We’ve been getting user reports about this bug recently although it’s a generally rare issue to affect Nintendo devices these days.
If you’re looking for solutions about this problem on your console (Wii or Nintendo Switch), you’ve come to the right place.
How to fix Nintendo Switch 52131 error?
Error code 52131 is a general Nintendo error that’s been observed to occur in both the older Wii console and the new Nintendo Switch. It’s usually a sign of a connection problem stemming from a bad IP address, non-working DNS settings, and, in some cases, poor wifi signal.
If you’re experiencing this error code on your Nintendo Switch, check out the solutions that you can try below.
Fix #1: Power cycle your network equipment.
Fixing the Nintendo Switch 52131 error should start with a restart of your network devices. Make sure that you turn off your modem or router and unplug it from the power outlet for at least 30 seconds. This will help clear its memory and hopefully get rid of the random bug that may have developed.

Do the same steps for all your other network devices (switches, hubs, etc.) if you have them connected to your router.
Some users managed to fix their Nintendo Switch 52131 error by resetting their router if nothing happened after a quick restart. You can try to also reset your router but keep in mind that this will, in effect, revert all settings to factory defaults. This means that you’re going to redo all the customizations (forwarded ports, blocked and exempted items, other custom settings) in the router afterwards.
If you’re interested to know how to reset your router, consult the manual on how to do it in your particular hardware. Usually though, there should a tiny hole somewhere that has the reset button inside that you can use.
Fix #2: Run a speed test.
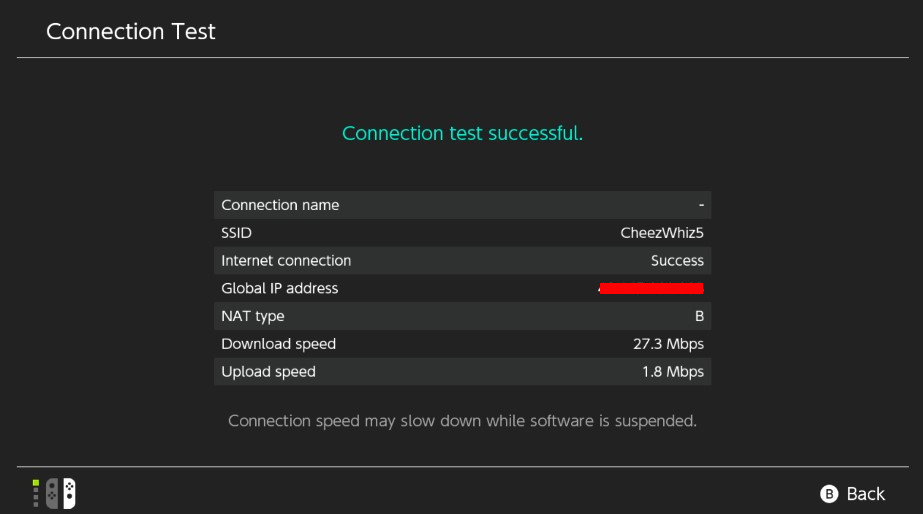
Once you’ve finished restarting your network devices, you then want to conduct a connection test on your Nintendo Switch.

- Go to the Nintendo Home Menu.
- Select the System Settings icon.
- Scroll down through the System Settings menu and select Internet.
- Select Test Connection.
- Wait for the test connection result.
The purpose of this step is to determine if there’s a slowdown in your network, particularly on the DNS server side. If the connection test takes longer than 10 seconds (from the start of the test to the finish), it may be a sign that there’s an on-going issue with your DNS servers.
If the connection test is quick and takes shorter than 10 seconds but your Nintendo Switch console continues to get the 52131 error code, you’ll need to troubleshoot further.
It’s also important to consider the download and upload speed results because having a slow internet connection can affect the performance of online games. Your console may also find it hard to maintain a connection to the server if your internet connection speed is slow when it’s trying to update.
If you think that you have a slow internet connection problem, make sure to get help from your Internet Service Provider.
Fix #3: Use a different DNS server.
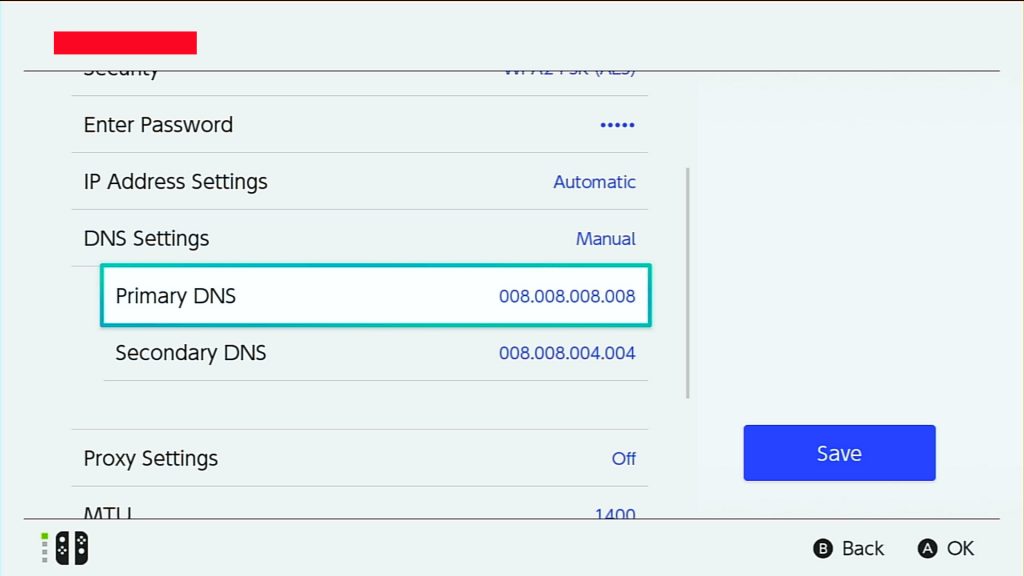
By far, the most effective way to fix the Nintendo Switch 52131 is to change the DNS settings in the console. Sometimes, the default ISP-provided DNS server and internet settings may not work properly. You can change the primary DNS and secondary DNS on your Nintendo Switch by using the free Google DNS.

ALSO READ: How To Change The DNS Settings On Nintendo Switch
Fix #4: Use a different router channel.
For some users, using another channel on their router helps in fixing the error code 52131. This can work if the main reason for the problem is due to network signal interference or if the frequency band is too crowded. If you live in an apartment complex and your neighbors’ wifi overlap each other, changing your router’s channel may help.
In order to do this, you must ensure that you connect your computer to your router either by wifi or by LAN cable. Then, you want to access the router GUI and look for the Advanced settings for your wifi. Find the channel settings and use Channel 1 or 11.
The exact steps on how to access your router’s GUI depends on your equipment. Check the manual, contact the router manufacturer or do some research about your router on how to do it.
Fix #5: Check for wifi signal interference.
Aside from signal interference, physical objects between the router and your Nintendo Switch can affect how the wifi signal is received in the console. If possible, try to use the console in the same room as the router. If you’re in another room, make sure that there’s no thick wall, metal, or glass in between the devices.
Other wireless devices (such as cordless phones, baby monitor, wireless CCTVs, etc.) at home can affect your wifi performance as well.
OTHER INTERESTING ARTICLES:
- How To Delete A Microsoft Account | New & Complete Guide 2021
- How To Fix Rainbow Six Siege Connection Failure On PC | NEW 2021
- How To Fix NBA 2K22 CE-34878-0 Error | NEW 2021
- How To Fix Soundcore Motion+ Won’t Turn On | NEW 2021
Visit our TheDroidGuy Youtube Channel for more troubleshooting videos and tutorials.