How To Make Your Nintendo Switch as Primary Console | NEW in 2026
If you’re a new player to Nintendo Switch system, you may have questions on how to transfer digital contents, save data, or games to another Switch. While the answer is not straightforward, one of the important things that you must know is on how to make your Nintendo Switch as primary console. This is necessary since non-primary Switch consoles cannot access digital software purchases or digital games on your account..
In this article, we’ll show you how to designate a Switch as a primary console. The steps in this guide applies to both the Nintendo Switch and Nintendo Switch Lite.
What does Nintendo Switch primary console mean?
A Primary Console means that the said Nintendo Switch has a clear advantage over a non-primary or secondary console. A Switch that’s designated as the Primary Console can play digitally purchased games even without an internet connection whereas a non-primary Switch needs to go online first in order to do so. This is because Nintendo systems will check if the said console (secondary console) has the license or DRM to access the games.
The primary console can play both physical and digital games anytime, which means that you can bring it anywhere, even in places where there is no internet connection. On the other hand, the secondary console will have to depend on internet connection so that your Nintendo account can be used to access games.
Each Nintendo account can only make one Nintendo Switch as primary console at a time. You don’t need to have an active Nintendo Switch Online membership to deregister your Nintendo Switch console.
How to make your Nintendo Switch as primary console?
Designating a Switch as primary console is automatic the moment you log in to your main Nintendo account that’s authorized to buy items in the eShop. If you have multiple Nintendo Switch consoles, the first console that you use to log in to the Nintendo eShop is immediately recognized as the Primary Console.
If you don’t want to make one Nintendo Switch as the new primary console and you want to designate a new one, the first thing that you want to do is to deregister the primary console. Here’s how:
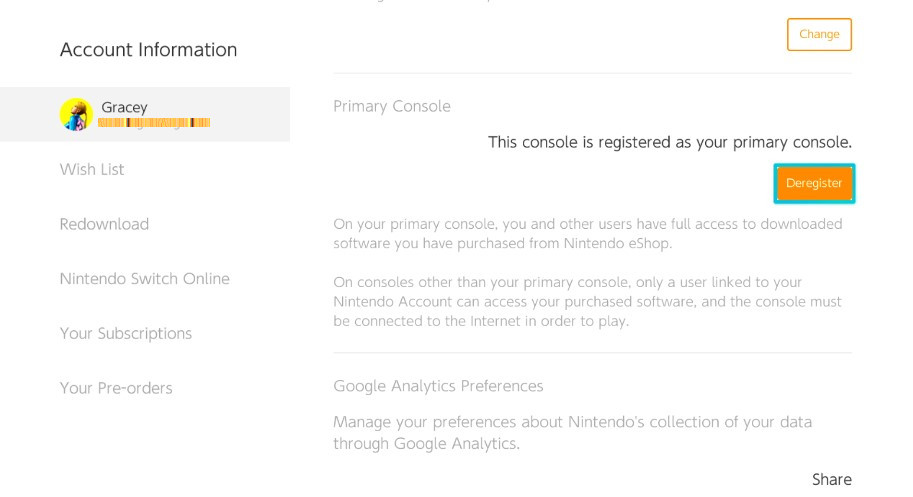
- Log in to your main Nintendo account (the one allowed to buy games and other contents or software purchases in the eShop).
- Go to the Nintendo Switch Home screen.
- Open Nintendo eShop.
- Select your user account profile icon at the upper right.
- On the right panel, scroll down and find Primary Console section.
- Select the Deregister button.
- Log in to your main Nintendo account on the second Nintendo Switch console.
- Open Nintendo eShop in the second console. The system will then automatically designate the new Switch as your Primary Console.
If you want to change your primary console again, simply do the same steps as shown above.
IMPORTANT: If you no longer have access to your previous Switch like when it’s already been sold, traded, or stolen, make sure that you change your Nintendo account password to avoid compromising your account.
How to know if you’ve successfully deregistered your Switch?
To verify if the above steps have worked successfully, simply visit your Nintendo eShop account again.
How to deregister my Nintendo Switch without a console?
If you no longer have a Nintendo Switch console at the moment, you can still unlink your Nintendo account from your main console by going to the Nintendo website.
Keep in mind that deregistering a primary console this way is only allowed once every year to avoid abuse.
Here’s how to do that:
- Open a web browser and go to Nintendo account login website.
- Log in to your Nintendo account.
- Select Shop menu.
- Go to the bottom and select Deregister Primary Console.
- Enter your account password and follow the instructions to deregister your Switch.
What to do if you can’t deregister the primary console?
If you are having a problem to deregister your Switch as primary console, you must contact Nintendo support so they can check what’s wrong, or do it on their end.
Other interesting articles:
- How To Fix Hitman 3 Black Screen Issue | New & Updated 2021
- How To Fix Nintendo Switch Error 2110-1100 | New & Updated 2021
- Easy Solutions To Fix Hitman 3 Connection Failed Error | 2021
- How To Find Nintendo Account QR Code | New & Updated 2021
Visit our TheDroidGuy Youtube Channel for more troubleshooting videos and tutorials.