How To Fix Google Chrome Out Of Memory Error In Windows
Google Chrome is the undisputed number one browser in the world for years now. Billions of people rely on it every day and while this browser is largely reliable for most users, some people may experience problems with it. One of such problems is the one we’re dealing with today: the Google Chrome Out Of Memory Error in Windows.
If you’re experiencing this issue, this guide will show you the solutions to fix it.
How to fix Google Chrome Out Of Memory error in Windows?
If you can’t use your Google Chrome browser because it’s not working, or keeps showing the “Error code: Out of memory.” or the “‘Aw, snap! Something went wrong while displaying this web page.” you’ll need to do a number of solutions to try and fix it. Both of these error messages refer to a memory error that’s common with the Google Chrome browser.
Fortunately, fixing this issue is simple and can almost always be resolved by tweaking some settings.
Here are the solutions that you can try:
Fix #1: Restart Chrome.
For some users, force closing their Google Chrome browser using the Windows Task Manager is the most direct and efficient way to deal with this error message. Here’s what you must do:
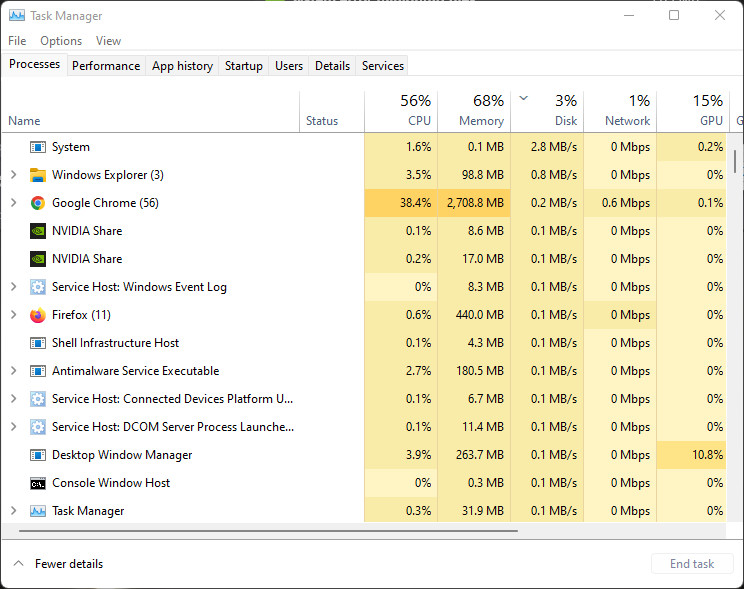
- Pull up the Windows Task Manager by pressing CTRL+SHIFT+ESC.
- Under the Processes tab, find Google Chrome and right click on it.
- Select End Task.
- Launch the browser again and check if that helped to fix Google Chrome “Ran Out Of Memory” error message.
Fix #2: Reboot PC.
The other basic solution to try is to restart your computer. This can be an effective way to bring your device to its normal working order if the main reason for the “Ran Out Of Memory” error is temporary bugs.
When you restart your system, these apps will shut down, and the RAM will be cleared. In this method, your computer will be able to begin with a fresh slate. Rebooting the computer can fix a variety of software and hardware issues that may be the reason why your Google Chrome browser is no longer working properly.
During the time that your system is active, a number of processes in the background as well as the programs that you use generate temporary cache and logs. The memory on the machine might get cluttered as a result of the traces left behind by these activities. When your RAM has reached its maximum capacity and is unable to retain any more data for the CPU, a memory leak will begin to occur, which may cause errors and other issues in a variety of programs.
What you have to do is to use the Restart option under the Power menu. Alternatively, you can also turn off the computer and unplug it from the power source for 30 seconds to allow the memory to be cleared.
Fix #3: Close other tabs.
Some people love to open a lot of tabs and while that’s generally fine, especially if your computer is powerful enough, others may not be so lucky. If you can’t seem to make Google Chrome work normally, try to check if closing some tabs might help.
If you need to open a lot of tabs at the same time, then be sure to manage them to avoid running out of memory. Instead of grouping together all tabs, try to open several Google Chrome windows instead and distribute the necessary tabs to each of these windows.
Fix #4: Check for updates.
Updating Chrome is another simple solution to fix issues. Google regularly provides updates to fix bugs and security flaws, as well as to enhance Chrome’s functionality.
Applications that have been allowed to get out of date can produce mistakes. You should update the application as soon as possible if it has been a very long period since you last did so. That could be the answer you’ve been seeking for all along.
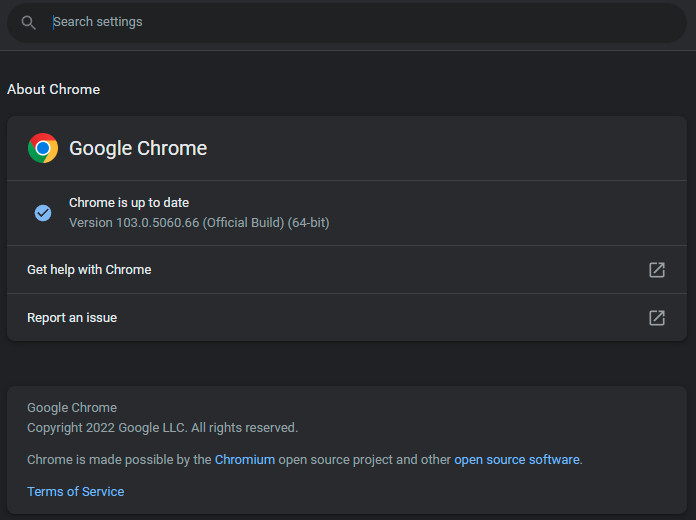
Here are the steps to check for updates:
- Open Google Chrome.
- Click on the three dots at the upper right.
- Click Help.
- Select About Google Chrome.
- Click the Update Google Chrome button, and then wait for the most recent version of Chrome to be installed.
- You are using the most recent version of your browser if you do not have access to the button.
- Then, make sure that you properly quit Google Chrome and start it back up.
Fix #5: Fix Google Chrome “Ran Out Of Memory” error by refreshing the cache.
Browsers accumulate files and other data (such as cached images and videos) and store them in a temporary location to allow it to open websites faster and to make your browsing experience more efficient. However, these temporary files and data called cache can sometimes become corrupted and cause problems.
To fix the problem, you can try to clear the Google Chrome cache with these steps:
- Open Google Chrome.
- Click on the three dots at the upper right.
- Click on More tools.
- Select Clear browsing data.
- Once the “Clear Browsing Data” window appears, select the box next to “Cached images and files” and “Cookies and other site data.”
- Then, click on the Clear Data button.
- Restart your Google Chrome browser and see if that helped to fix Google Chrome “Ran Out Of Memory” error message.
Fix #6: Disable Chrome browser extensions.
A browser extension is a tiny piece of software that may sometimes be referred to as a “plug in.” It carries out a variety of filters and controls to modify the manner in which a user may access a web page or read information that originates from a web service such as an online email.
In most cases, the purpose of a browser extension is to augment the existing capabilities of a website with new features and functions. But they may also be used to remove undesired features and capabilities from a website, such as pop-up adverts and other components of a website’s basic functionality that a user desires to opt out of.
If you are fond of using extensions in Google Chrome, there’s a chance that one of them is responsible for the problem you’re experiencing. You can try to disable them temporarily to check if Google Chrome will work normally without them.
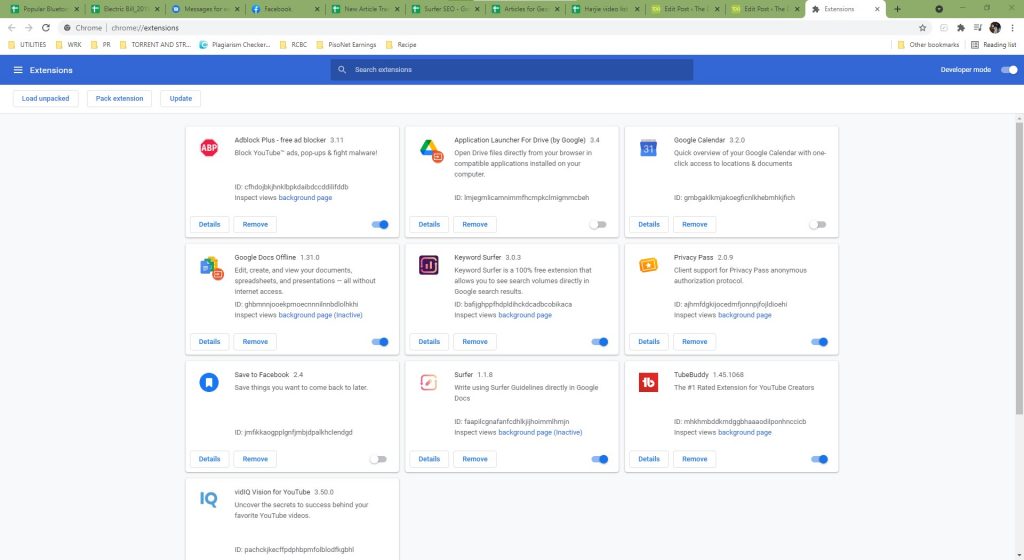
Here’s how that’s done:
- Open Google Chrome.
- Click on the three dots at the upper right.
- Click on More tools.
- Select Extensions.
- Once the Extensions page has opened, you may deactivate each extension by turning off the switch that corresponds to that extension.
- After that, you should close Chrome and open it again to see whether the issue has been fixed.
- If the issue has been resolved, go back to the Extensions tab and remove any extensions that were previously installed. To do this, pick the Remove option from the confirmation popup after clicking on the Remove button.
Fix #7: Use Incognito Mode.
The act of disguising one’s actual identity is what is meant by the term “incognito.” The Google Chrome Incognito mode is exactly what it sounds like: a mode that lets you browse the web anonymously. The incognito mode that is available in Google Chrome makes it possible to conceal your browsing history, preventing other people from seeing the websites that you have visited. In practice, it conceals your digital fingerprints throughout the internet.
When you use Incognito Mode, all extensions that are running in the background are disabled. When you use Incognito Mode, you are effectively turning off extensions, one of which may be the reason for the problem.
If you can visit the website or online service normally when using Incognito Mode, you are most likely having an issue with an extension.
In order to use Incognito Mode, follow these steps:
- Open Google Chrome.
- Click on the three dots at the upper right.
- Select New Incognito Mode.
- Visit the website or online service you’re having an issue with and check for the problem.
Fix #8: Remove suspicious apps from Google Web Store.
Did the Google Chrome issue start to appear after you’ve installed a new app?
It’s possible that the issue was caused by a web app that you installed via your browser or that you got from the Chrome Web Store. Remove the application, and then check to see whether the issue still exists. In order to resolve the issue, you might try removing all of your online applications.
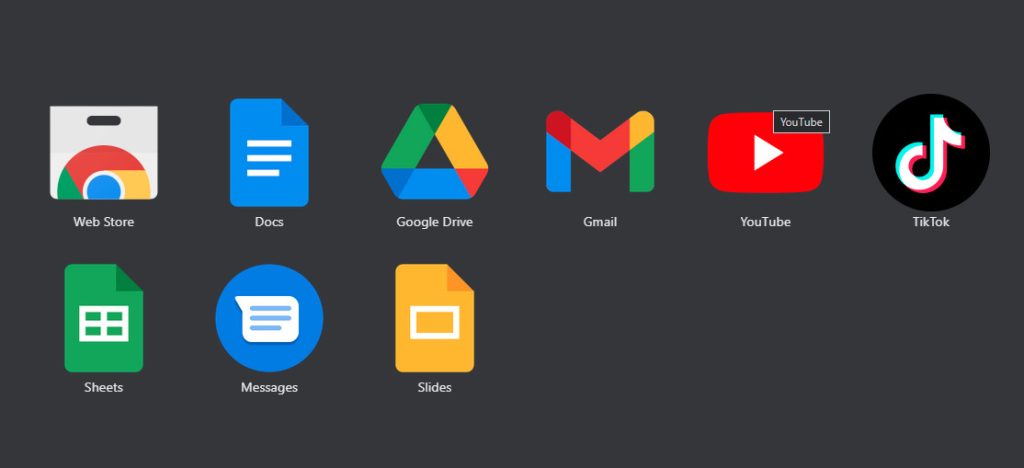
Here’s what you need to do:
- Open Google Chrome.
- Go to the address bar and type in: chrome://apps.
- Press Enter.
- Your apps downloaded from the Chrome Web Store should appear. Right click on the app you want to remove and select Remove from Chrome.
- Click on the Remove button.
Fix #9: Remove temporary files from the system.
For some users, clearing their computer’s cache or temporary files is enough to fix Google Chrome “Ran Out Of Memory” error. You can either use the Disk Cleanup utility or go under Windows Settings. We’ll show you each of these methods below.
Clear temporary files using the Disk Cleanup tool
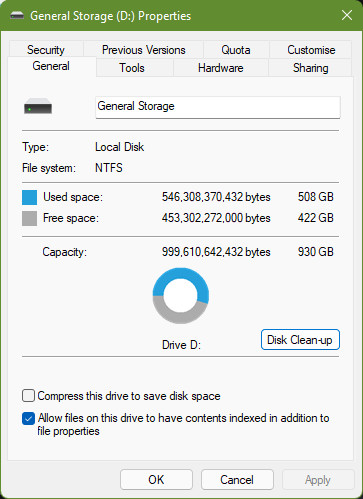
- `Open the Windows File Explorer.
- In the left panel, right click on your hard drive that’s under This PC.
- Select Properties.
- Under the General tab, click on the Disk Cleanup button.
- Once the Disk Cleanup window opens, you should see the temporary files stored in this hard drive.
- Select the categories (such as Recycle Bin, DirectX Shader Cache, etc.) that you want to delete.
- Wait for your PC to clear the files and restart your PC.
- Then, relaunch Google Chrome and check for the problem.
Clear temporary files via Windows Settings
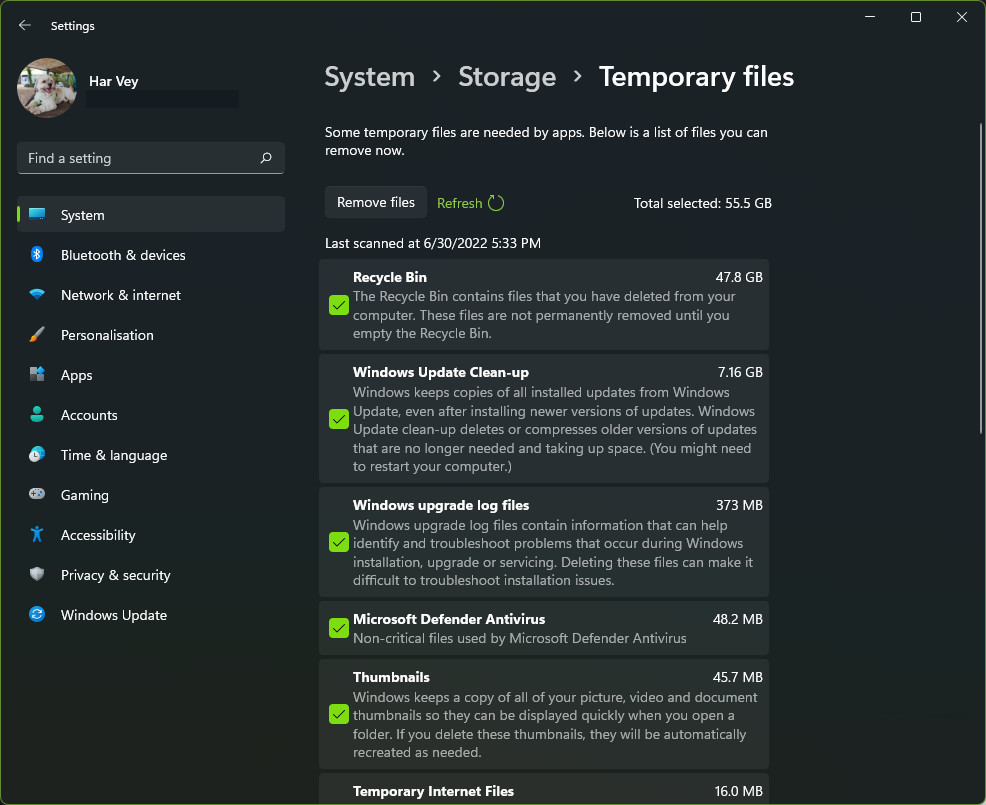
- Open Windows Settings by pressing the Windows key + I.
- Select System.
- Click on Storage.
- Under Storage, click on Temporary Files.
- It may take some time for all the categories to appear. Wait for the system and then click on Temporary Files.
- Select all the categories you want to delete and select Remove Files at the top.
Fix #10: Turn off hardware acceleration.
Google Chrome has hardware acceleration feature that lets it assign tasks to certain hardware. For example, if you’re trying to load a video, it can tell the GPU to process the tasks instead of letting the CPU do it. This feature is designed to offload tasks from the CPU and thus, relieve pressure from it. This can make the system to run and perform tasks faster.
While hardware acceleration in Google Chrome works properly for most people, others may experience issues with it. Others have reported started getting the Google Chrome Ran Out Of Memory error when it’s enabled. So, if you’re running this feature now, consider turning it off to see if that will help.
Here’s how it’s done:
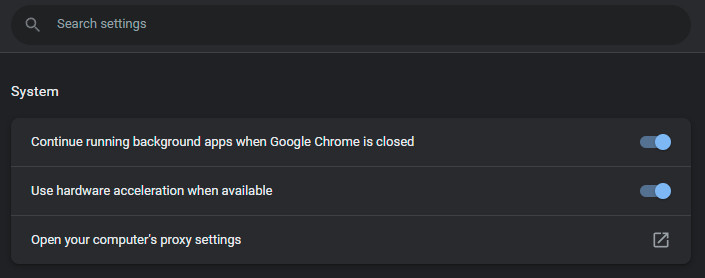
- Open Google Chrome.
- Click on the three dots at the upper right.
- Select Settings.
- Select Advanced from the left panel.
- Click System.
- Toggle off Use hardware acceleration when available.
Fix #11: Use Google Cleanup tool.
In case you didn’t know, Google Chrome has its own antivirus or security software that you can use to check for possible malware on your PC or browser. Just like a regular antivirus, you need to run it so it scans the system and do its job.
Here’s how to use it:
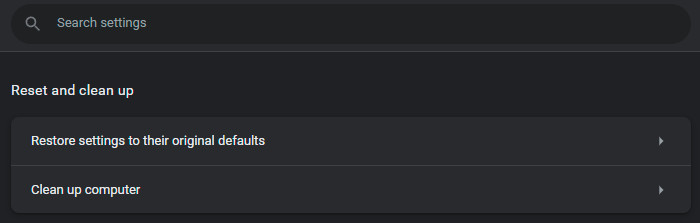
- Open Google Chrome.
- Click on the three dots at the upper right.
- Select Settings.
- Select Advanced from the left panel.
- Select Reset and clean up.
- Click on Clean up computer.
- Uncheck the option next to “Report details to Google about malicious software, system settings, and processes that were identified on your computer during this cleaning” if you do not want the program to transmit information to Google. This will prevent the utility from sending information to Google.
- Click on Find.
- Wait for the software to scan the system.
Fix #12: Use Chrome Task Manager.
Another not-so-popular feature that your Google Chrome browser has is its built-in Task Manager utility. This feature works similarly to the Windows Task Manager although the former is limited to the browser environment only.
You can use the Google Chrome Task Manager to check which of the processes in your browser is causing a memory error because of unusually high memory allocation.
Here’s how:
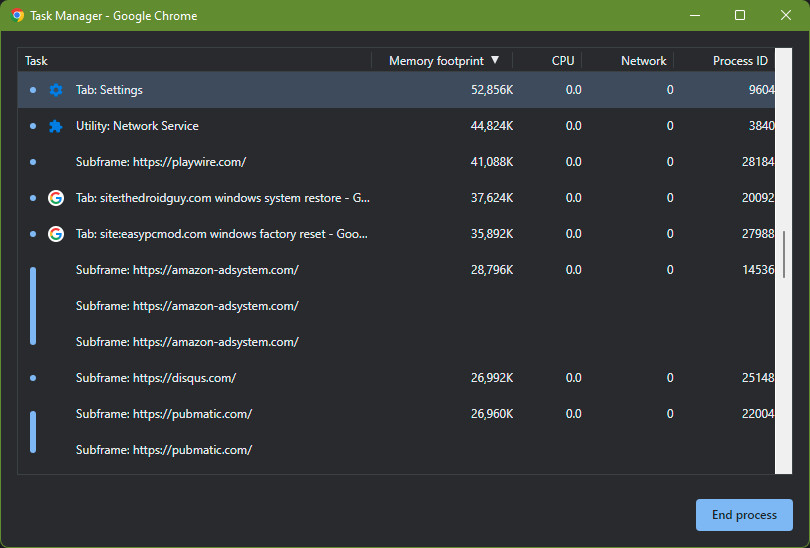
- Open Google Chrome.
- Click on the three dots at the upper right.
- Select More Tools.
- Click on Task Manager.
- Once the floating window for the Task Manager has opened, browse through until you discover a tab or extension that has an abnormally large memory footprint, and then close that tab or extension. When you want to terminate a process, you can do so by clicking on it and then selecting the End Process option that appears in the bottom-right corner of the window.
Fix #13: Delete and reinstall.
If none of the solutions presented above have been successful for you, the next step is to reinstall Chrome. At this point, it would not be unreasonable to think that some of the files used during the browser’s installation are faulty. The issue should be resolved after a new installation of Chrome’s most recent version has been completed.
You shouldn’t have any trouble reinstalling the browser since your browsing history, extensions, applications, and passwords are all linked to your Google account. The only thing that will be changed is that the browser will need to load those services again once it has been closed and reopened.
FAQs
OTHER INTERESTING ARTICLES YOU MAY LIKE: