Easy Fix For HDMI TV/Monitor Not Detected In Windows
Windows Operating System supports usage of multiple monitors at once. The OS can also work with HDMI-connected TV so if that’s what you want, you should be able to easily do so. However, some people may encounter issues when connecting an HDMI TV or monitor to their computer. If you’re one of them and your Windows PC is having a hard time detecting HDMI TV or monitor, this guide is for you.
How to fix HDMI TV not detected in Windows issue?
If your Windows 10 or 11 PC is not detecting HDMI TV or monitor, there are a number of fixes that you need to try to see which one will work for you.
Solution #1: Restart your PC.
A quick reboot might help fix this problem. This is a basic troubleshooting help for all types of issues you may encounter with your Windows PC.
If you’ve already restarted your computer ahead of time, proceed to the next step.
Solution #2: Check the physical connections.
Another basic thing to do here is to ensure that your PC and your HDMI TV or HDMI monitor are properly connected. You also have to make sure that the HDMI cables are working. If you have another HDMI cable, make sure to try that in case the other one is defective.
Be sure to also verify if you’re using the correct HDMI port, especially if there are multiple HDMI ports on your monitor or TV.
If trying to connect a TV via HDMI, try to cycle through the inputs or sources using your TV remote.
Solution #3: Detect the HDMI TV or HDMI monitor manually.
If your PC is not detecting HDMI TV or monitor, the next thing that you can do is to manually check by using the Detect button under Windows Settings menu. This usually works if there’s a problem connecting an old monitor to a Windows 10 or Windows 11 PC.
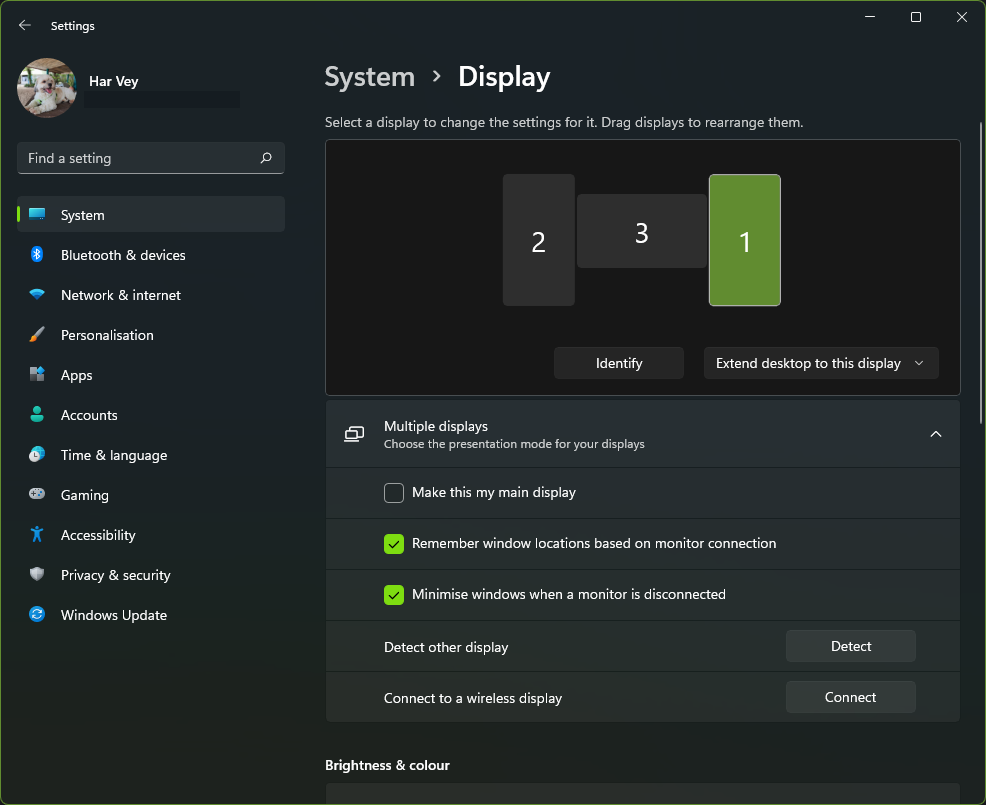
Here’s what you need to do:
- Open Settings app by pressing the Windows key + I.
- Go to System.
- Select Display.
- Click on Multiple Displays.
- Click on the Detect button.
- Check if your PC is now detecting HDMI TV or HDMI monitor.
Solution #4: Fix Windows not detecting HDMI TV or HDMI monitor by checking the Display Output settings.
Windows Operating System is designed to support multiple displays and can project the screen in a number of ways. Try to switch between the different projection options to see if that will clear the bug. If your Windows computer is not detecting the PC screen or HDMI TV, here are the steps to switch projection options:
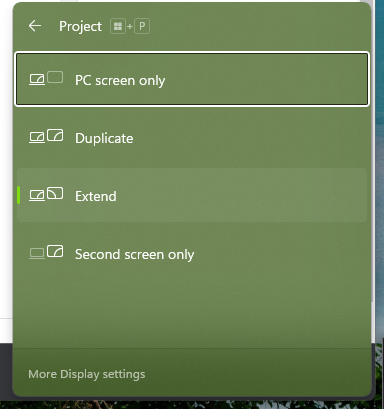
- Ensure that your PC and HDMI TV or HDMI monitor are connected.
- Press the Windows key + P.
- Select Duplicate.
- If Duplicate is not working, try Extend.
Solution #5: Install the latest graphics driver software.
Sometimes, computers may stop working properly because of corrupted or outdated driver software. You must ensure that your PC is running the latest graphics driver software. Here’s how it’s done:

- Right click the Start button.
- Click Device Manager.
- Expand Display Adapters.
- Check if there are question marks for your Display Adapters.
- Right click the display adapter then click Update driver.
- Click Search automatically for drivers. This will instruct your PC to search for the most recent version of graphics driver from the web.
Alternatively, you can use the Microsoft Basic Display Adapter option by selecting Browse my computer for driver software instead of selecting Search automatically for updated driver software. The Microsoft Basic Display Adapter option is recommended only when your computer is unable to connect to the internet to get the latest graphics driver.
Here’s how it’s done:
- Right click the Start button.
- Click Device Manager.
- Expand Display Adapters.
- Check if there are question marks for your Display Adapters.
- Right click the display adapter then click Update driver.
- Select Browse my computer for driver software.
- Select Let me pick from a list of available drivers on my computer.
- Check the box beside Show compatible hardware.
- Select Microsoft Basic Display Adapter.
- Click Next.
Once you’ve installed the drivers, make sure to reboot the PC and check for the problem again.
Solution #6: Use the hardware troubleshooter.
If manually updating your graphics driver did not help at this point, you can try to use the built-in troubleshooter. This tool is designed for situations like this one so be sure to give it a try right now. Here’s how to use it:
- On your keyboard, press the Windows key + I.
- Select System.
- On the right panel, scroll down and select Troubleshoot.
- Select Other trouble-shooters.
- Click on the Run box for Video Playback.
- Wait for the system to finish running the diagnostics.
Another way to do this is by going to the Control Panel.
- On your keyboard, press the Windows key and type “control panel.”
- Open Control Panel.
- In the View by section on the upper right, make sure that it says Small icons.
- Find Troubleshooting and select it.
- Select View all in the left pane.
- Click on Video Playback.
- Wait for the system to finish running the diagnostics.
Solution #7: Check if HDMI monitor or HDMI TV is set as default.
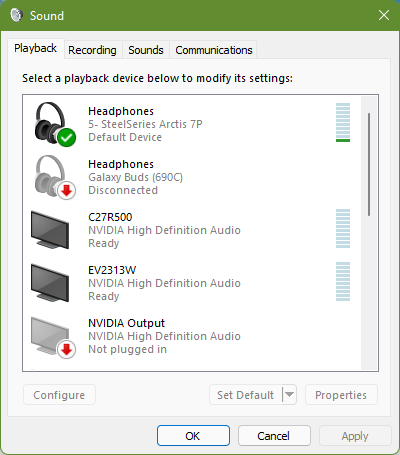
The next good thing that you can do here is to check whether or not you’re system it connecting to the right HDMI device. It’s possible that you may be using the wrong HDMI device or output. The options should depend on the devices you’re using so if you can’t see the HDMI audio device in the list of devices, it’s possible that the said HDMI device is not working for some reason. It’s possible that the HDMI cable attached may be disconnected, or not properly inserted. To check, follow these steps:
- On your keyboard, press the Windows key and type “control panel.”
- Open Control Panel.
- In the View by section on the upper right, make sure that it says Small icons.
- Find Sound and select it.
- Under the Playback tab, find your HDMI device and select it.
If your HDMI device is not in the list, try to check if it’s properly connected to the right HDMI port. If you have multiple HDMI ports, try connecting it to the other one and see if that will fix the problem.
Solution #8: Use Multiple Displays Operating Mode via Intel Graphics Control Panel.
If you’re not using a discrete or dedicated GPU like NVIDIA or AMD, you can use the Intel Graphics Control Panel software to force detect your HDMI device. Here’s what you need to do:
- Go to your desktop.
- Right click on a blank spot in your desktop and select Graphics Properties.
- Once the Intel Graphics and Media Control Panel appears, select Basic Mode, then hit OK.
- Under the Display section, select Multiple Displays.
- Select the drop down for Operating Mode and check if Intel Graphics Control Panel recognizes the HDMI TV or monitor. If it detects it, you should have the option to duplicate or extend the screen.
If your computer has an NVIDIA graphics card, make sure that you install the latest display driver for it. Then, ensure that you install the NVIDIA Control Panel and use it to force detect your HDMI TV or monitor.
For AMD users, they can install the AMD Radeon Settings software and do the same.
Solution #9: System Restore.
A drastic solution that you can try if none of the solutions have worked so far is to perform a System Restore. In order to solve the problem, you will need to use a restore point that had been established in the past. This will cause the computer to revert to the settings that were present on the restore point. Take note that restoring the system will not touch any of your personal data. Here’s how it’s done:
- Press Windows key + R to open RUN dialog box.
- At RUN dialog box, type rstrui and hit Enter. This will open System restore window.
- Click Next tab.
- Click to check “Show more restore points”.
- Select the restore point before you started experiencing the error and click Next tab. Wait for it to complete.
- Click Finish after System Restore process is complete.
- Restart your computer after System Restore
FAQs
OTHER INTERESTING ARTICLES YOU MAY LIKE: