How To Fix SSD Not Showing Up In Windows
When it comes to performance, SSD is a better choice over the traditional mechanical hard disk drives or HDDs. SSD stands for Solid State Drive and is the top choice for PC users who value performance over capacity. While SSDs have become more reliable than HDDs nowadays and their capacity has been expanded, some users may encounter problems with it.
In this guide, we’ll give you the details on what you can do if your SSD is not showing up in your Windows PC.
Causes of SSD not showing up in Windows
If your SSD is not showing, there’s a long list of possible reasons for that. For some people, it can be due to a minor glitch in the system or there may be a poorly connected component or cable in the motherboard. Others may experience a similar issue when their computer is running an outdated software or disk drivers.
This problem may also be caused a bug in Windows Disk Management or when the BIOS is not setup properly.
Some people may have trouble with their new SSD if its’ not formatted, or when it’s file system is incompatible with the Operating System.
How to fix SSD not showing up in Windows?
If your Windows PC is not detecting the SSD, either after an installation or during the middle of your normal operation, these are the solutions that you can try:
Solution #1: Reboot your PC.
When it comes to troubleshooting any issue, one of the basic things that you must do first is to refresh your computer. A quick reboot might help rid of temporary or minor bugs in the system that have developed over time. This can be especially useful if your PC has been running for several days already.
In order to completely reboot your PC, turn it off normally and try unplugging it from the power source for 30 seconds. This can help clear the memory and hopefully fix your issue.
Then, start the PC back up and check if your SSD is now working.
Solution #2: Check the physical connection.
If your problem started after disassembling your system unit, or if you think that the SSD might be poorly connected to the motherboard, now is the time that you check. Some people who experience the SSD-not-showing-up-in-Windows issue have this problem.
First, do a quick look at the motherboard to see if something is amiss. Make sure that the USB cable for the SSD was inserted properly by checking the connection. Make sure the cable is pushed in and plugged into the port properly. Examine the fit to make sure it is tight and test the cable to make sure it is not broken. If you’ve tried that and the computer is still not detecting the SSD, try replacing any damaged or malfunctioning hardware.
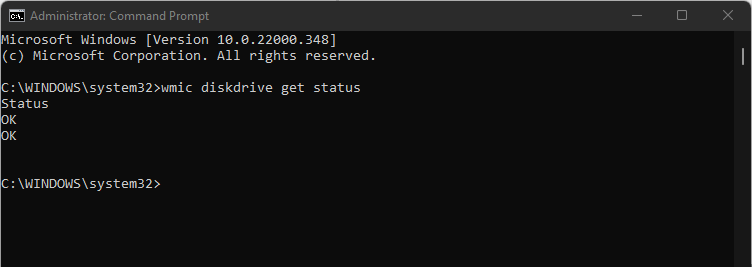
If the connected storage devices including your SSD looks properly connected and there’s no loose connection, then you can double check the status of the SSD using the Command Prompt.

Here’s how:
- Press the Windows key on your keyboard and type in “cmd.”
- Right click on Command Prompt app and select Run as Administrator.
- In the Command Prompt, type in wmic diskdrive get status and press Enter.
If you’re getting the Status OK response, then your SSD must be okay and is being recognized by the operating system.
You now have to do other troubleshooting steps to further narrow down the causes for the SSD-not-showing-up-in-Windows issue.
Solution #3: Change the assigned drive letter.
The SSD-not-showing-up-in-Windows problem may occur is there’s a mix up in the system like when your SSD is not assigned a good Drive letter, or if there’s a duplicate drive letter. This can create a conflict in the system that can result in Windows not recognizing your SSD or SSD data.
What you need to do here is to check the drive letter of your SSD and assign a different drive letter to it if necessary. To change the drive letter:

- Open File Explorer.
- Go to This PC and right click on it.
- Select Manage.
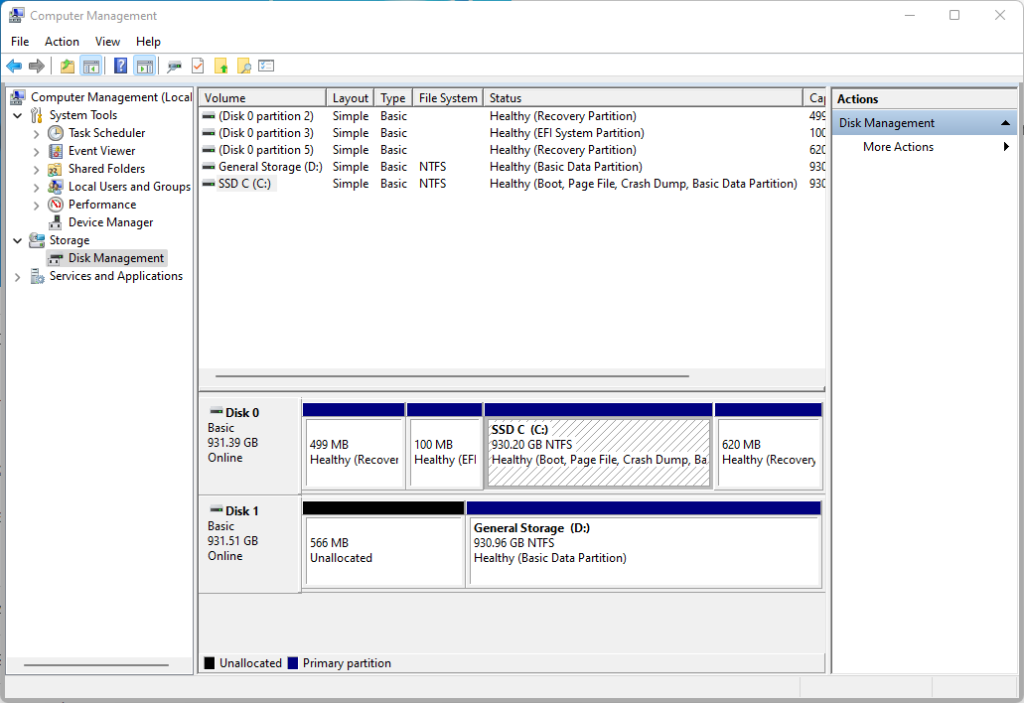
- In the left panel, under the Storage section, select Disk Management.
- Right click on the SSD partition and click on Change Drive Letter and Paths.
- Click the Change button.
- Select the drive letter you want and hit OK.
Afterwards, restart your computer and check the SSD-not-showing-up-in-Windows issue again.
Solution #4: Initialize SSD.
Some people may get the “disk unknown not initialized” error or may simply not get the indication that their new SSD is detected. In either of this situations, you need to ensure that you initialize the SSD to fix the problem. The Logical Disk Manager cannot access a disk until it has been initialized.
To do this procedure, you still have to open the Windows Disk Management window.
Follow these steps to do that:
- Open File Explorer.
- Go to This PC and right click on it.
- Select Manage.
- In the left panel, under the Storage section, select Disk Management.
- Right click the SSD that you need to initialize and click on the Initialize Disk option.
- Once you have the Initialize Disk window, select the disk that you want to initialize. You can use either the Master Boot Record (MBT) or the GUID partition table (GPT)
- Click OK.
Solution #5: Reformat the new SSD.
Another way to easily fix SSD problems is to ensure that its using the right file system that your Operating System recognizes. To do that, you need to reformat your new SSD drive.
IMPORTANT: Since an SSD employs a different technology than an HDD, formatting an SSD differs somewhat from formatting an HDD. Before formatting an SSD, please make sure the Quick Format checkbox is selected. Your computer will do a Full Format if the box is left unchecked, which might reduce the lifespan of an SSD.
Keep in mind that this procedure will wipe out all contents in your SSD so if you have important files in there, you will no longer be able to recover data afterwards. You can skip the Reformat option if you are working with an SSD with important contents on it. However, if the SSD you’re having an issue right now is newly installed and you haven’t used it yet, proceed to the steps below.
To reformat your new SSD, follow these steps:
- Open File Explorer.
- Go to This PC and right click on it.
- Select Manage.
- In the left panel, under the Storage section, select Disk Management.
- Right click on the SSD drive that you want to format and select Format.
- You may also manually define the allocation unit size, file system, and volume label before clicking OK.
- Check for the SSD-not-showing-up-in-Windows problem again.
Alternatively, you can reformat your SSD using the Command Prompt. Here’s how it goes:
- Press the Windows key on your keyboard and type in “cmd.”
- Right click on Command Prompt app and select Run as Administrator.
- In the Command Prompt, type in diskpart and press Enter.
- Select Yes on User Account Control Window if prompted.
- In the Command Prompt, enter the following commands individually and be sure to press Enter after:
- list disk
- select disk * (* represents disk number)
- list partition
- select partition * (* represents partition number)
- format fs=ntfs quick
After reformatting your SSD disk, reboot your PC and check for the SSD-not-showing-up-in-Windows problem again.
Solution #6: Check for SSD disk drivers.
One possible reason why you may be getting the the SSD-not-showing-up-in-Windows issue is outdated or corrupted SSD disk drivers. Make sure that you check for the latest drivers in Device Manager at this time. Here’s what you need to do:

- Right click the Start button.
- Click Device Manager.
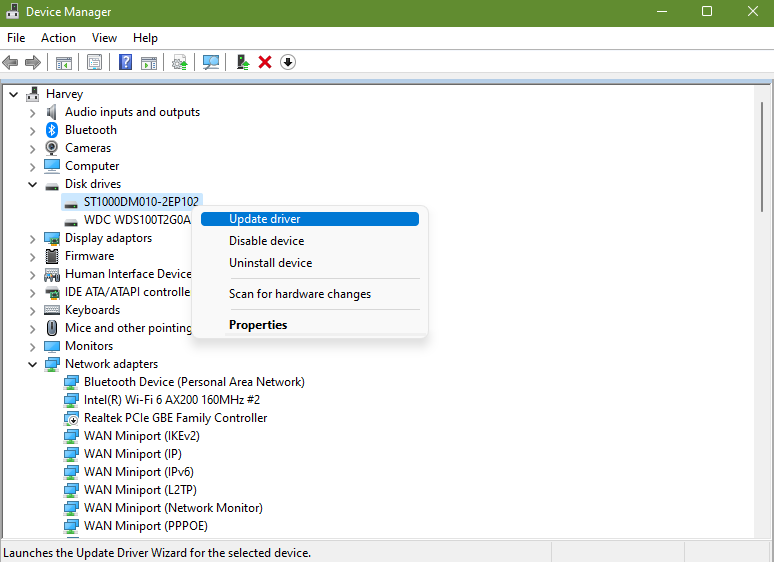
- Expand Disk drives.
- Right click the SSD drive and select Update driver.
- Click search automatically for drivers.
- Reboot your PC and check for the SSD-not-showing-up-in-Windows problem.
Solution #7: Configure BIOS settings.
Another solution to try if your Windows PC is having a hard time recognizing your new SSD is by checking your BIOS settings. It’s possible that your motherboard is not set to use your newly added drive.
Here’s what you need to do:
- Restart your computer.
- Press the F2 key (or another key to pull up the BIOS depending on your motherboard make and model).
- Press the Enter key.
- Find SATA Configuration or similar option.
- Save your changes to SATA Controller Mode Option.
- Reboot your PC and check for the problem.
FAQs
Why does SSD won’t show up in Windows PC?
There are many possible reasons for this problem and not every case has an identical solution. We discussed the causes of this issue above.
What are you to do if your SSD is not detected?
If your SSD is not recognized by Windows, you need to follow the solutions in this guide to fix it.
OTHER INTERESTING ARTICLES YOU MAY LIKE: