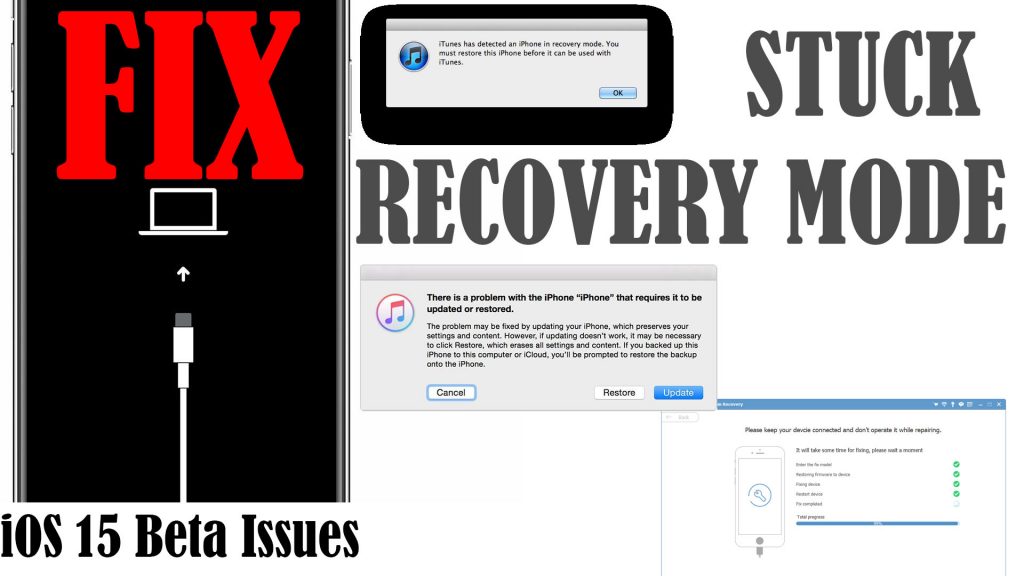
How to Fix an iPhone Stuck in Recovery Mode after installing iOS 15 beta
Post-update issues are inevitable among mobile devices be it Android or iOS. As a matter of fact, various issues are raised following a major software update rollout. Tackled in this post is a post-update issue on an iPhone that gets stuck after installing iOS 15 beta version. Read on to learn what to do if your iPhone is stuck in recovery mode after installing iOS 15 beta.
Specific Scenario
Apple has recently released the public beta version of the next major software update for iPhone — the iOS 15.
Among the highlighted features of this iOS version include the ability to start FaceTime calls with Android users, iMessage sharing, and significant updates to Apple Maps to name some. All these prompted a number of iOS loyalists to register the moment it was officially released to the public.
However, unexpected errors occur following the iOS 15 beta download and installation. In an attempt to fix the problem and get their iPhone’s back up and running smoothly again, they restore it in recovery. But the problem got worse as the iPhone got stuck in recovery mode.
If you’re among those who faced the same dilemma after installing the iOS 15 beta, feel free to try any of the outlined solutions in this post.
Why does your iPhone get stuck in recovery mode?
The main reason why an iPhone gets stuck is a fatal system error. In the case where the device gets stuck in recovery mode following a system upgrade, chances are that the update was unsuccessful and ended up corrupting system data. As a result, the device is no longer able to work as intended and gets stuck.
In some cases, update bugs are to blame. Considering that this is a beta version, there’s a higher chance that the software is still buggy and your iPhone system suddenly becomes unstable.
Another possibility is that your device may not be eligible for the iOS 15 beta version. To rule this out, verify and ensure that your iPhone is included in the list of all iOS 15 supported devices. According to Apple, the following devices are eligible for iOS 15 beta version.
- iPhone 6s
- iPhone 6s Plus
- iPhone SE (first generation)
- iPod Touch (seventh-generation)
- iPhone 7
- iPhone 7 Plus
- iPhone 8
- iPhone 8 Plus
- iPhone X
- iPhone XR
- iPhone Xs
- iPhone Xs Max
- iPhone 11
- iPhone 11 Pro
- iPhone 11 Pro Max
- iPhone SE (2020)
- iPhone 12 mini
- iPhone 12
- iPhone 12 Pro
- iPhone 12 Pro Max
If your device is not in the list, then it will definitely not run on the iOS 15 platform and there’s nothing you can do about it.
Troubleshooting an iPhone that gets stuck in recovery mode
The following solutions have been proven to work wonders in dealing with relevant issues in different iPhones and iPads that got stuck in recovery mode. That said, there’s a higher chance for your iPhone problem to be resolved after applying these solutions unless hardware damage is present.
First solution: Forced restart.
A forced restart is usually carried out whenever an iPhone is not responding, and won’t turn on or off. It forces the device to shut down and reboot the system. If you haven’t already, try to force restart your iPhone and see if that will fix the problem.
The steps to force restart iPhone vary between device models.
- In newer models like iPhone X, Xs, Xr, 11 and 12, a force restart is done with these steps:
- Press and quickly release the Volume Up button.
- Press and quickly release the Volume Down button, then press and hold the Side button.
- When the Apple logo shows up, release the button.
In earlier models like iPhone 8 or iPhone SE 2, a force restart is done with these steps:
- Press and quickly release the Volume Up button.
- Press and quickly release the Volume Down button, then press and hold the Side/Power button.
- When the Apple logo appears, release the button.
In iPhone 7 and 7 Plus models, a force restart is done this way:
- Press and hold both the Volume Down button and the Sleep/Wake button simultaneously.
- When the Apple logo shows up, release both buttons.
In iPhone 6s and first generation iPhone SE, a force restart is done with these steps:
- Press and hold both the Sleep/Wake button and the Home button simultaneously.
- When the Apple logo shows up, release both buttons.
If the force restart is successful, the device should boot up to the Home screen. But if it remains stuck, then you need to try other solutions.
Second solution: Restore iPhone in iTunes using a computer.
Apple’s very own system management software (iTunes) is also programmed to repair stuck iPhones and iPads. All you have to do is connect your problematic device to a computer using the Apple-supplied USB cable, launch iTunes and follow the built-in commands to repair or restore your device. Here’s how it’s actually done in newer iOS devices:
- Connect your device to your computer.
- You can connect your device using a USB or USB-C cable or a Wi-Fi connection. To turn on Wi-Fi syncing, see Sync iTunes content on PC with devices on Wi-Fi.
- In the iTunes app on your PC, click the Device button near the top left of the iTunes window.
- Click Summary.
- Click Restore, then follow the onscreen instructions.
- After restoring, click the Eject button right next to your iPhone name and then disconnect the device from your computer.
Restoring in iTunes deletes all saved information and settings on the device. After restoring, the device returns to its factory state.
Third solution: Restore iPhone in DFU Mode.
Device Firmware Update (DFU) mode restore will fix a stuck iOS device by reloading its software and the firmware. It’s another (more advanced) type of iOS restore. DFU mode allows your device to communicate with iTunes without activating the bootloader.
Please note though that this process will wipe everything from the device including saved data and personal files. As a final result, your iPhone will be restored to its factory state, running on the latest iOS version it’s compatible with. Again, the steps in performing DFU mode restart vary between device models.
In iPad, iPhone 6s and below, iPhone SE and iPod touch, follow these steps:
- Turn on your iPhone if it isn’t already.
- Connect the device to a computer using a USB cable.
- Launch iTunes on your computer, and check that your iPhone appears in the list of devices.
- On your iPhone, hold down both the Home button and Lock button.
- After 8 seconds, release the Lock button while continuing to hold down the Home button.
- After about five seconds, you will see a prompt saying something like iTunes recognizes an [iPhone] in DFU recovery mode along with further instructions. Just follow the prompts to repair your iPhone in DFU mode.
If the Apple logo appears, the Lock button was held down for too long.
If nothing will be displayed on the screen, it means that your device is already in DFU mode.
If your device shows a screen telling you to “Connect the device to iTunes,” it means that it has entered recovery mode instead of DFU mode. In this case, you need to repeat the previous steps until the screen turns completely black.
In iPhone 7 and iPhone 7 Plus, follow these steps:
- Turn on your iPhone if it isn’t already.
- Connect the device to a computer using a USB cable.
- Launch iTunes on your computer, and check that your iPhone appears in the list of devices.
- On your iPhone, hold down both the Side button and Volume Down button.
- After 8 seconds, release the Side button while continuing to hold down the Volume Down button.
- After about five seconds, you will see a prompt saying something like iTunes recognizes an [iPhone] in DFU recovery mode along with further instructions. Just follow the prompts to repair your iPhone in DFU mode.
If the Apple logo appears, the Side button was held down for too long.
If nothing will be displayed on the screen, it means that your device is already in DFU mode.
If your device shows a screen telling you to “Connect the device to iTunes,” it means that it has entered recovery mode instead of DFU mode. In this case, you need to repeat the previous steps until the screen turns completely black.
In iPhone 8, iPhone 8 Plus, iPhone X and later models, follow these steps:
- Turn on your iPhone if it isn’t already.
- Connect the device to a computer using a USB cable.
- Launch iTunes on your computer, and check that your iPhone appears in the list of devices.
- On your iPhone, quick-press the Volume Up button.
- Quick-press the Volume Down button.
- Hold down the Side button until the screen goes black, then hold down both the Side button and Volume Down button.
- After 5 seconds, release the Side button while continuing to hold down the Volume Down button.
- After about five seconds, you will see a prompt saying something like iTunes recognizes an [iPhone] in DFU recovery mode along with further instructions. Just follow the prompts to repair your iPhone in DFU mode.
If the Apple logo appears, the Side button was held down for too long.
If nothing will be displayed on the screen, it means that your device is already in DFU mode.
If your device shows a screen telling you to “Connect the device to iTunes,” it means that it has entered recovery mode instead of DFU mode. In this case, you need to repeat the previous steps until the screen turns completely black.
Once iTune is done repairing your device, exit DFU mode by performing a forced restart.
Other Suggestions
Use third-party iOS repair software. Black screen, stuck on white screen of data, white Apple logo and recovery mode are common indications of upgrade failure and iOS system corruption. This is likely what happened to your iPhone following the iOS 15 beta installation.
Usually, these symptoms are rectified by any of the outlined procedures but if none of that works, third-party iPhone repair tools can be regarded as an alternative solution.
These tools are specifically programmed to repair fatal iOS system errors that could not be rectified by the given solutions. A lot of these tools are already being offered but only a few emerged among the highly credible labels.
Listed among the top-rated iPhone repair software in 2026 are Dr. Fone – Repair, Joyoshare UltFix, Tenorshare ReiBoot, TunesKit iOS System Recovery, FoneLab iOS System Recovery and PhoneRescue for iOS. These tools can be downloaded for free or via one-time purchase.
Once you’ve got your preferred iOS repair tool installed on your computer, you can go ahead and start repairing your stuck iPhone.
Go for iPhone repair. If none of the given solutions worked and your iPhone is still stuck in recovery mode, then this is when you should seek for a technician’s aid. There might be some faulty hardware components that caused the device to freeze and get stuck in recovery. In this case, an iPhone repair is necessary.
You can take your iPhone to the nearest Apple-authorized service center in your area or visit your preferred iPhone technician for prompt support.
You can also contact Apple Support for further assistance and recommendations.
Hope this helps!
Please visit our YouTube channel to view different troubleshooting and tutorial videos that might be helpful to you.
You Might Also Want To Read:
In some conditions, iPhone stucking in recovery mode is caused by the iPhone system bugs. Facing the problem, you can use an iOS system recovery tool, like TunesKit iOS System Recovery. It can solve over 50 iOS-related issues like WhatsApp notifications not working, iPhone black screen, screen frozen, etc.