How To Fix Chrome “Couldn’t Load Plugin” Error [Updated 2023]
Some Windows users are getting the error “Couldn’t load plugin” when trying to use Google Chrome. If you are directed on this page looking for answers as you have encountered the same problem, then you are on the right track. Feel free to try the various solutions that you will find in this post to resolve the browser-related issue.
What causes the Chrome “Couldn’t load plugin” error
There are a number of reasons why the error “Couldn’t load plugin” could appear in the Chrome browser. The most frequent causes of the error are mentioned below.
- The installed version of Google Chrome is not the most recent.
- The plugins for Chrome are out of date.
- Browser cache is broken or corrupted.
- The browser wasn’t fully installed.
- The Adobe Flash Player plugin might potentially be a contributing issue.
- Corrupted system files.
How to fix Chrome “Couldn’t load plugin” error
We have chosen the most practical fixes for the Chrome “Couldn’t load plugin” issue. We advise that you use three or more of the solutions you will find on this page to ensure that the error is fixed because there are numerous reasons why the problem could occur while using the browser.
Fix #1: Update the Google Chrome browser.
An outdated Chrome browser can cause a lot of issues including the “Couldn’t load plugin” error. Follow the instructions below to verify and install the updates to make sure that the browser has received any available updates:

- Open Google Chrome.
- Click Customize and control Google Chrome (three-dots icon) found at the top-right corner of the browser.
- Select Help.
- Then select About Google Chrome next.
- Chrome will automatically install any updates when available and if it is already updated, a message should be reflected on the page.
- Restart Chrome once the updates are installed to complete the process.
- Try using Chrome to identify if the “Couldn’t load plugin” error has been successfully fixed.
Fix #2: Check if all the installed components are updated.
All plugins installed in the browser, particularly Adobe Flash, must be current as this could be the root of the issue. Verify and install the updates for the installed components using the following guide:
- Open Google Chrome.
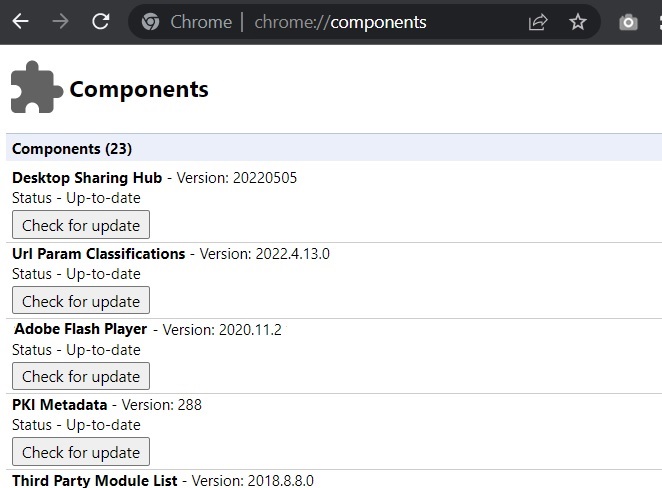
- In the Address bar, type chrome://components and click Enter.
- A list of all the plugins will be reflected on the screen. Click the Check for update button for each of the plugins to ensure that all are updated.
- Relaunch the browser after all the installed components are up to date.
Fix #3: Clear Google Chrome user data.
Another potential cure for the Chrome “Couldn’t load plugin” issue is to clear the cache and cookies on the browser. As a corrupted cache that may have accumulated in the browser could have been the cause of the problem.
- Open Google Chrome browser.
- Click the three dots icon.
- Select More tools.
- Select Clear browsing data.
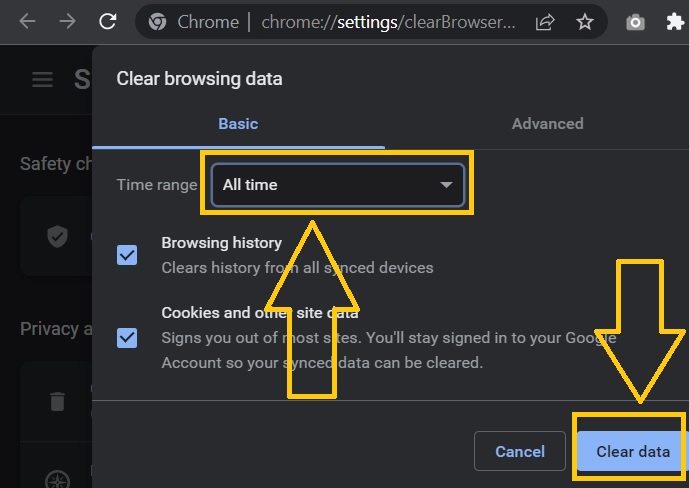
- Click the dropdown menu in the Time range field and select All time.
- Click Clear data.
- Restart the browser to check if the “Couldn’t load plugin” is now resolved after the Google Chrome user data has been cleared.
Fix #4: Modify the name of the pepflashplayer.dll file.
The “Couldn’t load plugin” is usually triggered by an issue with either the Adobe Flash Player or the Pepper Flash plugin. Try renaming the file from “pepflashplayer.dll” to “pepflashplayerX.dll” or any name that you prefer to resolve the issue. The file is located in the Local Disk (C:) of your computer. You can follow this path to locate the file: C:\Users\(Username)\AppData\Local\Microsoft\Edge\User Data
Fix #5: Delete PepperFlash folder.
If the “Couldn’t load plugin” error persists after attempting the solutions listed above, removing the PepperFlash folder entirely may be the solution you need. To identify and delete the PepperFlash folder, use the same steps outlined above. Restart Chrome after deleting the whole PepperFlash folder to see if the plugin problem has been addressed.
Fix #6: Disable Shockwave Flash.
Try disabling Shockwave Flash if it is installed on your Windows PC if removing the PepperFlash folder does not fix the problem. Here’s how to do it:
- Launch the Chrome browser.
- Click the three dots icon.
- Then select More tools.
- Choose Task Manager.
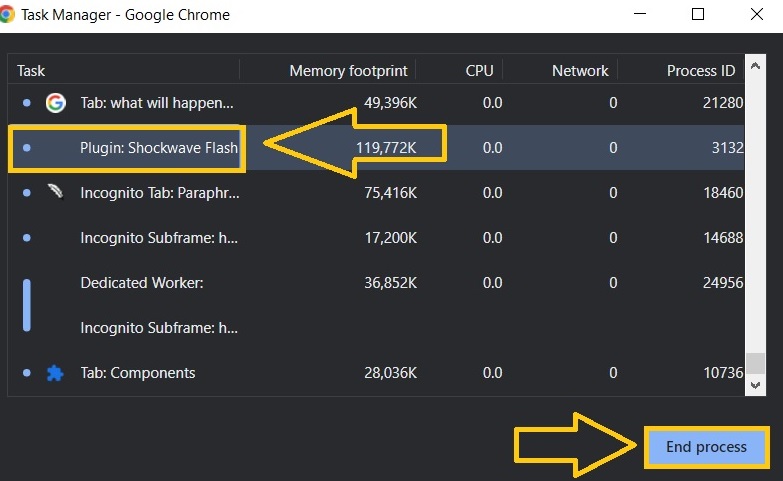
- Locate and highlight the Shockwave Flash.
- Select End process next.
- Select Reload afterwards.
- Relaunch Chrome to check if the “Couldn’t load plugin” error has already been fixed.
Fix #7: Disable the Adobe Flash NPAPI.
Some users were able to eliminate the error message by simply uninstalling the Adobe Flash NPAPI in their browser. If you have the two versions installed on your computer, we suggest that you apply this solution and only retain the PPAPI version instead. Turning off other Flash plugins available in your browser is also a solution worthy to try.
- Press the Windows icon on your keyboard.
- Type Control Panel and Enter.
- Select Programs.
- On the left menu pane, choose Uninstall a program under the Program and Features section.
- Highlight Adobe Flash Player NPAPI and click Uninstall. Take note of on-screen instructions to disable the application.
- Relaunch the Chrome browser to observe if the “Couldn’t load plugin” error doesn’t exist anymore.
Fix #8: Use the SFC tool.
The “Couldn’t load plugin” error can also be resolved by using the System File Checker (SFC) program. In certain cases, corrupted system files are the root of the issue that led to the problem in the first place. To repair the system files using this Windows built-in utility, go to the instructions.
- Press the Windows icon.
- Enter the word Command Prompt.
- Select Run as administrator.
- Select Yes when the User Account Control message appears on the screen.
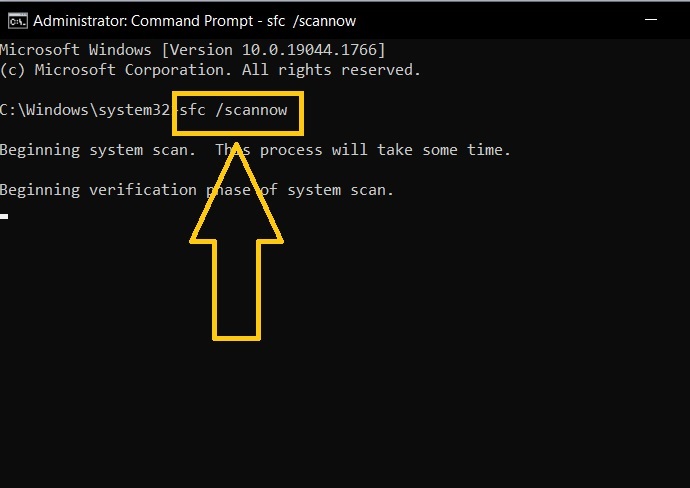
- In the Command Prompt window, type “sfc /Scannow” and hit Enter.
- Wait for a few minutes until the process is complete.
- Close the Command Prompt window.
- Restart your Windows computer and try using Chrome to verify if the “Couldn’t load plugin” error is eliminated.
Fix #9: Disable PDF isolation.
For certain Chrome users, disabling PDF Isolation in Chrome’s settings resolves the “Couldn’t load plugin” error. To disable this feature, follow the instructions below.
- Open the Chrome browser.
- In the Address field, type chrome://flags/ and click Enter.
- Find PDF Isolation. Click the dropdown menu ahead select Disable.
- Restart Chrome and see if the “Couldn’t load plugin” error is now removed.
Fix #10: Close other unnecessary tabs.
The Chrome browser issue can be fixed by closing unused tabs and using a minimal number of them. Too many open tabs can occasionally cause browser-related problems because they consume up a lot of memory on your computer and eventually affect the browser’s overall performance.
Fix #11: Uninstall and reinstall Chrome browser.
If none of the solutions mentioned have worked yet, uninstalling and reinstalling the Chrome browser may be required to eradicate the error. This is necessary especially if Chrome may have not been completely installed or there might be a bug or virus in the browser that leads to the error.
- Press the Start button.
- Type Control Panel and Enter.
- Select Uninstall a program under Programs.
- Locate and click Google Chrome.
- Click Uninstall next.
- Access the Google Chrome website to download the browser.
FAQs
OTHER INTERESTING ARTICLES YOU MAY LIKE: