How To Fix Minecraft Stuck On Mojang Screen
One of the common problems for many Minecraft players is the game getting stuck in the red Mojang screen. In this guide, we’ll show you the easy solutions that you can do to fix this problem.
How to fix Minecraft stuck on Mojang screen issue?
The Minecraft client may stop working or may get stuck in the loading (Mojang) screen for a variety of reasons. If you have no idea how to fix this problem, here are the list of solutions that you should try.
Keep in mind that there’s no single solution in this list that works in all cases. You’ll have to work your way through the list to find out which one is going to fix the problem for your system.

Fix #1: Force quit the app.
A basic solution, force quitting the Minecraft application might help fix the issue. Sometimes, a program may encounter an error and the system may not be able to resolve it on its own. This is where your intervention comes in. By manually closing Minecraft, you may be able to resolve the issue quickly without at this point.
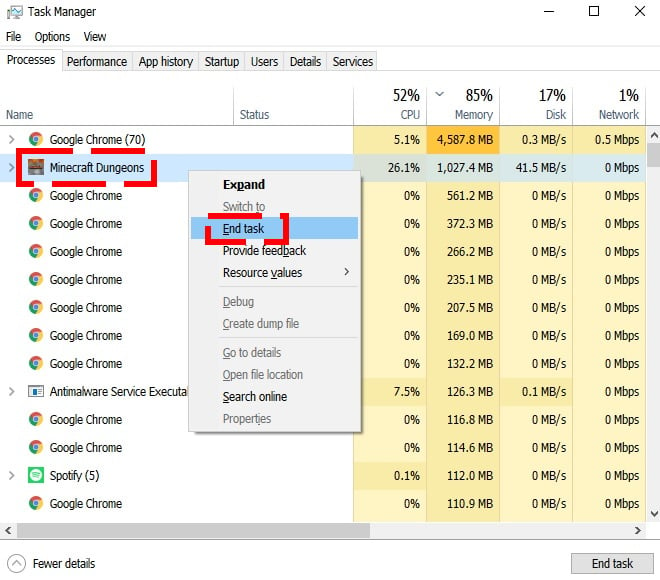
What you need to do here is to open the Task Manager by pressing CTRL+SHIFT+ESC.
Once the Task Manager is up, find the Minecraft application, right click on it, and hit the End Task option.
Fix #2: Restart your PC.
If the Minecraft stuck on Mojang screen issue returns after closing and restarting the game, the next basic solution that you should try is to see what happens when you refresh your PC instead. This can be an effective solution if there’s a problem with the OS or computer’s software and not in the game software itself.
What you need to do at this point is to clear the system cache by doing a full reboot.
If nothing works after restarting the PC, proceed to the next solution.
Fix #3: Install game updates.
Keeping the Minecraft client updated is important. Updating to the latest version not only brings new cosmetic changes as well as other improvements but also the necessary patches for identified bugs.
Random and persistent crashes as well as failure to load are usually fixed by hotfixes from developers so be sure to keep Minecraft running the latest version at this time.
Fix #4: Disable Mods.
If you’re using mods, try to see if that will help. Do this solution after making sure that the Minecraft client is updated.
Fix #5: Close the Runtime Broker
Another potential solution that many Minecraft players have found effective in fixing all kinds of troubles with this game is by closing the Runtime Broker.
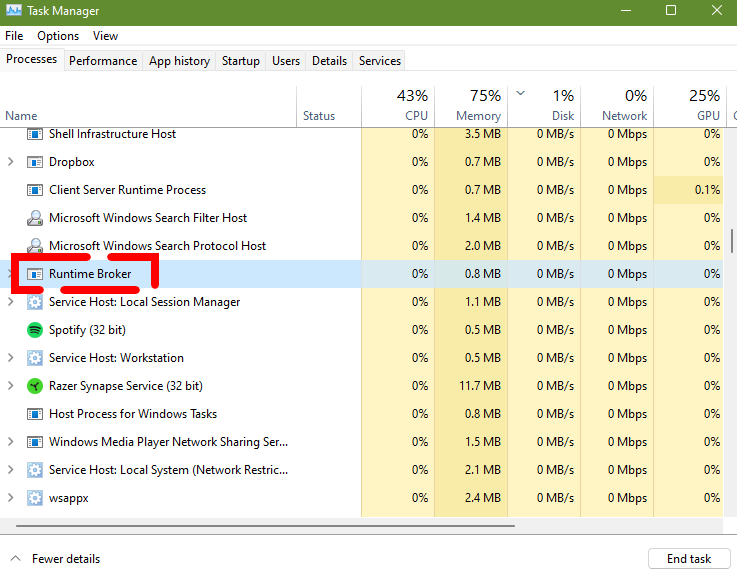
Runtime Broker is an important Windows core process to ensure that all apps purchased from the Windows Store uses the permissions they have declared. The Runtime Broker process constantly runs in the background due to the nature of its job so you’ll see it as one of the persistent processes in the Task Manager.
Sometimes, Runtime Broker can memory leaks causing the system to allocate it more memory than it needs to do its job. If this happens constantly when you’re gaming, it might cause the system to crash or interfere with programs or games that are currently running.
The good thing, closing the Runtime Broker is easy and if it’s the one causing the Minecraft stuck on Mojang screen problem, doing it can immediately address the situation.
So, if you noticed that your memory is spiking when playing Minecraft and you have no idea why, open the Task Manager again and this time, find the Runtime Broker process and close it.
After it’s been closed, restart Minecraft and see if it’s now working.
Alternatively, you can try to uninstall the runtime broker via the Windows PowerShell(admin) and see if it fixes the issue for good. Here’s how to do that:
- Press Windows key + X on your keyboard
- Click Windows PowerShell (Admin)
- In the command prompt, type or paste the following code: “Get-AppXPackage *WindowsStore* -AllUsers | Foreach {Add-AppxPackage –DisableDevelopmentMode -Register “$($_. InstallLocation)AppXManifest.xml”}”
- Press Enter.
- Open Windows Store app and click on the Menu button at the upper right.
- Scroll down and click on manage your devices to open the browser.
- Remove unused devices from this list.
Restart the PC and see if that fixes the Minecraft stuck on Mojang screen problem.
Fix #6: Install graphics driver updates.
You may resolve the Minecraft stuck on Mojang screen problem by ensuring that your PC is running the most recent version of graphics drivers.
This is yet another simple solution that may help you with the Minecraft issue.
Outdated graphics drivers are a common source of a wide range of gaming issues, including micro-stuttering, poor performance and even loading problems.
Fortunately, dealing with issues like this one is as simple as upgrading your graphics driver.
Go to the manufacturer’s website and get the most recent graphics driver version. The Nvidia GeForce Experience app for graphics cards is available for free download from the Nvidia website.
Individuals with AMD cards can get further information on the AMD website.
You may also search for Graphics drivers manually. Here’s how to get started:
- Press the Windows key on the keyboard.
- Type in “control panel” and select Control Panel.
- Change the View by dropdown to Small icons and click on Device Manager.
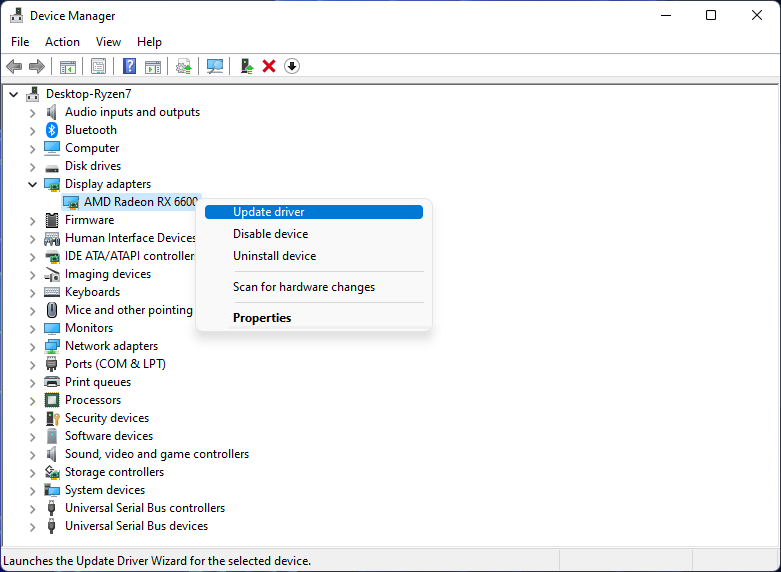
- Once the Device Manager is opened, click the dropdown for Display adapters.
- Find your display adapter and right-click on it.
- Select Update driver.
- Select Search automatically for drivers.
Despite the fact that the GPU manufacturer has only recently released new drivers, Windows will occasionally return a message claiming that your graphics driver has been updated. If you are unable to update your GPU via Device Manager, you must manually get the latest recent NVIDIA, AMD, or Intel drivers.
You can use one of the following URLs, depending on your GPU:
Fix #7: Allow Minecraft through your firewall.
If Minecraft is still stuck at the loading screen after updating your graphics drivers, the next step for you is to try to see if your own computer’s security, particularly the Windows Firewall is to blame.
The Windows Firewall is there to protect you from intrusion from unrecognized and potentially malicious third party networks. However, if the firewall is acting abnormally, or if it’s set incorrectly, it may block harmless programs from connecting to the internet, or the server of a game from reaching your computer.
To see if you have a firewall issue, you can try to disable it temporarily while you’re troubleshooting. Here’s how it’s done:
Press Windows key + R on your keyboard to open the RUN dialog box.
- At the RUN dialog box, type “control” and press Enter or click OK. This will open Control panel section.
- Make sure View by located at the upper right is set to Large icons.
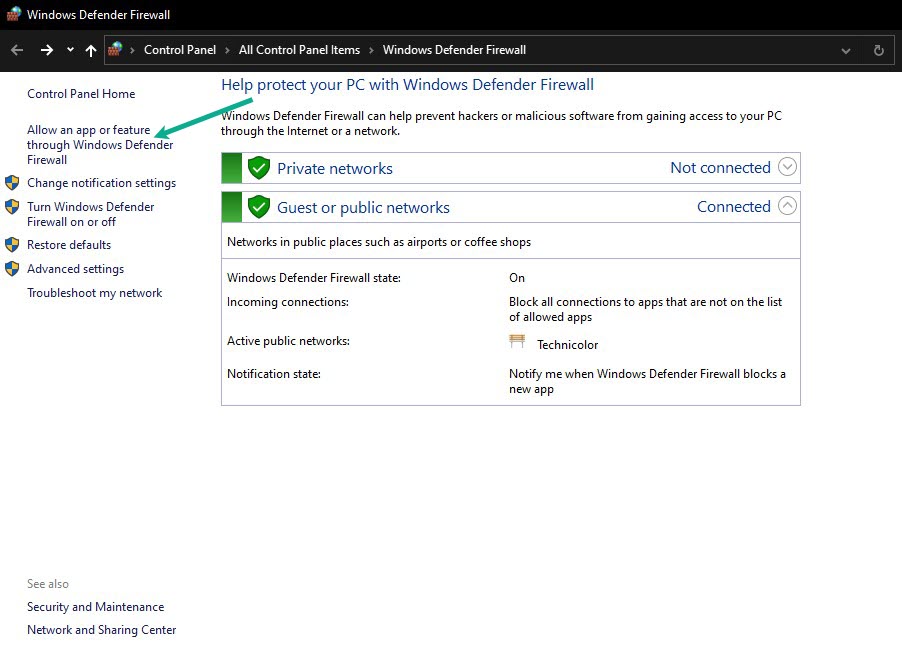
- Click Windows Defender Firewall.
- At left pane, click Turn Windows Defender Firewall on or off.
- Make sure to check Turn Off Window Defender Firewall option for both Public and Private Network settings to turn it off.
- Click OK to apply changes made.
- Once you’ve disabled the firewall, restart Halo Infinite game client and check if it’s now working.
Once the firewall is off, open the Minecraft launcher and run Minecraft again and see if it’s working. If it does, that means that your firewall is probably set to block Minecraft by mistake sometime before.
In this situation, you have two options. One is to leave the firewall disabled while you’re playing but it can leave the system vulnerable if you forget to turn it back on later. The other option is to ensure that the firewall is properly configured by allowing the game through it.
- Click the Start Menu located at the bottom left of the screen.
- Select Settings.
- Select Windows Security on the left pane.
- Choose Firewall and network protection.
- Select Allow an app through firewall option.
- Then select Change settings next.
- Find the Minecraft app. If the game is not in the list,, select the option Allow another app found at the bottom of the page.
- Click OK to save the changes.
Check for the Minecraft stuck on Mojang screen issue again.
Fix #8: Turn off Discord Overlay.
For some people, turning off the Discord overlay is the key. This solution is clearly applicable to those who are running Discord and using its overlay when gaming. If you’re not using Discord or its overlay at all, simply disregard this solution.
Fix #9: Disable antivirus.
If you continue to get the same red Mojang screen error, or if Minecraft is still stuck in the loading screen, it’s time that you check if the reason for it is your security software or antivirus.
Just like the firewall, an incorrect setting in your antivirus can also block programs from launching. So, try to see if Minecraft will run without issues when your antivirus is not running at this time.
The exact steps will vary depending on the antivirus product you have.
Fix #10: Reset Minecraft.
Corrupted game files in your Minecraft folder may result to all kinds of issues. You can try to reset the Minecraft client and its files with these steps:
- Click the Start Menu located at the bottom left of the screen.
- Type in “apps and features” and open the Apps and Features app.
- Look for Minecraft and select it.
- Go to Advanced Options and click Reset.
- Reboot your PC and check if the Minecraft stuck on Mojang screen error remains.
Fix #11: Reinstall Minecraft.
If none of the solutions has worked by far, you can reinstall Minecraft and see if that will work. Deleting and reinstalling Minecraft will ensure that you clear the Minecraft directory of unwanted or corrupted files.
Some people find this solution effective in cleaning up the Minecraft folder and fixing crashes and loading errors for good.
To ensure that you clear the Minecraft folder, here’s what you need to do:
- Make sure that you create a backup of your Minecraft folder before doing the steps below. You can copy the entire folder and save it to your desktop in case the reinstall won’t resolve anything, or if you need to reinstate the previous version of the game.
- Open the Run dialog box by pressing the Windows key + R at the same time.
- Type %appdata% and find the Minecraft folder.
- Make sure to delete all the files from your Minecraft directory.
- Reinstall Minecraft from its official website and check for the problem.