How To Reset Graphics Card To Fix Display Issues | Windows 11 | Updated 2023
If you’re experiencing graphical issues when playing a game or when using the computer, there’s a chance that the main reason for that is your graphics card. In some instances, refreshing the graphics card is an easy solution. If you’re wondering how to reset the graphics card to fix Display issues, that’s what this guide is all about.
How to reset graphics card on Windows 11?
There are a handful of ways to reset display adapters on Windows. We’ll go over a few different options for restarting and recovering your graphics card or GPU.
Method 1: Restart graphics card.
If you’re experiencing graphical glitches, stuttering, or UI freezes while in a game, it’s possible that the main reason is your graphics card. Users of gaming PCs are all too aware of this. Graphics card failure is not uncommon, and it can cause a slew of problems.
One way to quickly restart the graphics card is to use a key combination of keys: Win + CTRL + SHIFT + B.
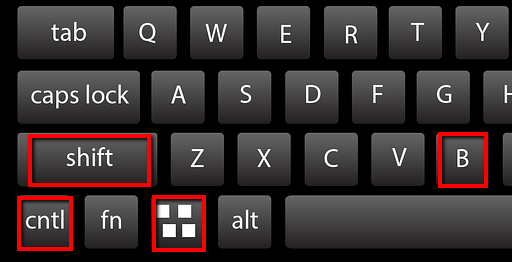
This will just restart the graphics card without closing any current programs or games. As a result, you won’t lose any unsaved work. The screen may go dark for a little period, and you may hear a beep sound, but that’s it. The keyboard shortcut works with all AMD, NVIDIA, and Intel graphics cards.
This is the simplest way to restart your driver without requiring an admin account.
Some PC users may find that the combination will not work on them. This may be the result of a deactivated Windows key. Normally, pressing the Windows key will pull up the start menu. However, if you configured your keyboard to disable the Windows key in order to accidentally pull up the Start menu when gaming, make sure that you enable it back before attempting to do the WIN + CTRL + SHIFT + B keyboard shortcut.
For some people, their gaming keyboard may have a special button to toggle the Windows key. In this case, pressing this special key on the keyboard should bring back the Windows key function.
Method 2: Forced reboot your PC.
If your screen has become frozen or unresponsive due to a malfunctioning GPU, you can restart graphics settings by refreshing the system altogether. Usually, an unresponsive screen when gaming still allows the system to work. In this situation, you can press the CTRL + ALT + DEL buttons and to wait for a few seconds. You should now see a black screen (blue screen in Windows 10) with a few options.
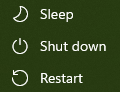
What you want to do is to access the Power options. The power button is located on the lower right side. Click on the Power icon and select the Restart option. This will restart the computer immediately, but you may lose any open or unsaved work.
Alternatively, you may force a hard or forced reboot by pressing and holding the physical Power button on your PC.
Method 3: Reinstall the graphics driver.
Another possible reason for any display issues some gamers encounter is a damaged or corrupted graphics driver. You must either reinstall the graphics driver or upgrade to the most recent version. Many times, outdated display drivers are incompatible with the most recent Windows Update, causing display drivers to cease responding.
Reinstalling your graphics driver can either be done via the Device Manager or the Control Panel.
Reinstall the graphics driver in Device Manager.
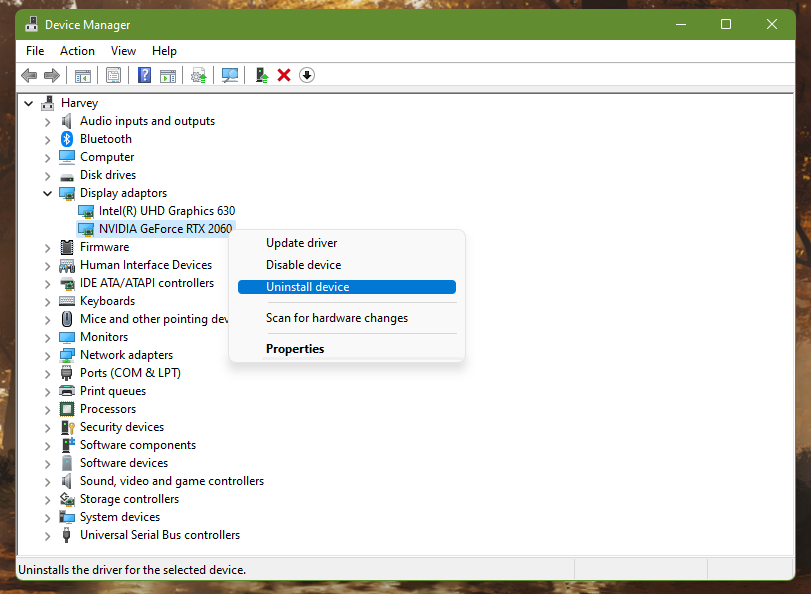
- Press the Windows key and type “devmgmt.msc” in the search box.
- Open devmgmt.msc to launch the Device Manager.
- Expand Display adapters.
- Right click on the graphics card you’re using. Make sure to select the correct one if you have more than one graphics card installed.
- Select Uninstall device.
- Restart your computer.
Your PC should automatically reinstall the graphics card upon booting up. To be sure that the system is running the latest display drivers, you can also manually update it by going back to Device Manager.
- Press the Windows key and type “devmgmt.msc” in the search box.
- Open devmgmt.msc to launch the Device Manager.
- Expand Display adapters.
- Right click on the graphics card you’re using. Make sure to select the correct one if you have more than one graphics card installed.
- Select Update driver.
Reinstall the graphics driver in Control Panel.
You can also go to the Control Panel and reinstall your graphics drivers. Here’s what you need to do:
- Press the Windows key and type “control panel” in the search box.
- Open the Control panel app.
- In the View by section, select Category.
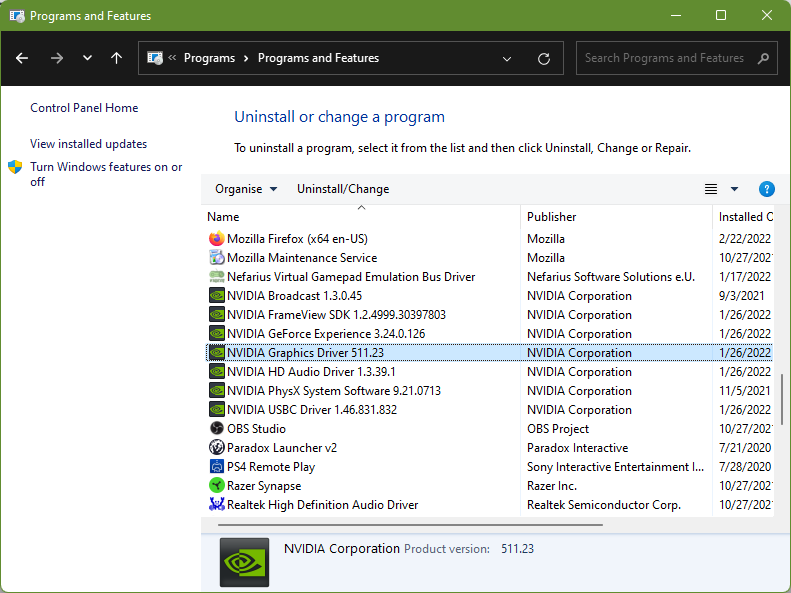
- Click the Uninstall program link below Programs.
- Find your graphics card software such as NVIDIA graphics driver or similar.
- Right click on the software and select Uninstall/Change.
Afterwards, download and reinstall the software you uninstalled by going to the official website. For example, if you uninstalled the NVIDIA graphics driver software, make sure that you reinstall the drivers from the official NVIDIA website.
Method 4: How to Reset GPU from BIOS
Enabling BIOS caching, which copies the video BIOS from ROM to the computer’s RAM, can be used to reset the GPU in BIOS. Due to poor video performance, the GPU must be reset in the BIOS. This occurs because your graphics cards’ BIOS caching has been disabled.
Here’s how to enable BIOS caching and reset the GPU in BIOS.
- Shut down your PC then start it back up.
- Then, start pressing the the “Pause Break” key on your PC’s keyboard. A dialog box will appear, instructing you to hit “” to enter setup.
- To enter the BIOS setup, press the ” key twice as instructed.
- Select “Advanced Chipset Features” and press Enter.
- To browse between the options, you’ll need to use the directional pad on your keyboard.
- Select “Video BIOS Cacheable.”
- To change the BIOS settings to “Enabled,” press the “+” and “-” buttons together.
- On your keyboard, press the “F10” key, then the “Yes” button.
- This aids with the BIOS reset of the GPU.
What to do if you have an overclocked graphics card?
You can revert an overclocked GPU to its default settings by resetting the MSI Afterburner (or any overclocking software you’re using) settings. Glitches in the computer screen are caused by an overclocked GPU. If you don’t return the GPU to its default settings, your computer may crash.
- Turn on your Windows computer as usual. If you can’t get into Windows in normal mode, select “Safe Mode” and proceed with the steps below.
- Open the list of programs for your PC’s GPU by pressing the “Start” button.
- Find overclocking software and reset their core sliders.
- Click the “Reset to Defaults” option if you have MSI Afterburner installed on your PC.
How to factory reset an AMD graphics card?
The AMD graphics card can be reset to factory settings by selecting “Factory Settings” from the AMD control panel. If you’re having trouble with the AMD drivers on your computer, you’ll need to restore factory settings to the graphics card. Here’s how:
- Right-click on your desktop and select “AMD Radeon Settings.”
- Once the AMD Radeon Settings app is up, go to the Preferences tab.
- Select Factory Settings Default when prompted.
- Select Yes from the menu. For a short period of time, the computer screen may go black. There’s no need to be concerned because the computer will need some time to restore the graphics card’s factory settings.
- Close the “Radeon Settings” window after your screen is restored. This will restore factory settings to your AMD graphics card on your PC.
How to factory reset an NVIDIA graphics card?
NVIDIA graphics cards can be reset to factory defaults by simply altering a setting in the specific control panel of the graphics card. If you’re having difficulties loading your PC’s screen at full resolution or if your gaming performance is bad, you’ll need to do this. Here’s how:
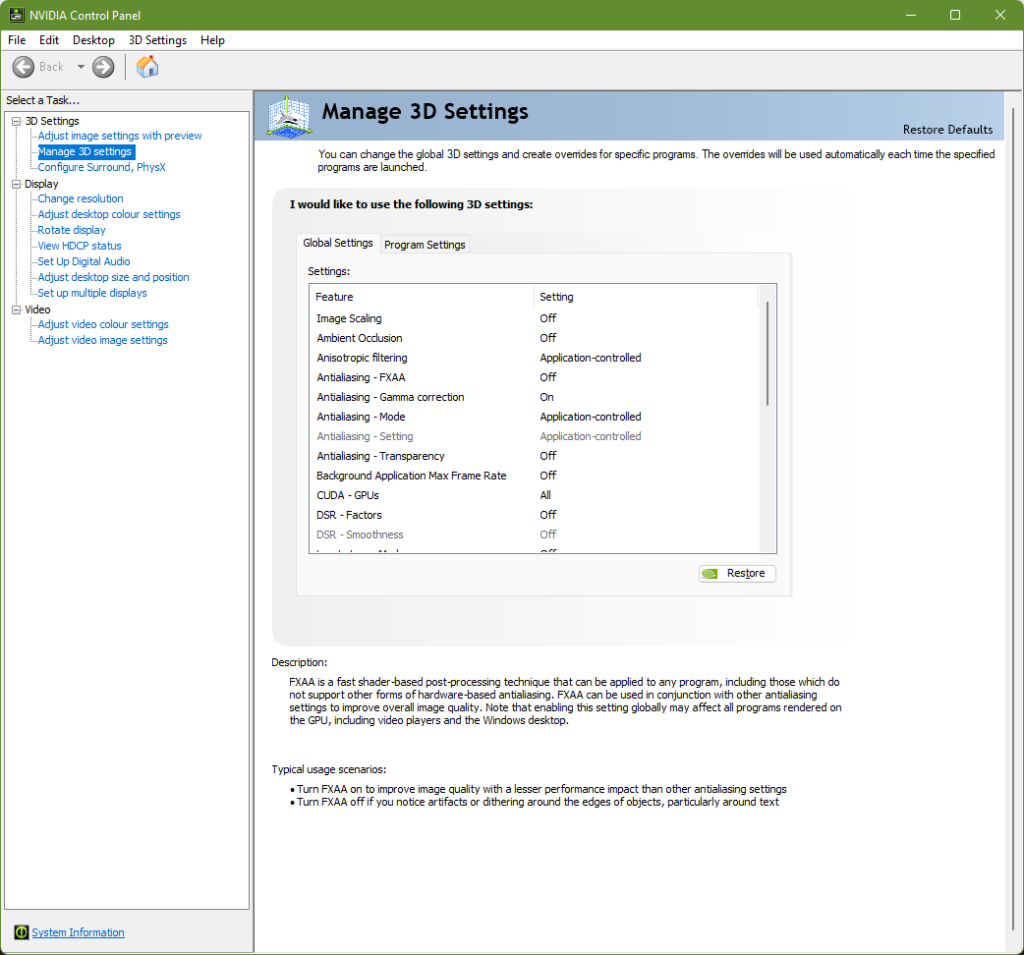
- Right click on an empty portion of your desktop.
- Select NVIDIA Control Panel.
- Expand 3D Settings on the left pane.
- Click on Manage 3D Settings.
- Select Global Settings tab.
- Click the Restore button then click OK to confirm.
Causes of display issues on Windows 11
There could be various reasons why your graphics card isn’t working or why you’re seeing the phrase ‘Display driver stopped responding and has recovered’ on your screen. The majority of the time, it’s due to a bad driver that’s either full of problems or just incompatible with your system’s version. It’s tough to pinpoint the problem because each scenario is different and each computer is configured differently.
To resolve the incompatibility issue, revert the driver to a prior version. To fix issues, reinstall or update the driver to the most recent version. To quickly fix a one-time unusual anomaly, use the keyboard shortcut to reset the graphics card.
OTHER INTERESTING ARTICLES YOU MAY LIKE:
- How To Change Device Bluetooth Name In Windows 11 | Easy Steps 2022
- How To Turn Off Steam Notifications [2022]
- How To Fix A Discord API Error | Updated Solutions in 2026
- How To Fix A Failed To Load Steamui.dll Error on Steam [2022]
Visit our TheDroidGuy Youtube Channel for more troubleshooting videos and tutorials.