How To Fix PS4 CE-38612-0 Error | NEW & Updated in 2026
There’s been a long list of various PS4 errors that we’ve encountered over the years but one of the frustrating error codes is the CE-38612-0 error code. If you’re getting this error and you have no idea how to fix it, check out the solutions in this guide.
What does the PS4 CE-38612-0 error mean?
Error code CE-38612-0 is usually a sign of an on-going issue with your PS4 storage device or hard drive. This error can occur if the hard drive has suffered hardware damage, or if some of your game data became unreadable or corrupted. This means that this error code can either be an indication of a software issue, or a hardware malfunction. The former is usually fixed by doing some software troubleshooting and solutions while the latter is the more serious one.
If the main cause of the error is due to a failing hard disk drive, you may need to replace the current hard drive with a new one, or try a factory reset first.
How to fix PS4 CE-38612-0 error?
If you are unable to play a game on your PS4 because it keeps on showing the error code CE-38612-0, you need to perform a series of troubleshooting steps to identify the main cause of the problem and to find a fix.
Before you proceed, make sure to create a backup of your game save data on a USB flash drive or to the cloud to avoid losing them in the event that you will have to factory reset.
Also read: How To Save PS4 Game Data To Online Storage [Cloud Backup]
Below are the troubleshooting steps and solutions that you can try:

Clear the PS4 system cache.
Refreshing the PS4’s system cache may help in fixing minor or temporary bugs. What you need to do is to simply turn the console off and unplug it from the power outlet for 30 seconds. Once the time is up, reconnect everything and check for the problem.
Delete and reinstall the game.
If you’re only getting the CE-38612-0 error when playing a particular game or games, it’s possible that the save data or files are corrupted. Make sure that you check if the error disappears if you update the game.
If the game is already running its latest version at this time, follow the steps below to remove it from the system:
- Go to the PS4 Home screen.
- Highlight the game tile you’re having a problem with and press the OPTIONS button on the controller.
- Select Delete.
- Once the game has been deleted, re-insert the game disc (if you have a physical copy), or redownload the game from the PlayStation Store.
- Run the game and check for the error.
Refresh the PlayStation 4 database.
For some people, refreshing the database of their PS4 console is an effective way to fix this error code. Follow the steps below on what to do:

- Turn off the PS4 by pressing and holding the Power button for 3 seconds. The LED light on the console will blink before the PlayStation 4 shuts down.
- After the console has shut down, press and hold the Power button in front again for 7 seconds. Release the button after the second beep.
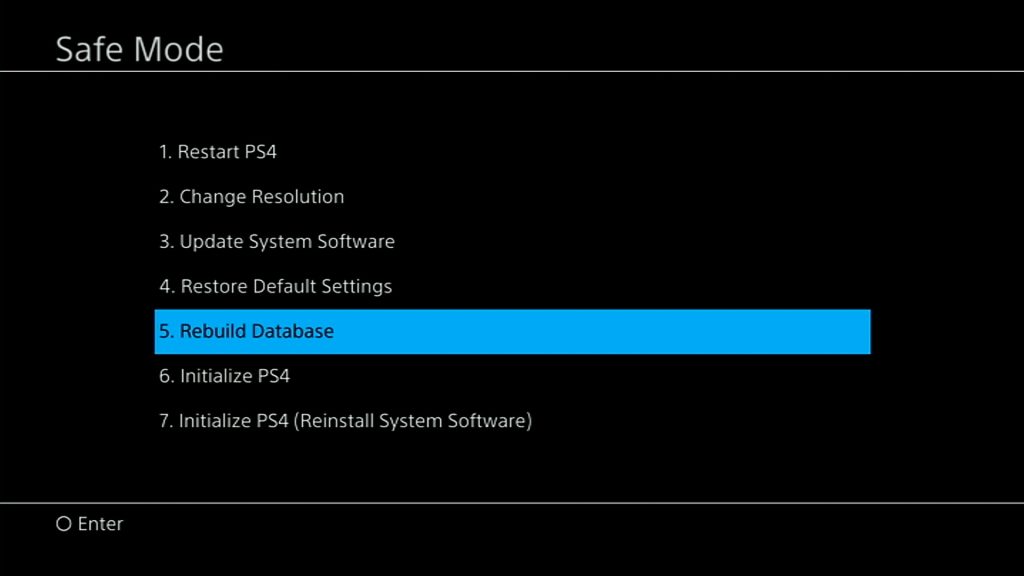
- Once the PS4 console is on Safe Mode, connect a PS4 controller to the console using a USB cable.
- On Safe Mode, select Option 5 [Rebuild Database].
- Press the X button to start the rebuild.
- Wait for the process to finish.
Initialize the console.
If nothing has changed after rebuilding the database, the next solution that you must try is to factory reset the console. This will wipe all the contents in the hard drive including games and save data.
In order to factory reset your PS4, you must boot it again to Safe Mode, just like what you did when you rebuild the database. Then, after you’ve reached Safe Mode, make sure to select Option 6 [Initialize PS4].
Troubleshoot the hard drive.
If you continue to experience the error code CE-38612-0 after a factory reset, you can assume that the cause of the problem is the hard drive. If you upgraded the hard drive of your HDD before you encountered this error, try to see if using the original hard disk drive will fix the issue.
If the original hard drive was never touched at all, you can also try to replace it with a new one.
OTHER INTERESTING ARTICLES:
- How To Fix Roblox 267 Error Code | NEW & Updated 2021
- How To Fix Fortnite LS-0014 Error | File Not Found | 2021
- How To Fix GTA 5 0xc0000005 Error On Steam | NEW & Updated 2021
- How To Fix Sims 4 Crashing On Steam | NEW & Updated 2021
Visit our TheDroidGuy Youtube Channel for more troubleshooting videos and tutorials.