How to Fix Minecraft Port Forwarding Not Working
Port forwarding lets friends connect directly to your Minecraft server, but getting it working is one of the most common headaches in self-hosted multiplayer. The problem usually comes down to one of a few things: your router isn’t forwarding the right port or protocol, Windows Firewall is blocking inbound connections, your local IP address changed since you set up the rule, or — increasingly common in 2026 — your ISP uses CGNAT, which makes traditional port forwarding impossible. This guide covers every fix, starting with the most likely culprit and working toward the less obvious ones.
Before you start troubleshooting, confirm which edition you’re running. Minecraft Java Edition uses TCP port 25565 by default, while Minecraft Bedrock Edition uses UDP port 19132. Getting the port number or protocol wrong is the single most common cause of port forwarding failures.
| Edition | Default Port | Protocol |
|---|---|---|
| Java Edition | 25565 | TCP |
| Bedrock Edition | 19132 | UDP |
| Bedrock IPv6 | 19133 | UDP |
Verify Your Router’s Port Forwarding Rule
The first thing to check is the port forwarding rule in your router’s admin panel. Log into your router (typically at 192.168.0.1 or 192.168.1.1 in a web browser) and navigate to the port forwarding section. The exact menu location varies by brand — look under “Advanced,” “NAT/Gaming,” “Virtual Servers,” or “Port Forwarding.”
Confirm all of the following:
- Port number matches your server: 25565 for Java, 19132 for Bedrock.
- Protocol is correct: TCP for Java, UDP for Bedrock. If your router has a “Both” option, that works too.
- Internal IP address points to the computer running the Minecraft server (not a stale IP from a previous session).
- The rule is enabled, not just saved.
A surprisingly common mistake is forwarding the right port but selecting the wrong protocol. Java Edition won’t work over UDP, and Bedrock Edition won’t work over TCP.
After verifying or updating the rule, restart your router to apply changes. Unplug it from power for 30–60 seconds, then plug it back in and wait for a full reboot.
Set a Static IP or DHCP Reservation
Your router assigns local IP addresses dynamically through DHCP. That means the computer running your Minecraft server might get a different local IP address after a router reboot, which breaks your port forwarding rule because it’s still pointing to the old address.
There are two ways to fix this:
Option A: DHCP Reservation (Recommended)
Log into your router and look for “DHCP Reservation,” “Address Reservation,” or “Static DHCP.” Add an entry that binds your computer’s MAC address to a specific local IP. This is the cleanest method because it doesn’t require changing anything on the PC.
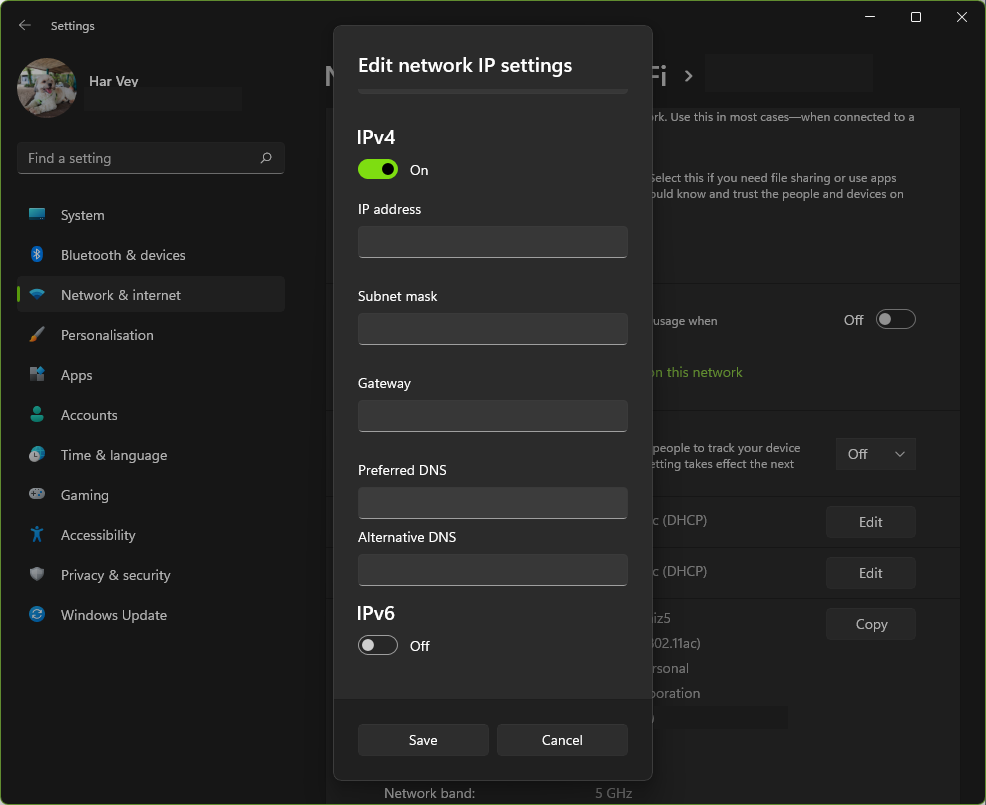
Option B: Static IP on Windows 11
- Press Windows + I to open Settings.
- Go to Network & Internet and select your connection type (Wi-Fi or Ethernet).
- Click Hardware properties, then next to IP assignment, click Edit.
- Change the dropdown from Automatic (DHCP) to Manual.
- Toggle IPv4 on.
- Set your IP address to something outside your router’s DHCP range but on the same subnet (e.g.,
192.168.1.200). - Set Subnet mask to
255.255.255.0. - Set Default gateway to your router’s IP (usually
192.168.1.1or192.168.0.1). - Set Preferred DNS to
8.8.8.8and Alternate DNS to8.8.4.4. - Click Save.
After setting a static IP or DHCP reservation, go back to your router’s port forwarding settings and make sure the internal IP matches.
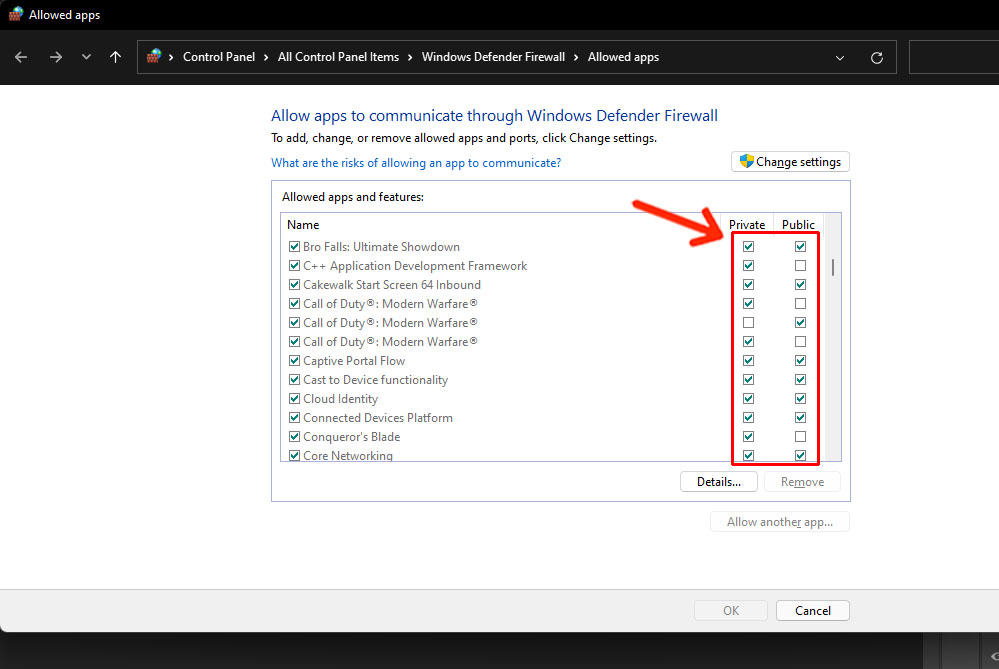
Create Proper Windows Firewall Rules
The instinct when port forwarding doesn’t work is to turn off Windows Firewall entirely. Don’t do that — it leaves your PC exposed to every other kind of network threat. Instead, create specific inbound rules that allow only Minecraft traffic through.
For Java Edition (TCP 25565)
- Press the Windows key, type Windows Defender Firewall with Advanced Security, and open it.
- Click Inbound Rules on the left panel.
- Click New Rule on the right panel.
- Select Port and click Next.
- Select TCP, enter 25565 in the “Specific local ports” field, and click Next.
- Select Allow the connection and click Next.
- Check Domain, Private, and Public, then click Next.
- Name the rule (e.g., “Minecraft Java Server”) and click Finish.
For Bedrock Edition (UDP 19132)
Repeat the exact same steps, but select UDP instead of TCP and enter 19132 as the port number.
Important: You should also create matching Outbound Rules using the same steps. Click “Outbound Rules” instead of “Inbound Rules” and repeat the process. Some plugins and server functions require bidirectional traffic.
If you prefer to allow by application instead of port, choose Program instead of Port in step 4, then browse to javaw.exe (Java Edition) or bedrock_server.exe (Bedrock Edition).
To verify your rules are active, look for them in the Inbound Rules list — they should show a green checkmark. If they show a gray icon, right-click the rule and select Enable Rule.
Check for Double NAT
Double NAT happens when you have two routers in series — for example, your ISP’s modem/router combo device feeding into your own personal router. Both devices assign local IP addresses and both run NAT, which means port forwarding on your personal router alone won’t work because inbound traffic never makes it past the ISP device.
How to check: Open Command Prompt and run tracert 8.8.8.8. If the first two hops show private IP addresses (e.g., 192.168.x.x then 10.x.x.x), you’re behind double NAT.
How to fix it:
- Bridge mode: Log into the ISP modem/router and set it to bridge mode. This turns off its routing and NAT functions, letting your personal router handle everything. The exact steps depend on your ISP’s hardware — search for your modem model number plus “bridge mode” for specific instructions.
- DMZ the second router: If bridge mode isn’t available, log into the ISP device and put your personal router’s WAN IP address in its DMZ. This forwards all traffic to your router, where your port forwarding rules can then work.
- Remove one router: If you don’t need both devices, connect directly to the ISP modem (if it supports it) or replace the combo unit with a standalone modem and use only your own router.
Check if Your ISP Uses CGNAT
This is the fix most guides miss, and it’s increasingly relevant as of 2026. CGNAT (Carrier-Grade NAT) means your ISP shares a single public IP address among many customers. When this is the case, you don’t have a real public IP, and no amount of router configuration will make traditional port forwarding work.
How to check: Log into your router and find your WAN IP address. Then go to a site like whatismyip.com in your browser. If the WAN IP on your router doesn’t match the public IP shown on the website, you’re behind CGNAT. Another telltale sign is a WAN IP starting with 100.64.x.x — that’s the CGNAT-reserved address range defined in RFC 6598.
ISPs that commonly use CGNAT include T-Mobile Home Internet, Starlink (on the standard plan), many 5G/4G fixed wireless providers, and some budget fiber providers.
What to do about it:
- Ask your ISP for a public IP. Some ISPs will assign you a dedicated public IP for a small monthly fee or even for free if you ask. This is the simplest fix.
- Use a tunneling service. Services like playit.gg, Pinggy, LocalXpose, and ngrok create a reverse tunnel from your server to a public endpoint. Your friends connect to the tunnel’s public address, which relays traffic to your Minecraft server. No port forwarding or public IP required. This is the most reliable workaround for CGNAT in 2026.
- Use a VPN with port forwarding. Some VPN providers offer port forwarding as a feature. You run the VPN on your server machine, get a forwarded port from the provider, and share that address with friends.
- Rent a cheap VPS. For around $3–5/month, you can rent a small cloud server and use tools like
frpor WireGuard to tunnel traffic from the VPS to your home server. This gives you a static public IP and full control.
Verify the Server Is Actually Running and Listening
Before blaming your network, make sure the Minecraft server process is actually running and bound to the correct port.
Open Command Prompt as Administrator and run:
netstat -an | findstr 25565(Replace 25565 with 19132 for Bedrock.)
You should see a line showing 0.0.0.0:25565 with a state of LISTENING. If nothing shows up, the server isn’t running or isn’t bound to that port. Check your server.properties file and confirm server-port=25565 (or your chosen port). Also confirm server-ip= is either blank or set to 0.0.0.0 — setting it to a specific local IP can prevent the server from accepting connections from external addresses.
Test From Outside Your Network
You can’t test port forwarding by connecting to your own public IP from inside your network — most consumer routers don’t support NAT loopback (also called NAT hairpinning). Instead, use an online port checker like canyouseeme.org or portchecker.co while your server is running. Enter port 25565 (or 19132 for Bedrock) and check whether it shows as open.
Alternatively, have a friend try to connect from their network, or use your phone’s mobile data (disconnected from your home Wi-Fi) to test the connection.
When Nothing Works: Contact Your ISP
If you’ve verified your port forwarding rule, confirmed your firewall settings, ruled out double NAT and CGNAT, and the server is listening on the correct port — contact your ISP’s technical support. Some ISPs block certain port ranges by default, and only their support team can lift those restrictions. When you call, ask specifically whether they block inbound connections on port 25565 (or 19132), whether your account is behind CGNAT, and whether they can assign you a static or dedicated public IP address.