How To Fix Minecraft Internal Exception Java.IO.IOException Error
Are you getting the frustrating “Internal Exception Java.IO.IOException” error when playing Minecraft? This problem affects a lot of players because it can be triggered by a number of factors. In this guide, we’ll show you the tips that you can try to fix this problem.
How to fix Minecraft Internal Exception Java.IO.IOException error?
The Internal Exception Java.IO.IOException error usually occurs when you launch Minecraft, or when the game is underway. This error can be caused by a number of different things.

One of the most common reasons though is the sudden loss of internet connection or poor bandwidth issue. For some, it can be caused by a bug in the Minecraft launcher or Windows Operating System.
Others may also encounter the internal exception error due to a glitch from the Minecraft server, or when the connection to the server is being blocked by Windows Firewall.
If you’re experiencing the internal exception java error in Minecraft, the following solutions may help:
Fix #1: Reboot your PC.
Restarting Minecraft should be done first. This is a basic troubleshooting step and must be performed before doing any advanced solutions. You can force quit the game and other Minecraft-related processes using the Task Manager (CTRL+SHIFT+ESC).
If nothing happened after you restart Minecraft, you then have to follow it up with a full PC reboot. Simply turn off the computer and restart it normally. Afterwards, check for the problem again to see if the problem is gone.
Fix #2: Check for game updates.
Keeping your Minecraft game updated is another basic stuff that may help fix “Internal Exception Java.IO.IOException” error. Be sure to check if there’s a new update that you’re yet to install at this time with these steps:
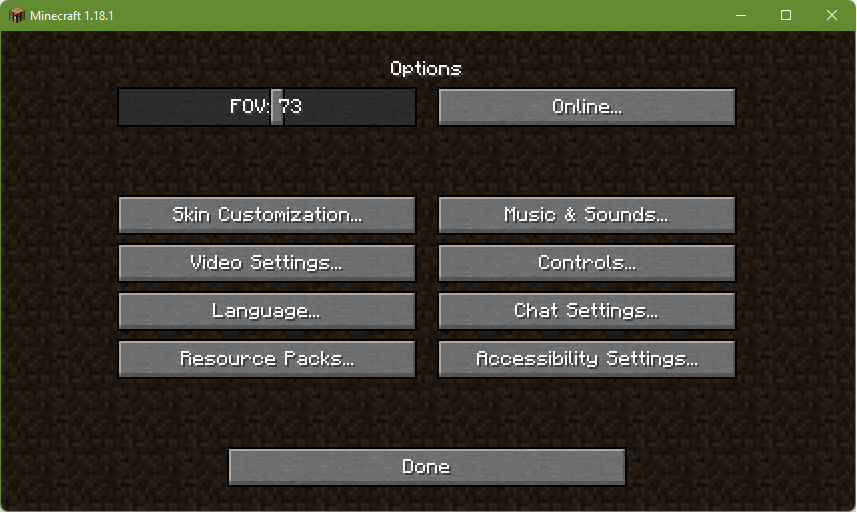
- Launch Minecraft.
- Go to Options..
- Click Force update!
- Click Apply to confirm.
Fix #3: Restart the Minecraft server.
Sometimes, players may encounter a Minecraft error message due to a server issue. In most cases, minor server errors are fixable by a quick Minecraft server restart.
If you continue to experience the same error, contact the server administrator of the server and ask them to restart the server.
Fix #4: Refresh the DNS settings on your PC.
Sometimes, a DNS issue in a PC may lead to connection issues. This can happen if the DNS server settings become corrupted after an update or when a user unintentionally makes changes to network settings.
You can try to flush the DNS on your PC to see if that will work. Here’s how to do that:
- Press the Windows button on your keyboard.
- Type “cmd” and right click on Command Prompt app.
- Select Run as administrator.
- Execute the following commands on the Command Prompt:
- ipconfig /flushdns
- ipconfig /release
- ipconfig /renew
- Restart your PC and check for the problem.
Fix #5: Use a different DNS server.
The DNS server that’s provided by your Internet Service Provider may sometimes go down unexpectedly. You can try switching to more reliable DNS servers like the Google DNS. Follow these steps to change the DNS server settings:
- Press the Windows key on your keyboard.
- Type in “control panel” and open the Control Panel app.
- Click Network and Internet.
- Go to Network and Sharing Center.
- Click on Change Adapter options.
- Right-click on Ethernet network (or wifi network that you’re using) and click Properties.
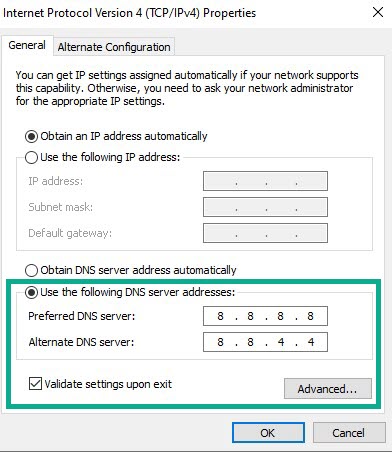
- In the Ethernet Properties window, click Internet Protocol Version 4 (TCP/IPv4), then select Properties.
- In the Internet Protocol Version 4 (TCP/IPv4) window, select Use the following DNS server addresses:
- For your preferred DNS server, type in: 8.8.8.8.
- For your Alternate DNS server, type in: 8.8.4.4.
- Make sure to enable Validate settings upon exit box, then click OK.
After getting the new DNS server settings, restart your PC and check for the problem again.
Fix #6: Disable Server’s Resource Pack.
If you’re using a server resource pack to enhance your Minecraft game, that can be the reason for the problem you’re facing right now. Try to disable the server resource pack and see if that will fix the ioexception error. These are the steps to do that:
- Run Minecraft.
- Select Multiplayer.
- Click Options.
- Go to Problematic Server and click Edit.
- Select Server Resource Packs and hit Disable it.
- Restart the game and see if the issue has been resolved.
Fix #7: Troubleshoot your internet connection.
The status of your own internet connection at home can affect your Minecraft gaming experience. At this point, you want check if you’re having an internet connection error, or if you have a previously unknown problem with your existing connection.
These are some of the basic network troubleshooting that you can do:
- power cycle your modem or router.
- run a speed test
- check if your internet connection is dropping randomly
If you have no idea how to perform network troubleshooting like the ones mentioned above, we recommend that you contact your Internet Service Provider.
Fix #8: Update Java.
This error can also be caused by an outdated Java program. Try updating Java and see if that will resolve the issue.
- Press the Windows button on your keyboard.
- Type “Configure Java” and click OK. (If you don’t have Java installed, the Java Control panel will not appear in the search result).
- Go to the Update tab.
- Click Update now.
Fix #9: Disable your Windows Defender Firewall.
In case the problem is being caused by your Windows Defender Firewall, you can temporarily turn it off.
Once the firewall is disabled, run Minecraft and see if the error shows up again. If the error disappears when your Windows Firewall is off, you need to create an exception for Minecraft launcher and game in your firewall.
Fix #10: Repair the Minecraft launcher.
If you’re playing Minecraft on Windows, you can try to see if repairing the Minecraft launcher will fix the problem.
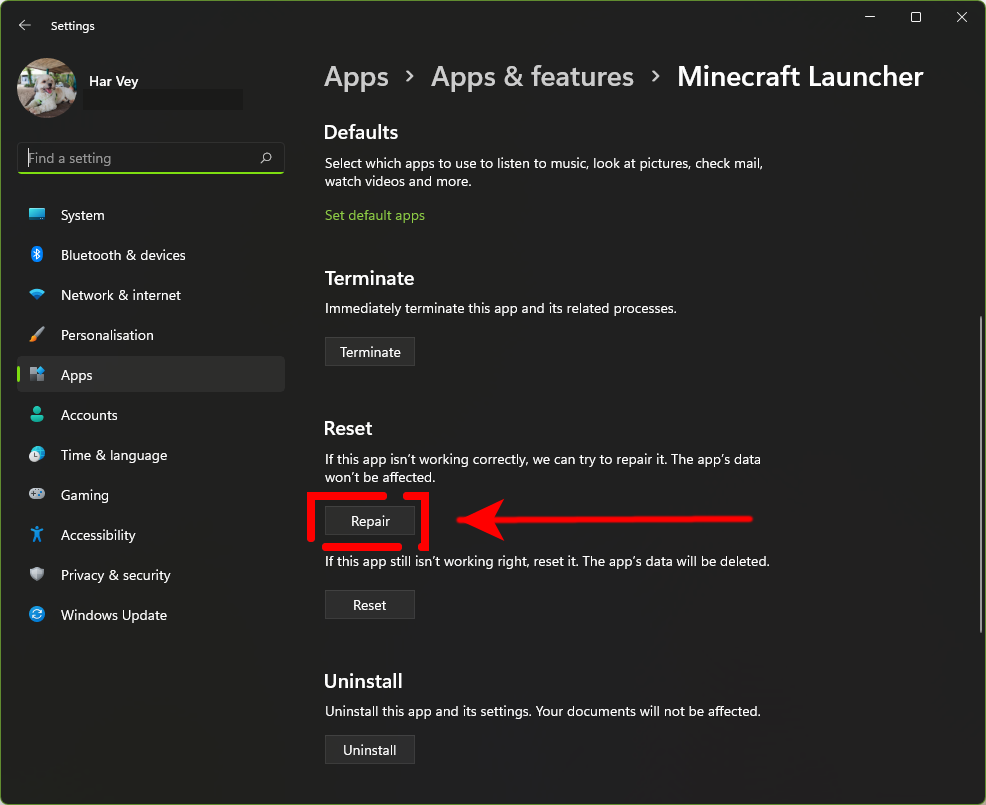
- Press the Windows button on your keyboard.
- Type “Minecraft launcher” and right-click on Minecraft launcher.
- Select App settings.
- Scroll down and look for the Repair button and click it.
- Run Minecraft to check for the problem.
OTHER INTERESTING ARTICLES YOU MAY LIKE:
- How To Watch Twitch On Nintendo Switch | Updated Steps [2022]
- How To Fix Steam Says Game Is Running Error [2022]
- How To Stream Twitch On Chromecast | Updated Steps [2022]
- How To Activate Twitch On PS4, PS5, Xbox One and Xbox Series X|S
Visit our TheDroidGuy Youtube Channel for more troubleshooting videos and tutorials.