How to set up Galaxy Buds with your Galaxy S10 | or other devices
The Galaxy Buds is Samsung’s answer to iPhone’s AirPods and surprisingly, it’s a worthy competitor to say the least. In some respects, the Buds is even better and we think it looks cooler than the AirPods. We’re not here to make a review about both wireless earpieces though so we’ll go straight to the point, which is on how to set up the Galaxy Buds. In this tutorial, you’ll learn how to prepare the Buds so it works with your phone.
https://www.youtube.com/watch?v=M7GF_413BJk
How to set up Galaxy Buds with your Galaxy S10
It is easy to set up your Galaxy Buds. Whether you are using a Galaxy S10 or any other smartphone or tablet, the steps below should give you the necessary information on what to do.
Set up Galaxy Buds step #1: Use the correct eartips
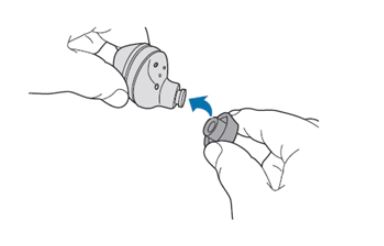
There are two changeable parts on your Galaxy Buds: the eartips and the wingtips. The first thing that you want to do in preparing or setting up your Galaxy Buds is by picking the right eartips. Samsung has included three pairs of eartips (the two are in the box), with one already installed. If you find that the installed eartips seem lose or uncomfortable after initially using it, take the other two spare eartips and try them. Changing the eartips is simple but you have to be careful in removing the installed one to avoid damaging or tearing it apart. Below are the steps to change the eartips:
- Select the eartip that fits your ear.
- Hook one edge of the eartip around the lip of the Galaxy Bud and gently press the eartip into place.
Set up Galaxy Buds step #2: Select the right wing tips
Once you’ve set the perfect eartip for you, your next job is to change the right wing tip as well. You want to make sure that you pick the right wing tip to avoid having charging issues when putting the earbuds in the charging case. If you put the right wing tip to the left earbud or the other way around, you may end up having an uncomfortable experience as well. You want to make sure that you don’t use the earbuds without the wing tips. Doing so might damage your ears.
Below are the steps on how to change the wing-tips.
- Select the wing-tip that fits your ear.
- Line up the hole in the wing tip with the hook on the Galaxy Bud and pull the rest of the wing tip into the grooves.
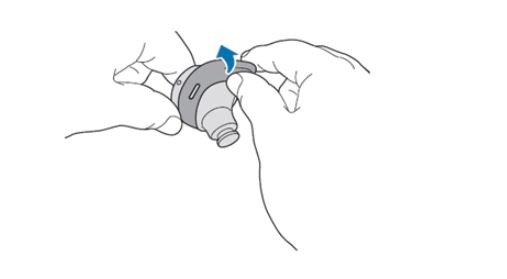
If changing the currently installed wing tip, be sure not to pull the tips or wing tips excessively as they can be damaged or torn.
Set up Galaxy Buds step #3: Pair the Galaxy Buds
Once you’ve selected the perfect eartips and wing tips for your Galaxy Buds, the set up is almost done. The only remaining thing to do at this point is to ensure that your Galaxy Buds can communicate with whatever phone you’re using. For demonstration purposes, we use our Galaxy S10 but if you have an older Samsung or non-Samsung device, you’ll need to make sure that that you install the app that allows your Galaxy Buds to work with it.
These are the steps to pair your Galaxy Buds with a Galaxy S10:
- Insert the Galaxy Buds into the charging case. Make sure the earbuds are sitting in the correct position.
- Close the charging case. If the battery indicator light doesn’t flash you’ll need to charge the earbuds for at least 10 minutes before they’ll pair to a phone or tablet.
- Open the charging case. The earbuds will automatically enter Bluetooth pairing mode.
- On a Samsung Galaxy device you should see a popup from the SmartThings app asking you to connect the earbuds. Select Connect.
- Follow the steps on the Galaxy Wearable app to finish the connection.
- Check out the full guide on Pair a device with the Galaxy Wearable app.
If you have an older Samsung device, download and install Galaxy Wearable (Samsung Gear) from the Play Store.
If you’re using a non-Samsung Android, simply open the Bluetooth panel on your device. Then, open the charging case of your Galaxy Buds and pair it with your phone.
If you have an iPhone, you also have to do a similar job to pair your Buds. Just open Bluetooth on your iPhone, open the charging case of your Galaxy Buds, and pair the devices.
How to know if your Galaxy Buds has been paired successfully
There are a few things that you can do to check if your Galaxy Buds has been set up properly or has been paired successfully. Just remember to open the charging case first with the earbugs inside it. Once the case has been opened, Bluetooth pairing mode will be launched automatically. If your Galaxy Buds was previously connected to your phone, a pop up box will ask you if you want to go ahead with the connection or pairing. This is true for Samsung devices but if you have a non-Samsung device, you will need to go into your phone’s Bluetooth mode to find out. Depending on your device, you may have to manually pair the devices again.
How to unpair your Galaxy Buds
If you have multiple devices and you want to pair your Galaxy Buds to another one, what you need to do is to turn off the Bluetooth function on the currently connected device. Once you’ve done that, turn on the Bluetooth on the other device you wish to connect to your Galaxy Buds. Then, close the charging case of your Galaxy Buds with the earbuds inside. Afterwards, reopen the charging case and pair your earbuds with your other device.
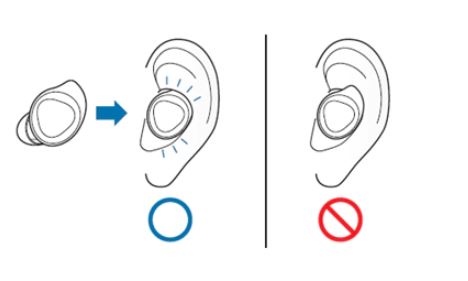
The right way to wear your Galaxy Buds
Each earbud is labeled appropriately to avoid confusion to the user. Make sure that you check the left earbud to your left ear and other to your right ear. Check for L for left or R for right in each one.
Also, make sure that you position the earbud in each ear in the correct orientation. The wingtip should point directly upwards. If you are uncomfortable with the earbud, or if you feel it is loose in your ear, try changing the eartip or the wingtip. Refer to the steps above on how to do this.
If you are one of the users who encounters a problem with your device, let us know. We offer solutions for Android-related problems for free so if you have an issue with your Android device, simply fill in the short questionnaire in this link and we will try to publish our answers in the next posts. We cannot guarantee a quick response so if your issue is time sensitive, please find another way to resolve your problem.
If you find this post helpful, please help us by spreading the word to your friends. TheDroidGuy has social network presence as well so you may want to interact with our community in our Facebook and Google+ pages.
How can I use my phone as a hot spot for s10 ultra and connect ear pods 3 with s10 ultra. The s10 is telling me to turn off hotspot.
How can I use my phone as a hot spot for s10 ultra and connect ear pods 3 with s10 ultra. The s10 is telling me to turn off hotspot