How To Fix “Your Folder Can’t Be Shared” Error [Updated 2023]
One of the most prevalent issues that both Windows 11 and 10 users have reported is the “Your folder can’t be shared” error. Some people find it irritating, especially when they are used to sharing data simply and it has suddenly become a hassle due to the error message displayed. If you’ve been sent to this page in search of a solution to the issue, feel free to try the offered options.
How to fix “Your folder can’t be shared” error
The techniques listed below were compiled from other Windows users who had successfully erased the error message and shared the folder. We hope that one of these solutions may be of assistance to you as well.
Fix #1: Restart Windows PC.
When you are unable to share a folder, try restarting your computer. This will usually resolve most issues and will also help your computer perform more smoothly. A simple restart can also alleviate your PC’s fundamental problems.
- Press the Start button on your Windows PC.
- Choose the Power button found in the left menu.
- Wait for a few minutes and once the computer is powered on, try to check if the folder can now be shared.
Fix #2: Activate File and Printer Sharing.
Activating File and Printer Sharing has shown to be one of the most efficient solutions for several customers who were dealing with folders that were unable to be shared in Windows. To enable file sharing on your Windows machine, follow the instructions provided.
- Press the Start button.
- Enter the word Control Panel and select.
- Select Network and Internet next.
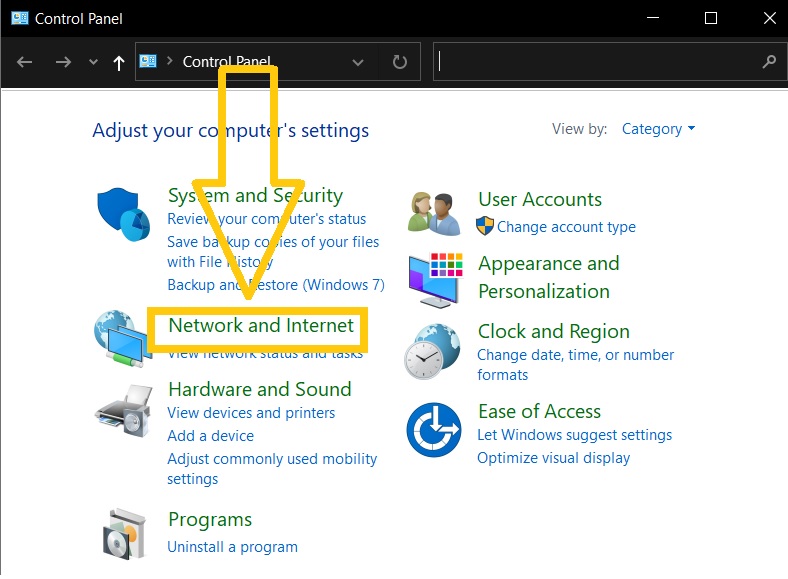
- Click Network and Sharing Center on the right pane.

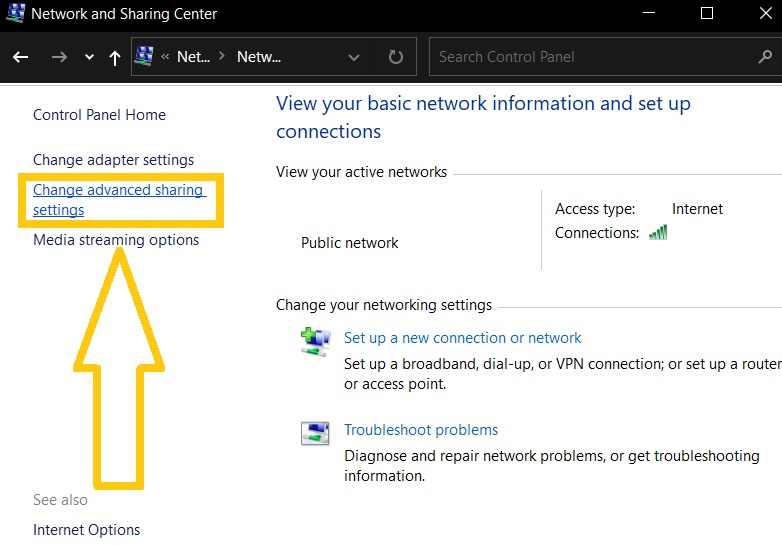
- Then select Change advanced sharing settings found on the left panel.

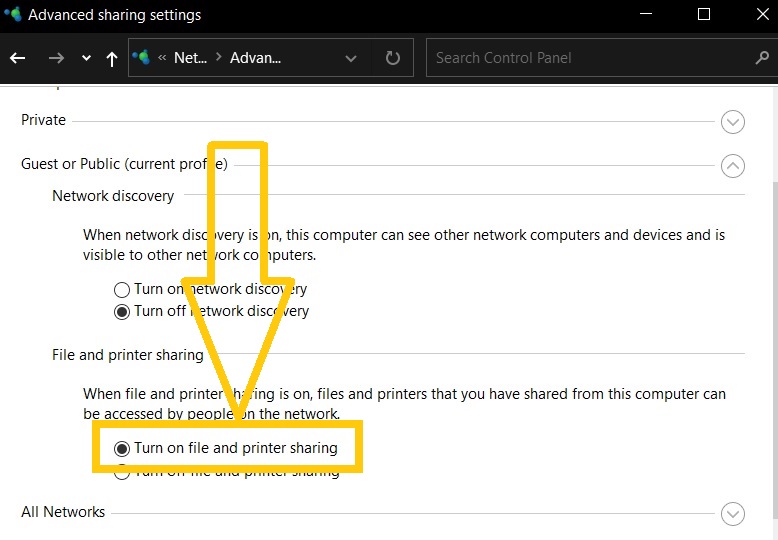
- Expand the Guest or Public section and click the radio button to enable the option “Turn on file and printer sharing”.


Fix #3: Utilize the Advanced File-Sharing Settings in Windows.
If the above suggestions have failed to fix the inability to share files issue yet, using the Advanced Sharing options should be one of the next methods you should try. This method which is known to be the solution that has worked for several Windows users allows you to adjust the permission in order to give full access to all users in the same network. Refer to the detailed instructions laid out below on how to do it.
- Locate the folder you want to share.
- Right-click and select Properties from the options.
- In the Properties window, go to the Sharing tab.
- Click Advanced Sharing Settings under the Sharing tab.
- In the Advanced Sharing Settings window, put a checkmark on the box labeled as Share this folder.
- Then select Permissions next.
- Under the Allow column, tick the box beside Full Control to give permission to anyone you wish to share important files in the folder.
- Click OK to save the changes.
After you’ve performed the steps above, you should be able to share the folder with anyone on your local network. If you’re utilizing the Password Protection feature on your Windows PC, you’ll need to do these extra steps.
- Click the Add button in the Share Permissions window.
- Select the Advanced button.
- Select Find now.
- Choose Authenticated users.
- Click OK.
- Check the Full Control box.
- Select Apply.
- Select OK.
Fix #4: Temporarily turn off the third-party Antivirus program installed.
There are times when a third-party antivirus application installed on the computer is the primary cause of the “Your folder can’t be shared” problem. Disable your antivirus program for the time being in order to successfully share the folder in your local network.
Fix #5: Disable Password Protected Sharing feature in Windows.
If disabling your antivirus software does not work, try disabling your computer’s password secured sharing. Keep in mind that this method is hazardous because it allows unauthorized users to access the folder, but it does solve the problem of sharing the folder.
- Press the Start button.
- Enter the word Control Panel and select.
- Choose Network and Internet.
- Then select Network and Sharing Center next.
- Click Change advanced sharing settings.
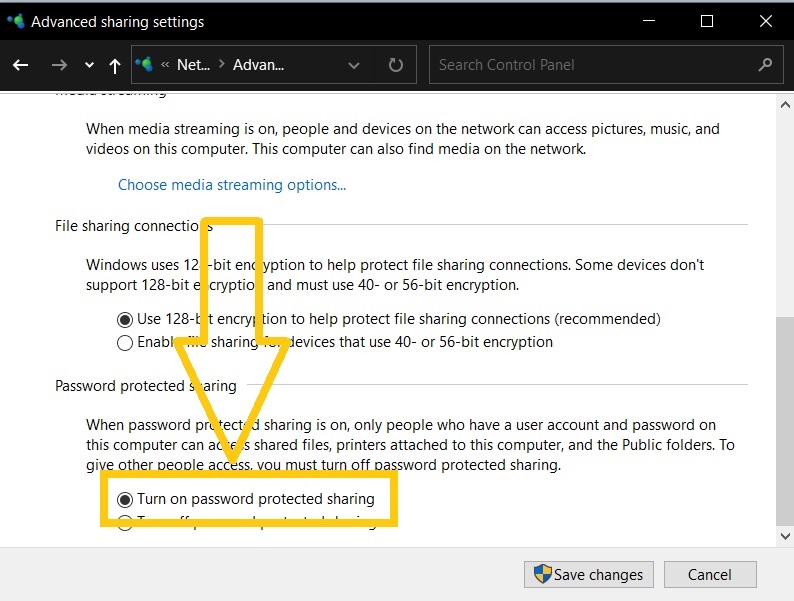
- Expand the All Networks section.
- Locate the Password Protected Sharing section.
- Tick the box beside Turn off Password Protected Sharing.

- Click Save changes afterwards.
- Check if the message “Your folder can’t be shared” is eliminated now that the Password Protected Sharing feature has been disabled.
Fix #6: Remove and reinstall Windows version.
Reinstall the Windows 10 or 11 version on your computer in order to fix the error message “Your folder can’t be shared”. We recommend this solution as a last resort in case none of the enumerated suggestions allows you to share the folder in your local network.