How To Fix Halo Infinite “You Have Been Disconnected” Error
Does the error appears that says “Connection lost. You have been disconnected from the local network. Returning you to the Main Menu.” when playing Halo Infinite?
This error has affected many players across the PC and Xbox platforms ever since Halo Infinite has been released in November 2021. In this troubleshooting guide, we’ll show you the solutions that you can do to fix this problem.
How to fix Halo Infinite “You Have Been Disconnected” error?
If you are unable to play Halo Infinite because of the You Have Been Disconnected” error, here are the solutions that you can try:
Fix #1: Restart your device.
Before doing anything else, make sure that you refresh your PC. This simple solution may work if the cause of the problem is due to a minor bug with your network after leaving your PC running for an extended period.
Fix #2: Check Halo Infinite server status.
Halo Infinite servers can sometimes go down due to a multitude of issues. Sometimes, the main reason is simply capacity-related but most of the time, server problems are due to an unforeseen glitch.
If you are having connection problems such as the Halo Infinite connection lost issue, one of the basic things to do is to check the game servers. To do that, you can visit the official support site for Halo Infinite to get first-hand information from devs and publishers.
If you’re using an Xbox system, you should also check Xbox.com to see if there are any ongoing difficulties with the Xbox Live service. If Xbox Live is unavailable in your location, you may be unable to access any online games.
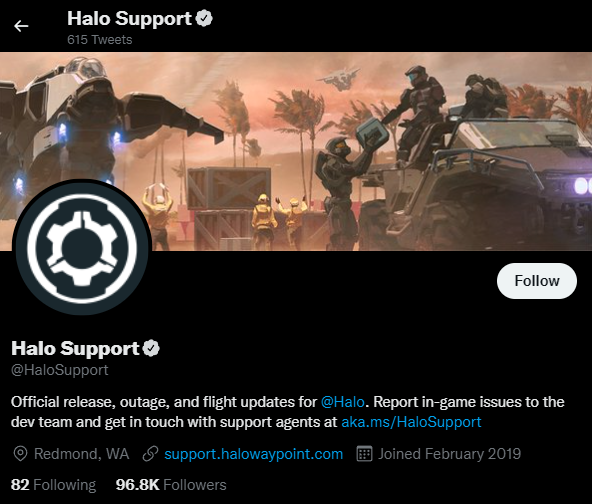
As an alternative to the official websites, you may also get near-real time server status updates about the game by following the official Twitter account.
You can also use other resources such as Downdetector. Sometimes, third party sites such as this are even better at providing information regarding outages and server status updates than the devs when it comes to reports regarding server connection issues.
Fix #3: Power cycle your modem/router.
A quick power cycle of your network equipment (modem/router) may help in fixing internet connection troubles in gaming.

If there are no known server difficulties at the present, you should check your home internet connection. You want to ensure that the modem or router is rebooted. Sometimes, simply refreshing the network equipment is all that is required to resolve the “Connection lost” error message.
In order to fully reboot your equipment and refresh its system, be sure to turn it off and unplug its power cable from the power outlet for 30 seconds. This allows the software to reset and the memory to be cleared. Afterwards, connect everything back in and check how Halo Infinite connection works.
Fix #4: Check your internet speed.
The quality of your home internet can have a direct impact on your online gaming experience. If your internet connection is inconsistent or unpredictable, Halo Infinite may prevent you from connecting to the servers, especially if you keep disconnecting while playing with other people.
Run a speed test
Random or frequent disconnections in Halo Infinite can sometimes be an indication of slow internet speed issue.
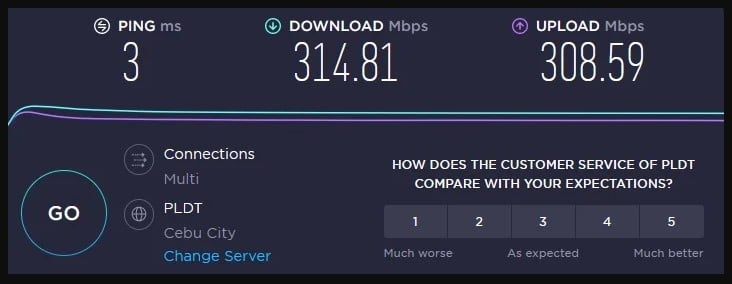
Try running a speed test on your PC or console to check the download and upload speed of your internet. In order to maintain decent connection to the server, you must have a minimum of 10 Mbps for both download and upload. Anything slower than that may result in a Halo Infinite Connection Lost error message.
Check for low bandwidth
If your internet connection at home seems to slow at certain times of day only, you may have a low bandwidth issue. This means that your network may be struggling during these times, such as when everyone’s at home and streaming or gaming on multiple devices at the same time.

What you can do in this case is to disconnect other devices from your network to ease pressure on your modem or router and hopefully allow your PC or Xbox console to establish a strong communication with the game servers.
Fix #5: Install the latest network adapter driver.
If Halo Infinite continues to fail to connect, the issue might be due to out-of-date network adapter drivers. Make sure that you check for the latest drivers for your network adapters.
What you must do is as follows:
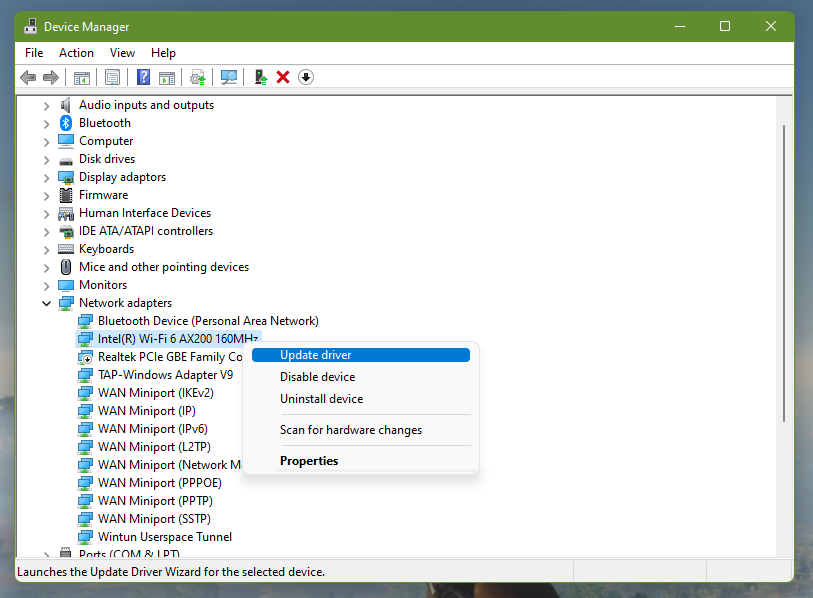
- Press the Windows key on the keyboard.
- Type in “control panel” and select Control Panel.
- Change the View by dropdown to Small icons and click on Device Manager.
- Once the Device Manager is opened, click the dropdown for Network adapters.
- Find your network adapter and right-click on it.
- Select Update driver.
- Select Search automatically for drivers.
Fix #6: Use another DNS server settings.
DNS is short for Domain Name System. This system consists of a collection of computers that handle requests to convert human-readable domain names (such as TheDroidGuy.com) into IP addresses. So, if you wish to visit our website and type in our domain, DNS servers will convert what you’ve typed into computer-readable information, allowing you to access our website. There is no need to input the IP address allocated to your website’s or any other website’s server.
DNS servers are an essential component of all Internet-related activities; without them, it will be difficult to open any website you wish to visit since you will need to memorize each IP address. However, if DNS servers have difficulties, they can set off a chain reaction.
Slow response time is a typical problem with DNS servers. Your ISP’s DNS server may be sluggish or improperly set for caching, resulting in poor internet loading times. Websites may become completely unreachable in rare cases if your Internet Service Provider’s (ISP) DNS server is down.
The good thing is, all of these issues may be resolved simply switching to a different set of DNS servers. You may update your DNS settings by going into your computer’s settings.
How to change the DNS server settings on PC
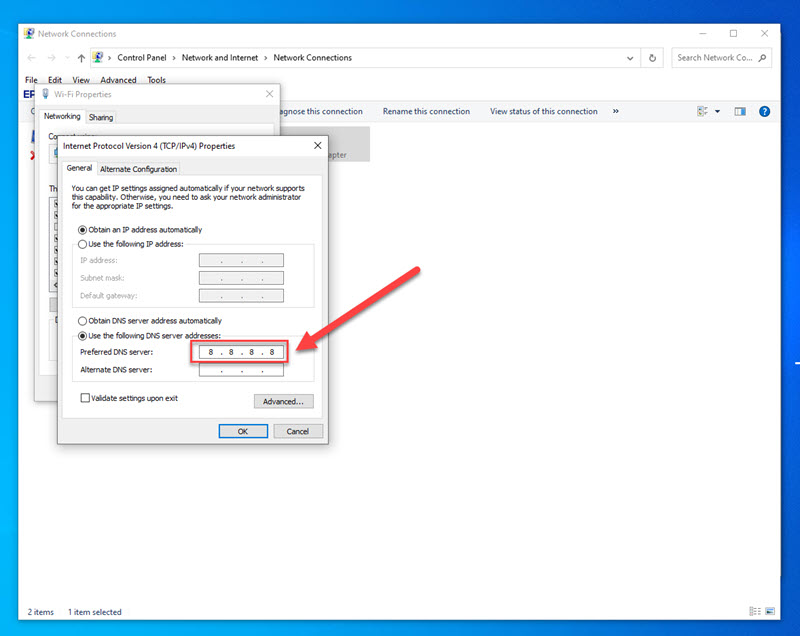
- Press the Windows key on the keyboard.
- Type in “control panel” and select Control Panel.
- Change the View by dropdown to Category and click on Network and Internet.
- Click Network and Sharing Center.
- Click on your Connection type (this can be Ethernet, Wifi, or others).
- Click Properties.
- Double-click on Internet Protocol Version 4 (TCP /IPv4).
- Select Use the following DNS server addresses and change the preferred DNS server accordingly. Most people use the Google DNS servers (8.8.8.8 and 8.8.4.4) but other companies like Cloudflare and OpenDNS are equally fine.
- Check the box next to Validate settings upon exit and then click OK to confirm the changes.
How to change the DNS server settings on Xbox One
- On your Xbox One Home screen, go to System.
- Select Settings.
- Head over to Network.
- Select Network Settings.
- Go to Advanced Settings.
- In the next screen that appears, you will several network information such as the Internet Protocol version address, MAC address, and DNS addresses. Make sure that you write down the original DNS addresses so you can switch back to them later on if you need to.
- Using the on-screen keyboard, change the Primary and Secondary DNS server that you want to use. We recommend that you use Google DNS servers (8.8.8.8 and 8.8.4.4).

How to change the DNS server settings on Xbox Series X|S
- On your Xbox Series X|S Home screen, select the Configuration tile.
- Go to General.
- Select Network Configuration.
- Go to Advanced Settings.
- Select DNS Settings.
- Select Manual.
- In the next screen that appears, you will several network information such as the IP address, MAC address, and DNS addresses. Make sure that you write down the original DNS addresses so you can switch back to them later on if you need to.
- Using the on-screen keyboard, change the Primary and Secondary DNS server that you want to use. You can use the following DNS server addresses: 8.8.8.8 and 8.8.4.4.
Fix #7: Reset network settings.
Refreshing your PC’s network settings may resolve the Connection Lost problem because it eliminates faulty network settings that may have been introduced by a third-party software.
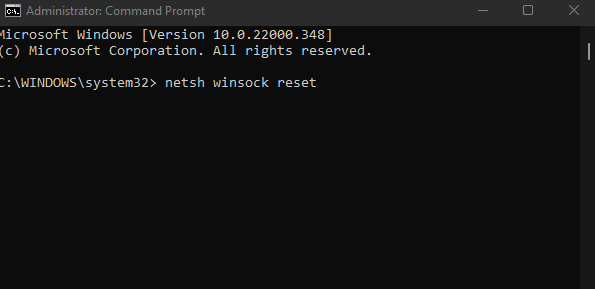
Here’s what you need to do:
- Press the Windows button on your keyboard and type Command Prompt at the search box.
- Right click on Command prompt result and click Run as Administrator.
- Inside the Command Prompt window, type the following commands and press Enter after each command:
- Type netsh winsock reset and press Enter
- Type netsh int ip reset and press Enter
- Type ipconfig /release and press Enter
- Type ipconfig /renew and press Enter
- Type netsh interface ipv4 reset and press Enter
- Type netsh interface ipv6 reset and press Enter
- Type reset ipconfig /flushdns and press Enter
- Restart your PC and check if the Halo Infinite Connection Lost error message returns.
Fix #8: Play with a VPN.
A VPN, or virtual private network, is used to modify the path of your network’s packet signals.
We use VPN for a variety of reasons, such as when we are unable to connect to the server due to a slow internet connection or when we intend to access resources that are restricted in our nation or area.

To summarize, it is a program that is used to conceal the location from the server and obtain the encrypted data.
Keep in mind that VPN usage is a double-edged sword. For some people, it can give them added advantage of a faster connection as their packet signals are routed to the nearest server. However, for some, this may result to a completely opposite situation and can even degrade their internet connection at best.
We suggest that you try the free versions of the VPN that you wish to use first to evaluate its performance before spending money on the product.
Fix #9: Check the NAT type.
The ideal NAT type on your PC or Xbox console is Open. However, most of the people may get the Moderate or Strict NAT types. While the former is still okay for gaming, having a Strict NAT type will block you from playing with other people in a multiplayer setting.
Make sure that you check the NAT type on your Xbox device with these steps:
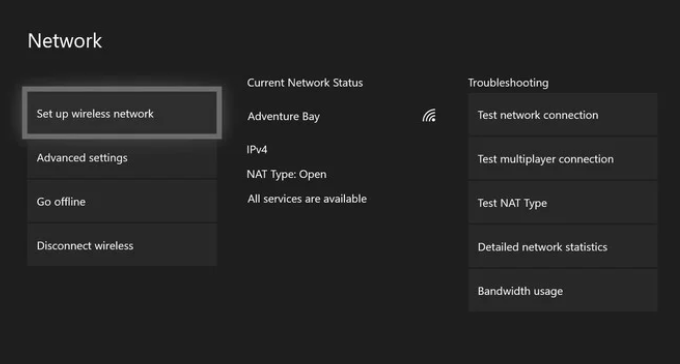
- On your controller, press the Xbox button.
- Once the Guide menu appears, find Profile & System and select it.
- Select Settings.
- Go to Network Settings.
- Check your NAT Type in the Current Network Status screen that appears.
If your NAT Type shows as Strict or Unavailable, you can do these steps to hopefully change them to either Open or Moderate:
- Go to Settings and select Network settings.
- Select Test NAT Type and refresh it if needed.
- Perform a hard reset on your Xbox by pressing and holding the Power button. Afterwards, run Halo Infinite again and check if the error returns.
If the hard reset did not fix your NAT Type, try following this guide on how to get an Open NAT.
Fix #10: Verify the game files.
Lastly, make sure that you check for corrupted or damaged game files by verifying the integrity of game files.
If you have the Steam version of Halo Infinite, you can use the Steam client’s Verify utility tool to do this task. Here’s what you need to do:
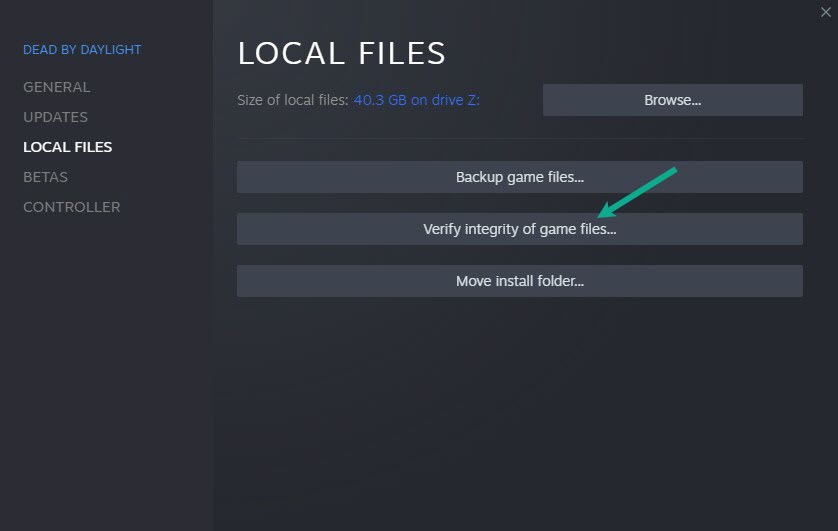
- Go to the Library after starting Steam.
- Find Ghostwire Tokyo and right click on it.
- Choose Properties.
- From the drop-down option, select Local Files.
- From the menu, choose Verify Integrity of Game Files.
- Allow some time for the operation to complete.
- After the operation is completed, restart your computer.