How To Get An Open NAT On Xbox Series S
In this post, we will show you how to get an Open NAT Type on your Xbox Series S. There are a couple of procedures you can use to get rid of a strict NAT on your console. Continue reading to learn more.
Having a strict NAT Type may not have mattered to you until you’ve encountered network-related issues in your Xbox Series S. NAT, or Network Address Translation, actually tells you how well your router and Xbox communicate with each other. Many network-related issues with your Xbox can be attributed to a strict NAT type.
If you have an open NAT, then it means that your console has full access to all of the network connections. This is the most ideal type you should get.
For the Moderate type of NAT, you may still be able to enjoy most of the online features but you won’t have full access. Lastly, if you have a Strict NAT, then it means your connection is limited to the most basic functions. You need to do some procedures to make it open or at least, moderate.
Get Open NAT on your Xbox Series S
For you to have an Open NAT on your console, you will need to have access to your router’s setup webpage. You don’t need to be technical to be able to change some settings in your router to make it work the way you want it. If you don’t know how to access the setup page, call your Internet Service Provider and ask for it. Assuming you already know how to access your router’s settings page, here are the things you should do:
Make sure UPnP is enabled
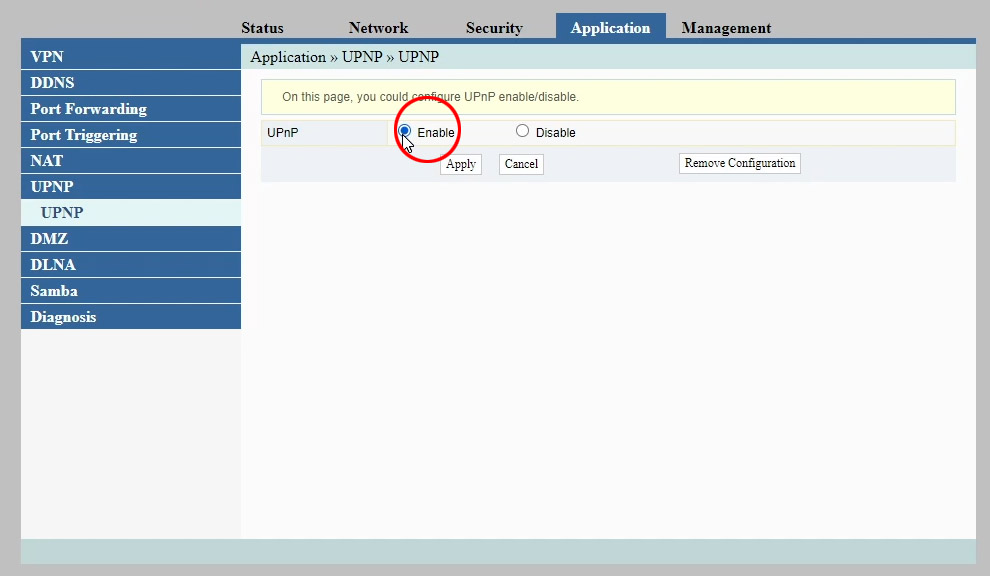
- In your router’s settings page, look for UPnP and click on it.
- Most of the time, it’s disabled by default, so enable it and save the change you made.
- In your console, launch Settings.
- Highlight General, and select Network settings.
- Select Test NAT Type, and wait until the console finishes the test.
Most of the time, you only have to do this as Xbox uses UPnP for multiplayer gaming, chat and other network features. However, if this doesn’t work, then do the next procedure.
Setup DMZ for your Xbox
- Press the Xbox button on your controller, and select Profile & system.
- Select settings and choose General, if it’s not selected yet.
- Select Network settings and navigate to Advanced settings.
- Take note of your console’s IP Address.
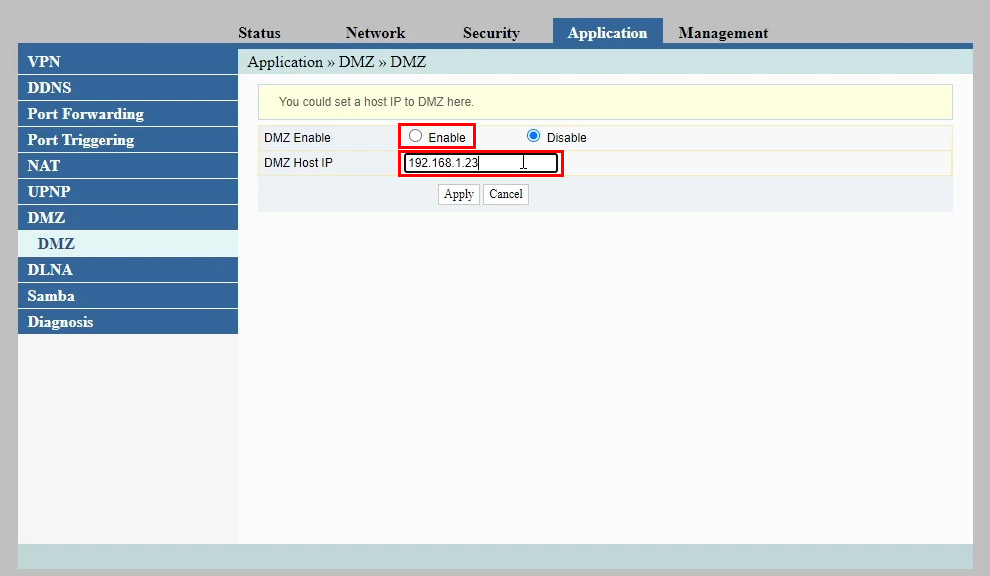
- In your router’s settings page, look for DMZ and click on it.
- Enter your console’s IP Address and enable DMZ.
- Save the changes you made.
- Going back to your Xbox, try to Test NAT type again.
This will change the NAT Type from Strict to Open as your console is placed in the DMZ. If it doesn’t, then reboot your Xbox and that should do it.
We hope that this simple tutorial can help you.
Please support us by subscribing to our YouTube channel. Thanks for reading!
ALSO READ: