How To Fix YouTube Playback Error [Updated Solutions]
Are you having difficulty watching a video or videos on YouTube because of playback error? In this guide, we’ll share to you the known solutions for this problem.
How to fix YouTube Playback error?
YouTube playback errors can occur due to a number of reasons. If you’re getting any playback error when playing Youtube videos, here are the solutions that you can do:
Fix #1: Check YouTube server status.
If you’re getting any YouTube playback error, the very first thing that you want to do is to check whether or not it’s due to a server issue. You need to do this first regardless of your method or platform in watching YouTube videos. Playback errors can happen whether you’re watching in a YouTube TV app, web browser, or smartphone Youtube app.
In order to check the status of the Google servers, you need to use third party resources like Downdetector to know if other people are having a similar experience. You can also visit the official social media accounts of YouTube such as Twitter to see if they have updates about any possible server downtimes, or if there’s on-going unplanned maintenance.
If there’s any indication that YouTube is encountering server troubles, there’s nothing much that you can do but wait until the issue is fixed on their end.
Fix #2: Refresh the browser tab.
Another simple way to fix YouTube playback errors is by closing and relaunching the current YouTube tab. You can try to close and reopen browser tabs where you watch YouTube videos and see if that will fix the playback error.
Alternatively, you can refresh the page by pressing the Refresh button on your browser or on your keyboard (usually F5 button).
If refreshing the page or relaunching the tab won’t work and you’re still getting the same playback error on YouTube, proceed to the next solutions below.
Fix #3: Restart the browser or app.
If restarting the tab did not help, a good follow up step to do is to relaunch the browser or app. Simpy close and reopen the browser or app and then try watching YouTube videos again.
If the YouTube playback issue won’t happen after that, you can assume that it may be caused by a temporary minor bug in the browser or app. In this situation, you may fix the problem by updating the browser or app.
Fix #4: Reboot your PC or mobile.
If the YouTube playback error did not disappear after restarting the browser or app, it’s time to refresh the device itself. If you’re using a PC, make sure that you restart your computer normally. Do the same thing if you’re watching YouTube videos on a mobile device.
Fix #5: Log out of your Google account.
There are all sorts of tricks when it comes to fixing the YouTube playback error and this one is one of them. What you need to do right now is to sign out of your Google account, sign back in afterwards, then check for the YouTube playback error again.
Alternatively, you can also try to log out of your problematic Google account and sign in using another one before checking for the YouTube playback error afterwards.
Keep in mind that you can have as many Google accounts as you like so if you don’t have another one, simply create a new one and see if that new account will help.
Fix #6: Power cycle the router.
Another neat trick that you can do is to ensure that you refresh your network equipment, specifically the modem/router. Routers are like computers that needs to be restarted from time to time. Sometimes, a simple router restart can easily fix a network connection issue.
What you need to do is to do a power cycle by turning off the router and unplugging it from the power source for 30 seconds. This lets the system of the router to drain all the energy from the capacitors as well as clear the memory of the device.
Once you’ve restarted the router, make sure that you wait until all the lights are stable and your PC or mobile phone is connected to the internet before checking for the YouTube playback error.
Fix #7: Check for the latest router firmware.
There have been several reports from consumers indicating that upgrading the router’s firmware worked for them. Therefore, you shouldn’t rule out the possibility of using this approach. In order to get the specific instructions on how to upgrade the firmware on the router, you will need to check the modem model on the router vendor’s website.
If you’ve already tried updating the router’s firmware before, then we recommend that you check for the latest version right now.
Fix #8: Refresh cookies and cache.
If you’re getting YouTube playback errors on a web browser and not on a YouTube app, you can try to clear the browser’s cache or temporary internet files and cookies before checking for the problem again.
Clearing the cookies and cache files and browsing history is often effective in fixing browsing issues but some users were able to use it to deal with the YouTube playback issue as well.
The exact steps to clear the cookies depends on the browser you’re using.
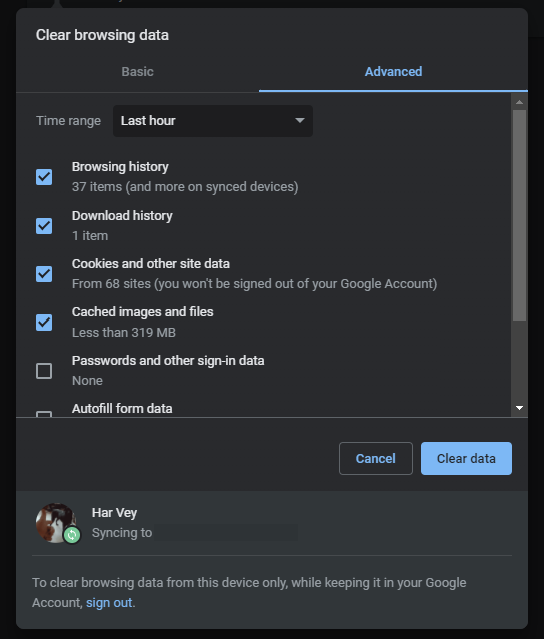
Clear browser cache on Chrome
- Launch the Chrome browser.
- Click the Menu bar (three dots) at the top right corner of the page.
- Select More tools.
- Select Clear browsing data.
- Click Clear data.
Clear browser cache on Firefox
- Launch Mozilla Firefox browser.
- Click the Application Menu (three lines) located at the top right corner of the page.
- Select Settings.
- Choose Privacy & Security.
- Scroll down to the Cookies and site data section and click Clear data.
- Check both boxes and select Clear.
Clear cache and cookies on Safari
- Open the Safari browser.
- Select History.
- Choose Clear History.
- Select All History.
- Click Clear.
If you’re using a mobile app when getting the YouTube playback error, clearing the app’s cache may also help.
It’s possible that clearing the app’s cache and cookies will fix the issue you’re having with YouTube’s Restricted Mode. It is essential that you be aware that clearing the cache will not result in the loss of any movies or other data associated with your account.
- Using your Android phone, access Settings.
- Under Settings, select Apps.
- Locate the YouTube app and select.
- Select Storage.
- Click Clear data and Clear cache at the bottom.
- Try to check if you can turn off Restricted Mode.
Fix #9: Disable extensions before playing YouTube videos.
There are occasions when the add-ons and extensions that you have installed on your browser are the reason of a website not working properly. You may test whether the playback error on YouTube has been removed by attempting to disable these add-ons and then restarting your browser to see if this resolves the issue.
Fix #10: Uninstall Adblock extension.
Using the AdBlock extension when playing videos has been the reason for some browsers to experience YouTube playback errors.
If you’re using this extension, we recommend that you turn it off, at least for YouTube. You can also get rid of it entirely to avoid any issues with it going forward.
Fix #11: Update YouTube app.
Playback errors on the YouTube app can also occur. If you experience this issue on the app, make sure to check if it’s running its latest version at this time.
Outdated YouTube apps can sometimes encounter difficulties like the YouTube playback error when trying to play downloaded videos. If you download YouTube videos before and you’re getting the playback error when playing it, updating the app might work for you.
By default, mobile phones (both Android phones and iOS) are set to update apps including YouTube automatically. However, you can manually check if the app is not running its latest version by opening your App Store and updating the app from there.
Fix #12: Change the video quality.
There are several video quality options that you choose when playing videos on YouTube. By default, your app should automatically determine the best video quality depending on the internet speed of the device. However, if you manually selected a higher video quality such as 4K but your internet connection can’t sustain the said video resolution, the YouTube app might return a playback error.
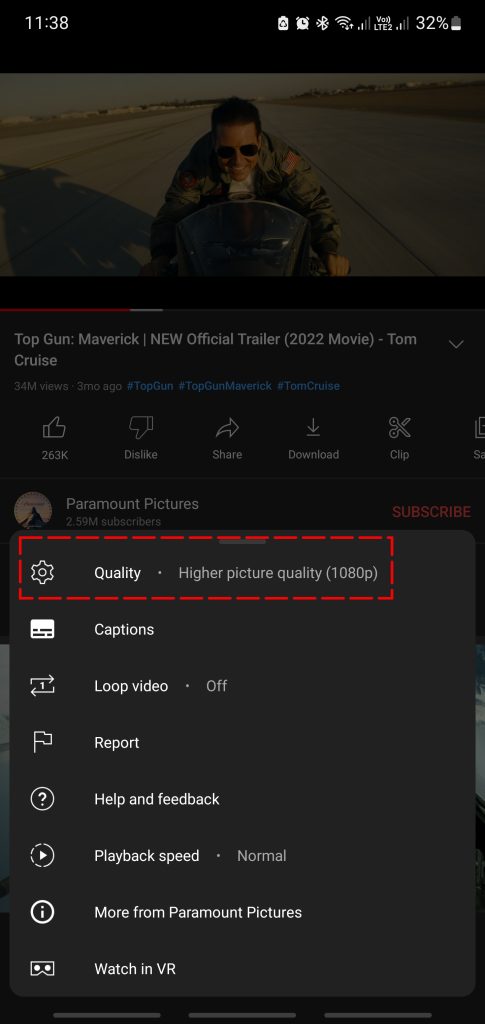
Try to see if choosing a lower quality video resolution will fix YouTube playback errors for you.
Also, be sure that you have a stable internet connection on your device when playing 4K or higher quality videos. If the download speed is not enough and you have a weak internet connection, or if the signal drops off when the app is trying to load the videos, you may encounter playback issues.
Fix #13: Use another browser.
If you’ve been using the same web browser all this time, you can now start to check if you can normally play YouTube videos using a different browser. This is hardly an ideal option, especially if you’re having trouble with your favorite browser but it’s worth giving a try.
Fix #14: Use different DNS.
If using a different web browser did not fix YouTube playback errors for you, the last solution that you can try is to use a different DNS servers. By default, your device or computer uses whatever DNS settings your Internet Service Provider gives you. However, you can change that by using a different DNS address.
You might consider switching your DNS server since the one you’re currently using could have DNS limitations. Instead, make use of Google’s DNS servers since this has shown to be one of the remedies that has been successful for other customers who have had the same issue with YouTube.
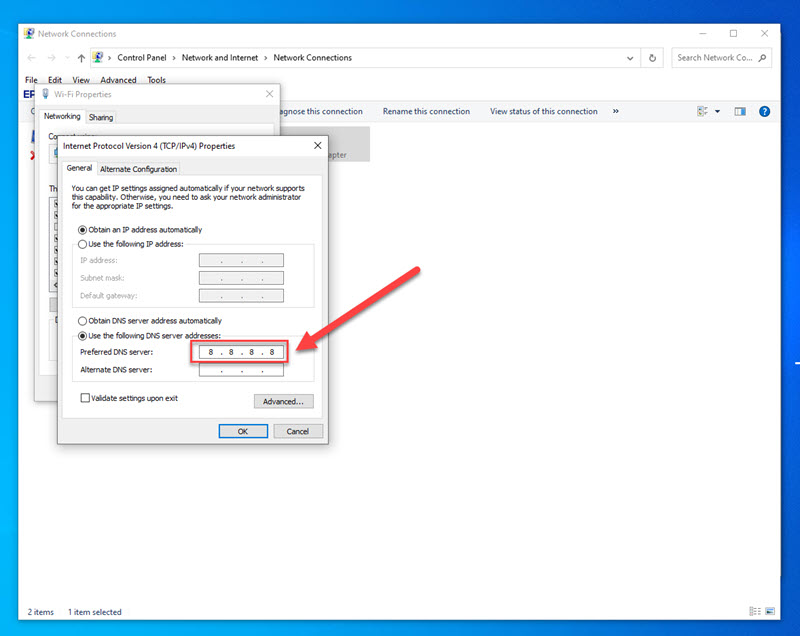
To change DNS address follow steps below:
- Press the Windows key on your keyboard.
- Type in “control panel” and open the Control Panel app.
- Click Network and Internet.
- Go to Network and Sharing Center.
- Click on Change Adapter options.
- Right-click on Ethernet network (or wifi) and click Properties.
- In the Ethernet Properties window, click Internet Protocol Version 4 (TCP/IPv4), then select Properties.
- In the Internet Protocol Version 4 (TCP/IPv4) window, select Use the following DNS server addresses:
- For your preferred DNS server, type in: 8.8.8.8.
- For your Alternate DNS server, type in: 8.8.4.4.
- Make sure to enable Validate settings upon exit box, then click OK.
Once you’ve changed your DNS server, try to check if the packet loss in Valorant has been fixed.
FAQs
OTHER INTERESTING ARTICLES YOU MAY LIKE: