Samsung Galaxy Note 4 Tips, Tricks, Tutorials, How Tos, Guides and FAQs [Part 2]
Hello there, dear readers! Welcome to the second part of our Samsung Galaxy Note 4 Tips and Tricks series. We published the first part in December last year dealing with the most common procedures that will help you make the phone work normally in case of problems. In this part, however, I included the most common features and functions that will make user experience better and the phone run smoother. The first on the list is, of course, the Power Saving Mode, which I think is helpful enough to make the battery last longer.
We will be publishing more articles like this in the following weeks or months, so stay tuned. After we’re done with the basic stuffs, we will include more complicated procedures like rooting and flashing custom ROMs. Please remember that these tutorials are intended for users with average technical knowledge. Advanced users already know these stuffs but I think this post will still serve its purpose being a reference.
In case you have problems with your Galaxy Note 4, feel free to email us at [email protected] but provide as much details as possible so we can easily and accurately assess your concerns. You may also post your problems on our Facebook wall or Google+ page as we use them to help our readers.
The following are tutorials included in this post. Click on a link to jump to a specific topic:
- Power Saving Mode
- Configuring S Pen
- Motion Gestures
- Saving MMS Attachment
- Switching Easy Mode On
- Turning On Private Mode
- Download Additional Camera Modes
- Android Device Manager
- Take Screenshot with Hard Keys
- Accessing Task Manager
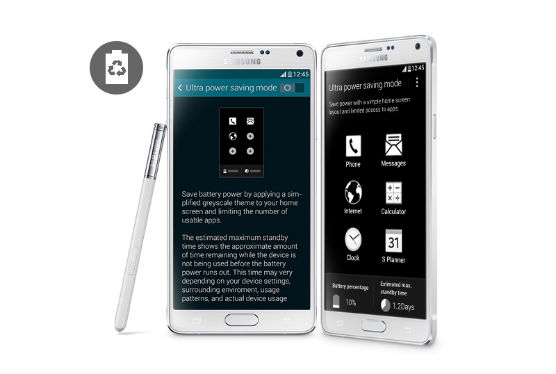
Power Saving Mode
If all Galaxy Note 4 are enabled, the phone can drain its 3220 mAh battery in an hour or two that is why some were disabled by default. Samsung already anticipated the phone’s capability to become a power hog if the user allows it to. One of its ways to address this is by giving the phone power saving features. This is how you enable Galaxy Note 4 Power Saving Mode:
- From the Home screen, touch the Apps icon.
- Tap Settings to open it.
- Scroll to and touch Power saving.
- Touch Power saving mode to turn it on.
- Tick the checkbox next to Restrict background data, then touch OK.
- Tap Restrict performance to view additional features you may disabled to even minimize battery use.
Another feature that would handicap the phone but extends battery life even longer is the Ultra Power Saving Mode. Just follow the same steps above and touch Ultra Power Saving Mode and follow on-screen instructions.
When turning the Power Saving Mode, there are options that are disabled. This means you cannot use the phone to its full potential and there is also a noticeable decrease in its performance. It is best you enable this feature if the phone is below 30%.
Configuring S Pen
The S Pen is one of the features of Samsung’s Note series. While it functions like a generic stylus, the company made it a point to make it as interactive as possible not to mention a bunch of features that are embedded on the firmware itself as core services. The following are some of the features of the S Pen:
Air Command – this will allow you to easily access other S Pen features. To open it, just hover the S Pen near the screen and press the S Pen button. You will then have access to Action Memo, Smart select, Image clip, and Screen write.
Action Memo – this is probably the best feature of the S Pen as its functionality is just so diverse and unique. You can perform several actions after you’re written a note. For example, if you’ve written a number, you have the option to dial it without opening the dialer and keying in the number again. You may also start a conversation through text or email. As mentioned earlier, S Pen features are embedded on the firmware that core services can be easily used or pulled up.
Smart Select – aside from being an obvious cropping tool for texts, Smart Select also remembers additional data from the source of copied text that makes it easier for you to browse or find the website again.
Image Clip – it is a cropping tool for pictures that makes it easier for users to change the form of the selection and then share, save or both the output.
Screen Write – it is more than just a screen-grabbing feature. When used, the feature will take a shot and then the user can write all over the picture. It is best used when jotting down information in connection to a website or image.
Handwriting Recognition – it is obvious that anyone can type faster than scribble but if you find scribbling on your phone’s screen fun, then you can use the S Pen to literally write. The device will take care of converting what you’ve scribbled into words.
To turn on Air Command and its feature, follow these steps:
- From the Home screen, touch the Apps icon.
- Touch Settings.
- Scroll to and touch S Pen.
- Under ‘GENERAL’ section, touch Air command.
- Touch the slider to turn in On.
- Air command is now enabled.
Motion Gestures
In a bid to make Note 4 even smarter, Samsung included a bunch of features that can be executed with a wave of a hand or touch. Some of them are the following:
Direct call – this allows the user to trigger a call by simply holding the phone near the ear.
Smart alert – the feature will make the phone vibrate when the user picks it up, indication that there are missed notifications.
Palm swipe – this allows the user to take a screenshot by simply swiping a hand on the screen.
Air wake up – the user can turn the screen on by hovering a hand over it.
Single tap mode – you can dismiss calls, events and alarms by a single tap.
Flit to mute – this is a very handy feature where the user can mute the phone by simply flipping it over or by placing the palm over the screen.
You may enable or disable these features through Settings:
- From the Home screen, tap the Apps icon.
- Touch Settings.
- Scroll to and touch Motions and gestures.
- You now have access to some of the features.
Others can be accessed through Accessibility settings:
- From the Home screen, tap the Apps icon.
- Touch Settings.
- Scroll to ‘SYSTEM’ section and touch Accessibility.
Saving MMS Attachment
Saving MMS or picture messages on a Note 4 can be with ease. This guide may be helpful for people who often receive pictures sent through text messages. Follow the steps below and you’ll be fine:
- From the Home screen, tap Messages.
- Touch the message that contains the attachment you want to save in your phone.
- Once inside the conversation, touch the attachment to view it.
- If the picture is viewed in full size, you can find the Save button at the top.
- Once saved, the picture will be visible via Gallery.
Troubleshooting: If you can’t receive MMS or picture messages, make sure mobile data is enabled in your phone. If attachments are not displayed and altered by exclamation mark, lower priority from High to Normal.
Switching Easy Mode On
The Note 4 has two Home screen modes. The default is the Standard mode and when the phone boots up, this screen mode is automatically selected. The Easy mode, on the other hand, provides a more simplistic, minimalist experience to the user. If you’re a first-time user and lost in the sea due to countless features, it may help if you turn the Easy mode on. Here’s how:
- From the Home screen, touch the Apps icon.
- Tap Settings.
- Scroll down to find Easy mode and tap on it.
- Touch Easy mode to tick the radio button to the right.
- Tap Done on the upper right.
Turning On Private Mode
Samsung made it a point to include yet another security feature better known as Private mode. As what the name denotes, it makes things a little more private. Among the things you can hid are photos, videos, recordings and virtually any file you want hidden from prying eyes.
- From the Home screen, touch the Apps icon.
- Touch Settings.
- Scroll to and tap Private mode.
- Tap Next.
- Read the Disclaimer if you want and then tap Next.
- Review the information on the screen to know how to set privacy status for your files and then touch Start.
- Before you can hide your files, you need to setup your unlock method first. You may choose Patter, PIN, Password or Fingerprint. For this example, let’s use PIN.
- Enter your PIN and touch Continue.
- Re-enter your PIN to confirm it, then touch OK.
- Now that Private mode is properly setup and turned on, you may start moving files to private directory.
- For example, you may open Gallery and choose albums or photos you want to keep private.
- Once you’ve selected the files, tap the More options icon at the upper right corner and choose Move to Private.
- Turn off Private mode once you’ve finished moving files to make sure others can’t view them if given access to your phone.
Download Additional Camera Modes
One of the selling points of Galaxy Note 4 is its 16 megapixels camera; it speaks for itself. It is complimented by camera modes but Samsung only included a handful of them, although others can be downloaded for free. The following steps will guide you through downloading additional camera modes for your phone:
- From the Home screen, touch the Apps icon.
- Touch the Camera app to launch it.
- Touch MODE.
- Scroll to and tap Download.
- Now choose the mode you desire.
- Touch Install to begin the download.
- Tap Accept and Download.
- Tap Back twice to return to the camera viewfinder.
- Touch MODE.
- You can now find the mode you just downloaded.
Android Device Manager
If you think you wouldn’t lose a phone the size of the Note 4, think twice. Theft is very real and there are always times when you could misplace it. Of course, it would be easy to just dial your number from another phone to make it ring, but what if it was set to the lowest volume level? That’s when Android Device Manager comes into play. Among the things it can do are remotely lock the phone, play the ringtone at full volume for five minutes, remotely wipe the device, and track its location.
- From the Home screen, touch the Apps icon.
- Touch Google Settings.
- Tap Android Device Manager.
- The option Remotely locate this device is enabled by default, so enable Allow remote lock and erase by ticking the checkbox to the right.
- Now tap Activate to turn it on.
Take Screenshot with Hard Keys
There are three ways to take a screenshot on a Note 4 and the most common way to do it is by using the hard keys. The easiest is by swiping across the screen and the other is by using the S Pen through a feature called Smart Screen. Here’s how you take a screenshot using hard keys:
- Go to the screen you want grabbed.
- Press and hold the Home key and the Power key simultaneously for two seconds or until you see the screen flashes.
- Once the screenshot is taken, it will copied to the clipboard and saved to the Screenshots folder in the Gallery.
- The most recent screenshot will appear in the Notification Panel.
- With two fingers slightly separated, swipe the notification down to access screenshot shortcuts.
- When you expand the screenshot in the Notification Panel, you can Share, Edit or Delete it.
Accessing Task Manager
The task manager is one of the most important service you should learn to access in your Note 4. It offers quick memory management, which lets you free up system resources. But unlike any other services, there is no way for you to directly access it. But it’s a good thing, though, because before you can access it, you can do a couple of things that will also help in improving the devices performance.
- From any screen, touch the Recent apps key to the left of the Home key.
- You are now viewing recently used apps. You may swipe each one to the left or to the right to close them or just tap the Close all button.
- Touch Active apps.
- The Active apps screen will display all apps that run in the background as well as the current RAM usage.
- You may tap the End button beside each app to close then one by one or you can just tap the End all button to close all of them simultaneously. This simple procedure is helpful enough to make the device run faster.
Engage with us
Feel free to send us your questions, suggestions and problems you’ve encountered while using your Android phone. We support every Android that is available in the market today. And don’t worry, we won’t charge you a single penny for your emails. Email us via [email protected] any time. We read every email but can’t guarantee a response. Lastly, if we were able to help you, please help us spread the word by sharing our posts with your friends or visit our Troubleshooting Page. Thanks.