How to Manually Download and Install Update on Samsung Galaxy Note 20 | One UI 3.0 beta
This post depicts the steps on how to download and install update manually on the Galaxy Note 20. Read on to view more detailed instructions.
Keeping a device’s software up-to-date is recommended to ensure optimum performance and system stability. This is true to all smartphones and tablets from entry levels to high-end models. Just recently, the One UI 3.0 beta update was rolled out to some selected versions of the Galaxy Note 20 series in the US. This is by far the latest software version rolled by leading carriers namely Sprint and T-Mobile. The update is also made available to the unlocked versions of the Note 20 devices.
One UI 3.0 Beta Update Features
According to prior reports, the recent update brings in a bunch of new Android 11 features to the receiving devices. Among the said features include a dedicated chat section in the notifications shade, visual improvements to Samsung’s web browser, contacts, home screen, lock screen and volume slider.
Should you need any help getting the new One UI 3.0 beta on your Note 20, then feel free to refer to this demo.
Here’s how to manually check, download and install available software version straight from the Galaxy Note 20 settings.
Steps to Manually Download and Install Update on your Note 20
Before you proceed, verify and ensure that your phone has sufficient power and storage space allocated for the update file. If necessary, keep your phone plugged into the charging while updating. Fast and stable internet connection is also imperative to ensure seamless download of the update file.
1. Once everything is set, go to the Home screen. From the Home screen, swipe up from the bottom to launch the Apps viewer.
The Apps viewer houses all app icons or shortcut controls.

2. Tap the Settings icon to continue.
Another window opens with the main settings menu, highlighting basic and advanced Android features you can manage and utilize.

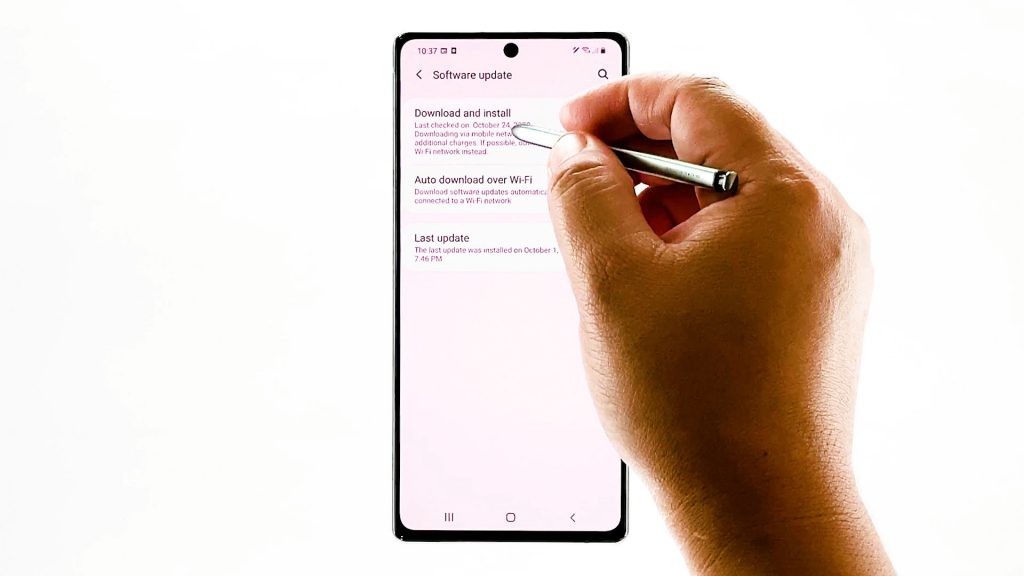
3. Scroll down to the bottom section and then tap Software update.
The Software update menu opens next. Here, you can see three main headers.

An indication that another software version is available is a red circle with a letter N inside. This icon is typically visible next to the Software update label and right under the Download and Install section.
4. To view any available software update, tap Download and install.
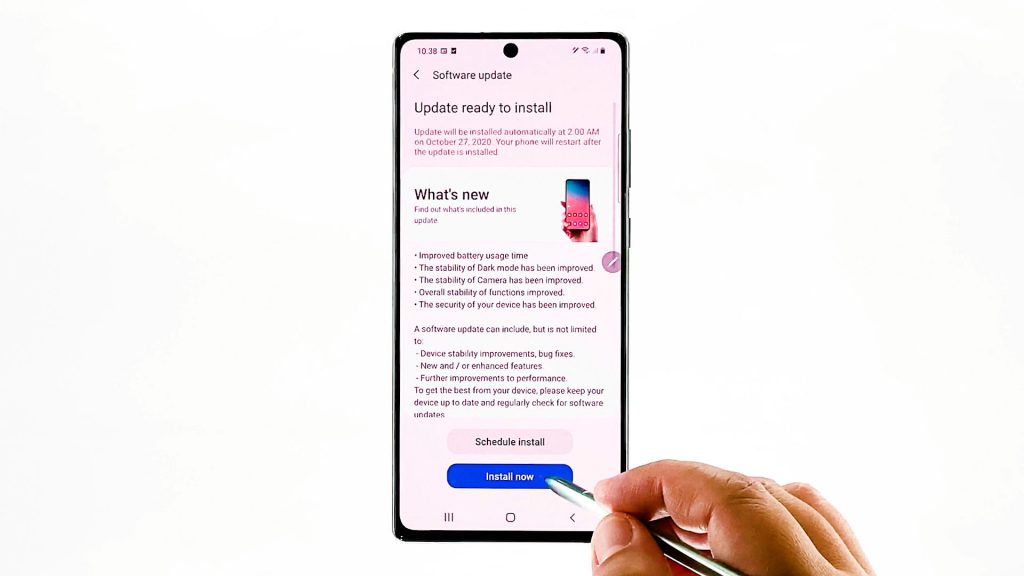
On the next screen, you will see a note that says, an update is ready to install. Beneath that is the summary of the software like how it works when installed on your device.
Read and review the information and then tap any of the buttons below.
You may opt to Schedule Install or Install Now.
If you choose Schedule Install, the update will automatically install on the specified time. Just make sure that your device is connected to the internet and is fully charged on the scheduled time.
5. To proceed with this demo, let’s tap the Install now button.
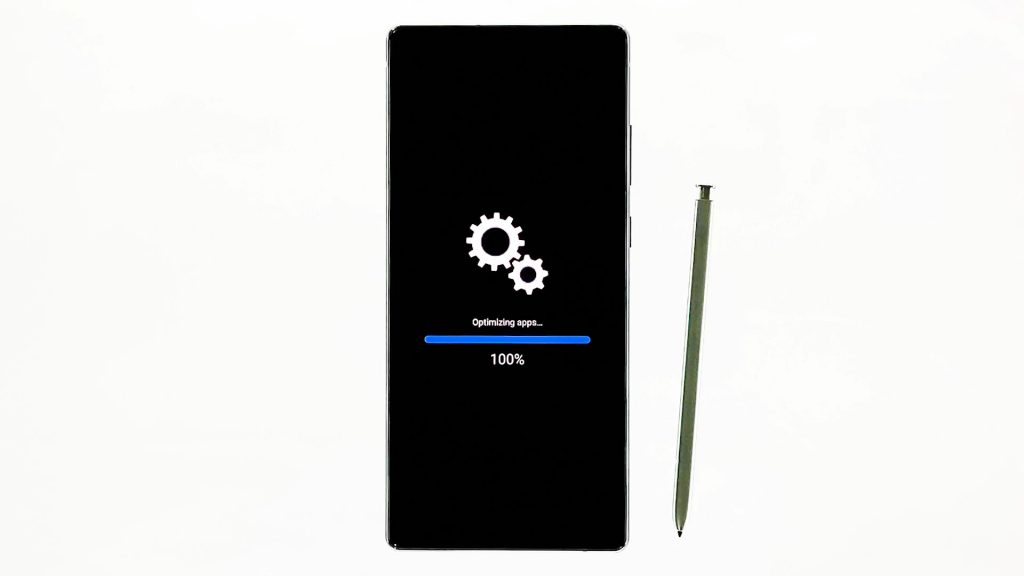
Doing so will prompt the device to download and install the new update.
The installation process may take several minutes to finish depending on the actual file size and internet speed on your device.
Your device then reboots.
6. After it restarts, the progress bar will show up on the screen.
Just wait until it reaches a hundred percent and it should be all set.
7. To check and see if the update was installed successfully, you may go back to the Software update menu from Settings and then tap Download and install.
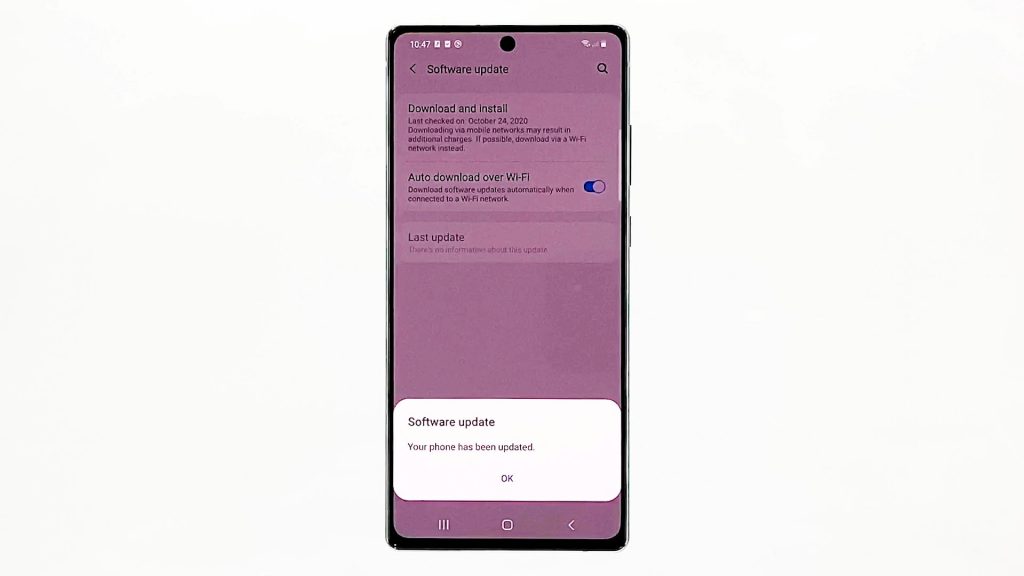
You then should see a pop-up message saying that Your phone has been updated. That means your phone is updated successfully.
Unable to Update your Device?
There are many factors that can hinder a device from downloading and installing updates. These include but not limited to network-related errors, server problems as well as random software glitches on the phone. In some cases, update errors are tied to memory problems including insufficient storage.
To deal with these culprits, performing basic troubleshooting would be necessary. So here’s what you can do should you wish to resolve the problem on your end.
- Soft reset. Performing a soft reset or restart on the phone can help rectify minor software glitches that are randomly transpiring. This process does not affect any saved data and therefore does not require back-up creation beforehand. Just turn your phone off for about 30 seconds, turn it back on and then retry updating.
- Power cycle the modem. If you can reach the wireless router or modem, then power-cycling it can help. A power cycle refers to the standard reboot process on the network equipment. It works by turning the modem/router off then unplugging it from the power source. Keep it unplugged for about 30 seconds to one minute. After the elapsed time, plug it back in and then power on. This simple tweak has been proven by many to work wonders when dealing with common internet problems that might have hindered your device from reaching the update server.
In the case where insufficient memory is the underlying cause, freeing up storage space like deleting unnecessary files including old text messages and unused apps is usually what’s needed.
However, if the update server is at fault, there’s not much that can be done on your end but to wait until it’s back up and running properly again.
Hope this helps!
More Video Tutorials
To view more comprehensive tutorials and troubleshooting videos on different mobile phones and tablets, feel free to visit The Droid Guy channel on YouTube anytime.
You might also want to read: