How to fix your Samsung Galaxy J5 that won’t turn on [Troubleshooting Guide]
The #Samsung Galaxy #J5, while a mid-range device, packs decent technical specifications that put it on a higher ground compared with other mid-range devices in the market today. It also received positive reviews which is evident that it worked as advertised and that owners encountered only minimal issues with it. But since it’s an electronic device that depends on its hardware and firmware, problems can occur.
Among the most common issues owners may encounter are related to its power. Power-related issues may occur due to hardware problems or even firmware issues caused by third-party elements or anything else. The point is, we won’t know for sure what the issue is if we don’t try to troubleshoot and that’s the main purpose of this article. So, read on to know what to do in case your Galaxy J5 won’t turn on for some reason.
Before we do to our troubleshooting, if you happen to own this device but having different issues, then I suggest you visit our Galaxy J5 troubleshooting page for we have already addressed some of the most commonly reported issues. Odds are that we may have already published articles that contain answers to your problems. So, try to find ones that are similar with your concerns and use the solutions we suggested. If they don’t work and you need further assistance, you may contact us by completing our Android issues questionnaire. Make sure to provide us with the information we need so that we can give you more accurate solutions. Don’t worry, it’s free.
Step 1: Pull the battery out and check it up, do soft reset
One good thing about a phone that has a removable battery is that you can easily do the soft reset procedure without much of a hassle. In this case wherein the phone doesn’t turn on when you press the Power key, it’s possible that it’s experiencing some kind of minor firmware or hardware glitch. While glitches can easily be fixed by doing the normal reboot, there are times that it’s impossible for the firmware to turn the device off and back on due to conflicts in the system. Therefore, you need to do a forced reboot, otherwise known as soft reset, to help it out in bringing the device back to life. That said, here’s what I suggest you do in this step:
- Remove the back cover of your phone but be careful not to damage the locks.
- Pull the battery out of your device.
- Place the battery on a level surface and flick it to see if it rotates freely because if so, then it must have expanded, which is a sign that it needs replacement. If it doesn’t turn, then do the same procedure for the other side for the battery.
- After physically verifying the battery’s condition, press and hold the Power key of the phone for a minute to drain stored electricity.
- Now, place the battery back in and secure it with the back cover.
- Attempt to turn the phone on.
If the phone turns on after doing this procedure, then problem solved! If not, then you have to continue your troubleshooting to try to bring it back to life.
Note: In case the battery has some leakage, bumps or any signs of damage, dispose of it properly and refrain from using it anymore as it may cause for serious problems not just to your phone but even to the user. Batteries explode! You may buy a spare battery if you want to continue using the phone.
Step 2: Attempt to charge the phone to see if it responds
After doing the procedure in the first step and the phone still won’t turn on, then you have to make sure that it’s not just a problem caused by a drained battery. In this step, you need to try to charge the phone to make sure there’s enough battery to power up its components and to find out if it actually responds and charges.
Plug the charger to the wall outlet and then connect your phone to it using the original cable that came with it in the box. Look at the screen to see if the usual charging icon displays and try to see if the LED indicator at the top of the display lights up. If none shows, leave the phone charging for 10 minutes and then try to see if those signs show.
In case the phone doesn’t charge, try connecting it to your computer or laptop to see if it responds with them and if so, then the problem is with the charger and not your phone. It’s time to buy a new charger. But if the phone still won’t respond with other devices, then try to use a different cable and if the problem persists, then the phone is experiencing a charging issue. You must first address this problem.
Assuming the phone charges fine, then leave it charging until it’s full and then attempt to turn it on normally. If it doesn’t respond to that even after charging, try the next step.
Step 3: Attempt to boot the device up in safe mode
It is possible one or some of the third-party apps is causing the problem, at least, let’s try to rule out this possibility since we know the phone is charging fine. We need to run the phone with all third-party elements disabled so we can isolate immediately if the issue is caused by one or some of them. This is how you boot your Galaxy J5 in safe mode:
- Turn your Galaxy J5 off.
- Press and hold both the Volume Down button and the Power key.
- When the Samsung logo displays, release the Power key but continue holding down the Volume Down button.
- Allow the phone to start up while holding down the Volume Down button; it may take a few seconds to complete.
- When the phone reaches the home screen and you can see “Safe mode” in the lower left corner of the screen, then it’s successful. Otherwise, repeat the steps from the top.
If the phone boots up successfully in this mode, then it’s clear enough that a third-party or some of them, is causing the problem. Find that app and then uninstall it. You may need to uninstall more than one app to fix the issue and I suggest you start with apps you recently downloaded or those you installed by the time this problem started. This is how you uninstall apps from your J5:
- From any Home screen, tap the Apps icon.
- Tap Settings.
- Tap Applications.
- Tap Application manager.
- Tap the application in question.
- Tap Uninstall.
- Tap Uninstall again to confirm.
After installing some suspected apps, try to reboot your phone in normal mode to see if the problem got fixed. However, if it still can’t boot up successfully, at least, we know the hardware of your device is fine and it can actually boot up in safe mode. So, I suggest that you reboot your phone in safe mode one more time, backup your files and data and then just proceed with the factory reset.
- From the Home screen, tap the Apps icon.
- Tap Settings.
- Tap Backup and reset.
- If desired, tap Back up my data to move the slider to ON or OFF.
- If desired, tap Restore to move the slider to ON or OFF.
- Tap Factory data reset.
- Tap Reset device.
- If you have screen lock turned on, enter your PIN or password.
- Tap Continue.
- Tap Delete all.
After this, try to boot up normally and that should work. Continue your observation and then install apps one by one until you’re satisfied the problem is fixed.
On the other hand, if the phone failed to boot up in safe mode, then move on to the next step.
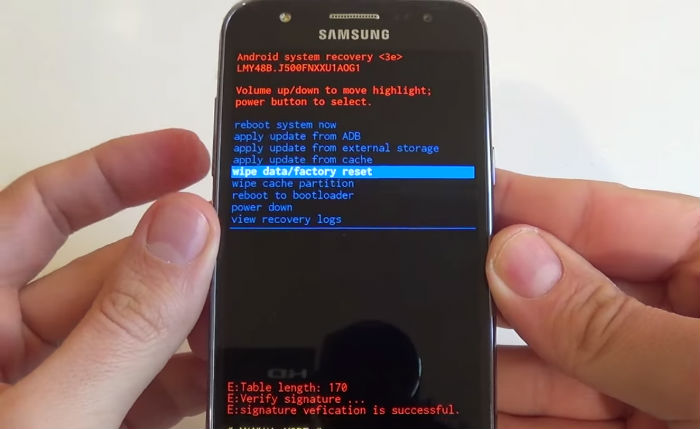
Step 4: Try to start the phone up in recovery mode
Booting up in recovery mode will power up all hardware components but won’t load Android interface. Instead, it loads the Android System Recovery menu wherein you have several options to choose from. If your Galaxy J5 can boot up in this mode successfully, it also means the hardware is fine but the device is experiencing some kind of software or firmware problem, which can be fixed by wiping the cache partition or doing the master reset. Now, here’s how you boot your phone in Recovery mode:
- Press and hold the Volume Up key and the Home key, then press and hold the Power key.
- When the device logo screen displays, release only the Power key
- When the Android logo displays, release all keys (‘Installing system update’ will show for about 30 – 60 seconds before showing the Android system recovery menu options).
If successful try to wipe the cache partition first…
- Press the Volume down key several times key to highlight ‘wipe cache partition.’
- Press the Power key to select.
- Press the Volume down key to highlight ‘yes’ and press the Power key to select.
- When the wipe cache partition is complete, ‘Reboot system now’ is highlighted.
- Press the Power key to restart the device.
- It will take a little longer for the phone to reboot after this procedure but wait until it reaches the home screen before using it.
Should the problem remain after wiping the cache partition, then you should do the master reset. However, you cannot disable the anti-theft since the phone neither boots up normally or in safe mode. It means you may be locked out of your device if you didn’t know your Google account and password. But if you don’t have issue remembering them, then proceed with the reset:
- Press and hold the Volume Up key and the Home key, then press and hold the Power key.
- When the device logo screen displays, release only the Power key
- When the Android logo displays, release all keys (‘Installing system update’ will show for about 30 – 60 seconds before showing the Android system recovery menu options).
- Press the Volume down key several times key to highlight ‘wipe data / factory reset.’
- Press Power button to select.
- Press the Volume down key until ‘Yes — delete all user data’ is highlighted.
- Press Power button to select and start the master reset.
- When the master reset is complete, ‘Reboot system now’ is highlighted.
- Press the Power key to restart the device.
If the problem the persists after this or if the phone cannot boot up in recovery mode, then you have no other choice but to send the phone in for checkup and/or repair.
Connect with us
We are always open to your problems, questions and suggestions, so feel free to contact us by filling up this form. We support every Android device available and we are serious in what we do. This is a free service we offer and we won’t charge you a penny for it. But please note that we receive hundreds of emails every day and it’s impossible for us to respond to every single one of them. But rest assured we read every message we receive. For those whom we’ve helped, please spread the word by sharing our posts to your friends or by simply liking our Facebook and Google+ page or follow us on Twitter.
My samsung galaxy j5 pro suddenly went blank as a result of over heating I think,
I have tried following the instructions above but it’s still like that. I don’t know what to do, any one please help.
my j5 slips into odin mode.so please help me what to do now.
I had a problem 2 wks ago, my Samsung j5 Prime would not switch on, then it started up, now i was using it and went to answer sms it had closed down, i cannot get it to reboot , it is not even charging
Plz tell me.i have reset my glaxy j5 and would not turn on.
I did charged my phone cause my battery was 40 percent already and I’m just listening to music, as soon as i pulled my phone cord at my powebank, my phone went dead and it’s not working anymore 🙁 I need help 🙁
On the 1st July 2017 My Samsung J5 Prime went black after screen frozen when I was on the Web.Then I press the volume key and home key and then the power key as instructed above. After several seconds a warning message appeared and then disappeared. Went black again. I then pressed the power key. Finally everything turned on.
Some 20 minutes later it showed : 2applications updated Android System WebView and Google Photos.
My samsung galaxy J5 2017 fell, the screen is only just a bit broken, the phone makes noises , but the screen wont turn on, what do you think is the problem?
My Samsung J5 Prime wouldn’t boot or charge. Followed your troubleshooting guide and I’m back in business. Thanks so much for your easy-to-follow help guide.
Samsung J5 Prime is my phone. i was just watching youtube then all of the sudden my phone shut down then it wont turn on nor charge anymore? how can i fix this please thankxxx.. 🙁