Samsung Galaxy Note 5 Email Guide: Setup, Add, Manage, Compose, Send & Delete Email Accounts
This guide will teach you how to set up and manage different types of email accounts using the stock email app on the new Samsung Galaxy Note 5 (#Samsung #GalaxyNote5) device. While many smartphone users would prefer to use other standalone email applications like the #Gmail app, on their mobile phones, for some reason, utilizing the pre-installed app is still deemed better by others.
The Galaxy Note 5 email app allows you to send and receive email from your webmail or other accounts via POP3 or IMAP, as well as access your Exchange ActiveSync account for your corporate email needs.
- Set Up Personal Email Account (POP3/IMAP)
- Add Email Account(s) through the Email App on Galaxy Note 5
- Set Up Corporate Email Account (Microsoft Exchange ActiveSync)
- Configure Exchange ActiveSync Settings on Galaxy Note 5
- Compose and Send Email on Galaxy Note 5
- Open and View Email Messages on the Galaxy Note 5
- Set/Add Priority Senders on your Galaxy Note 5 Email App
- Delete an Email account
Those who would opt to use the native Samsung app for checking emails on the go with their new Note device, we have prepared a step-by-step (standard) tutorial for your reference in setting up and managing emails on your phone. Feel free to use this guide whenever you need it.
There are several types of email accounts supported by this new Galaxy handset. This means you can set up multiple accounts at one time.
Among the information you need to successfully set up an email account on your new Samsung Note 5 include your user ID (username), password, server name, etc. You may contact your service provider or carrier to ensure you’re getting the correct information for your server settings. By then you can start setting up email(s) on your new device.
Before we go any further, if you have issues with your new phone, visit our Samsung Galaxy Note 5 Troubleshooting page as it contains all problems we already addressed as well as tutorials, tips and tricks. If you can’t find what you’re looking for there, then feel free to contact us by filling up this form.
How to Set Up Personal Email Account (POP3/IMAP)
Set Up your personal email account(s) to your new Galaxy Note 5 and check your inbox via POP3/IMAP account. Here’s how:
- Touch Apps from the Home screen to get started.
- Touch Email. The Email accounts screen will open.
- Type in your email address on the field under Enter sign-in details and then touch the Password field.
- Touch Next to continue.
- Type in your password and touch Sign in to sign in with your Google account.
- When prompted, read and review the Accounts Permissions information and touch Accept to proceed.
- The next screen will give you options to set up email account using either Manual Setup or regular automatic setup.
To manually setup your account, touch Manual Setup. Otherwise, touch Next. If you touch Next, you will let your device try to complete the entire setup process by finding your email server settings automatically.
For this guide, we will go for manual setup, so touch Manual Setup and continue to the next step.
- Touch POP3 Account as your account type since you are trying to set up a personal account on your device.
- Type in your incoming server settings such as username, POP3 server, security type, port, etc. Then touch Next to continue.
Again if you are not sure what information to enter in these fields, please contact your carrier for further assistance.
- Allow your device to connect to the incoming server using the settings you have entered. If it successfully connects to the server, the Outgoing server settings screen will display. Otherwise, you will be prompted to review your server settings and then try again.
- Enter your outgoing server settings including SMTP server, Security type, and port number, then touch Next to continue.
- Allow your device to connect to the outgoing server using the settings you’ve provided. If it successfully connects to the outgoing server, you will be prompted with the Sync settings screen. Select your preferred sync schedule. Mark the checkbox next to “Notify me when email arrives” if you opt to receive notifications every time a new email arrives to your inbox. Otherwise, leave it unchecked and proceed to step 13.
NOTE: If the server settings (for incoming and outgoing servers) you’ve entered are incorrect, you will be asked to confirm your settings and retry. Just follow the instructions to get through it.
- When you are done making your selections, touch Next to proceed.
- To finish the account setup, provide a name for your account. You may also enter your name as you want it to appear on outgoing messages.
- Touch DONE to complete the process. By then you should start getting email for the personal email account you’ve setup. Just check your Inbox.
Add Email Account(s) through the Email App on Galaxy Note 5
If you want to add other POP3 or IMAP email accounts directly from the Email App on your Note 5, follow these steps:
- Touch Apps from the Home screen.
- Touch Email to open the Email Inbox screen.
- Touch More to view more options.
- Touch to select Settings.
- Touch Add account.
- Follow the instructions to complete the account set up. Once the email account is successfully added, you will start receiving emails for that account.
Another way to add an Email Account is using the Settings Menu. Just go to Settings->Accounts menu. Here’s how:
- Touch Apps from Home.
- Touch Settings.
- Scroll to and touch to select Accounts.
- Touch the Plus (+) symbol to add an account.
- Scroll to and touch to select Email.
- Enter the Email Address and Password for the email account you want to set up and then touch Next to prompt your phone to attempt a regular email setup and test the incoming and outgoing servers automatically. Otherwise, touch Manual setup and enter your server settings including email type, username, password, server, security type, etc. Choose Manual setup if you have custom settings that you need to configure.
- Select your sync settings and then touch Next.
- Enter a name for your account and a display name for your outgoing emails.
- Touch Done to complete the setup.
Note: You may be required to enter more details if the account type you are trying to set up is not in your phone database. In this case, please get all pertinent information for the email account such as the incoming and outgoing server settings before proceed.
Another way to set up and add more email accounts on your Note 5 is by going through the Apps->Settings->Personal->Accounts menu.
Set Up Corporate Email Account (Microsoft Exchange ActiveSync)
Below are a few simple steps to synchronize your Note 5 with your work/corporate email (Exchange ActiveSync) account and then read, send, and manage emails in the same easy manner as with a personal account. Contacts, calendars, and tasks will also be synced using the Microsoft Exchange ActiveSync server.
Note: You may need to contact your company’s Exchange Server administrator for the required account settings information before setting up a Microsoft Exchange ActiveSync Account on your Note 5 device.
Once you’ve got everything ready, you may start the standard setup process with the following steps:
- Touch Apps from Home.
- Next, touch Settings.
- On the Settings screen, swipe the headings from right to left.
- You should then see three tabs — Device, Personal, and System. Tap the Personal tab to continue.
- Scroll to and touch to select Accounts from the given items.
- Touch the Plus (+) symbol to Add Account.
- Scroll to and touch to select Microsoft Exchange ActiveSync.
- On the next screen, enter your work email address and password. Again if you opt your device to do the regular account setup and automatically search for your Exchange server settings, touch Next. Otherwise, touch Manual Setup.
For this guide, we’ll set up a work email manually, so touch Manual Setup to proceed.
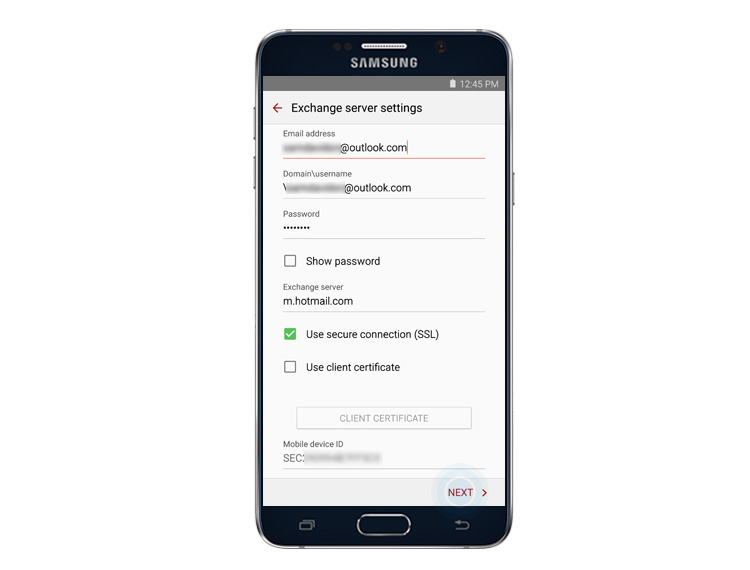
- Enter your server settings (information provided by your company’s Exchange servers administrator), and then touch Next.
Required Information to enter are as follow:
- Email address – your work email address.
- Domain/username – your network domain and username, separated by a backslash (\)
- Password – your network access password. Passwords are case sensitive.
- Show password – option to display (or not) the password as you enter.
- Exchange server – the Exchange server remote email address of your system. This information is obtainable through your company network administrator.
- Use secure connection (SSL) – option for SSL (Secure Sockets Layer) encryption requirement. Just tap to check the box next to this option, if your system requires SSL encryption. SSL is a standard security technology used to establish an encrypted link between a browser and a web server.
- Use client certificate – option to use client certification. Tap the checkbox to enable it.
Hint: You will be prompted to confirm your settings and retry, if your phone cannot find the additional details required to complete the setup process.
- The Activate Email screen will display. Read and review the prompted information and touch OK to proceed.
- Configure the sync settings according to your preference and then touch Next when done.
- Enter a name for your account.
- Touch Done to complete the process. You now have successfully setup your work account.
How to Configure Exchange ActiveSync Settings on Galaxy Note 5
There are different options you can set for your corporate Exchange ActiveSync email messages, including sync options, out-of-office messages, account settings, and the like. You can access these settings and configure them when necessary. Here’s how to access Exchange ActiveSync settings on your new Note device:
- Touch Apps from Home.
- Touch Email.
- On the Email Inbox screen, touch More to view more options.
- Touch to select Settings.
- Touch the Exchange ActiveSync account name to view available options. Just tap to select the option(s) you want to configure.
Now that you already have learned how to set up/add email accounts on your new Note device, you may start composing and sending email and see if it works just fine. You can use any of the existing accounts set up on your device in sending emails. To increase productivity, you may attach files like photos, videos, or documents to your email messages.
In case you need further assistance, here are the quick steps to compose and send email using the stock Email app on your Note 5.
How to Compose and Send Email on Galaxy Note 5
- Touch Apps from Home.
- Touch Email to open the Email Inbox.
- If you want to use a different email account, simply tap the account name located at the top of the screen, and then choose another account. Continue to step 4.
Hint: To view multiple inboxes simultaneously, simply tap the account name and then tap Combined inbox to display all messages from all email accounts you have configured.
- Tap Compose to open the Email composition screen.
- Specify the message recipient(s), subject, and compose your message. To attach photos or other files to your email, tap Attach, select a file type, and then tap a file to attach it to your email.
Hint:You can also view more options when composing email messages, to do so, tap More and then select any from the options available.
- Once you’re done with your message and file attachments, tap Send.
How to Open and View Email Messages on the Galaxy Note 5
Email messages can be opened and read directly from the email inbox. The process of reading and replying to an email on your Note 5 is as simple as you do it on your computer. But for the sake of those who are new to Android Email interface, we’ve provided the steps the following steps for reference.
- Touch Apps from Home.
- Touch Email to open the email inbox. The account name on top of the screen will tell which email account inbox is currently used. If you want to switch to a different email account, just tap the account name and select the account you prefer to use.
- Tap on the message you want to open/view.
Hint: To reply to a message, just tap Reply or Reply All.
Email Message Options
Typically, there are four available options when reviewing email messages on your phone.
- Resetting Mail as Unread – to select and use this option, touch and hold a read message, and then tap More-> Mark as unread.
- Deleting Email – to remove a message from the inbox, touch and hold the message, and then tap Delete->Delete. Alternatively, you can directly tap the Trash icon, Delete->Delete, when reading an email.
- Replying to Email Messages – this option is available with an email message open. To use it, tap Reply or Reply all, compose your reply message, and then tap Send.
- Forwarding Email Messages – option to forward a currently opened email. To use it, tap Forward, enter a recipient email, and tap Send. You can also edit or add your message to forward.
More Hints:
- To sort email messages, go to the email account inbox, tap More->Sort by, and then select options for sorting email messages.
- To delete email messages, go to the email account inbox, touch and hold the message you want to delete, and then tap Delete to confirm. You may be prompted to confirm the deletion depending on your settings. If so, just tap Delete to proceed.
How to Set/Add Priority Senders on your Galaxy Note 5 Email App
If you wish to view emails from priority senders right away, just add the email address of the people you want to be tagged as priority senders beforehand. Here’s how:
- Open the stock Email app on your phone.
- Tap Priority senders on the email account inbox.
- Tap the Tap to add priority senders icon.
- Choose a contact to add as a priority sender. Another way to do this is by tapping on the Contacts tab, and then select one or more contacts to add, then tap Done.
By default, messages from priority senders will automatically be shown first in your inbox. If you want to view only emails from priority senders, just tap the Priority senders icon on the email account inbox.
How to Delete an Email account
To stop getting messages for certain account on your phone, you can delete that email account. To delete and email tap Apps->Email. On the email inbox tap More->Settings. Finally, tap the account name you want to delete, and then tap Remove->Remove. The account will then be completely removed from your phone.
Connect with us
We are always open to your problems, questions and suggestions, so feel free to contact us by filling up this form. We support every Android device available and we are serious in what we do. This is a free service we offer and we won’t charge you a penny for it. But please note that we receive hundreds of emails every day and it’s impossible for us to respond to every single one of them. But rest assured we read every message we receive. For those whom we’ve helped, please spread the word by sharing our posts to your friends or by simply liking our Facebook and Google+ page or follow us on Twitter.