Samsung Galaxy S6 Edge Plus Email Guide: How to Setup and Manage Email Accounts
There’s a lot more you can do with the bigger and better Samsung Galaxy S6 Edge Plus (#Samsung #GalaxyS6EdgePlus). Aside from offering you with an immersive entertainment experience through its revolutionary seamless dual edge display, you too can utilize this ingenious device in a variety of clever ways like setting it up for #email and check your emails on the go.
This content highlights the use of the Galaxy S6 Edge Plus stock Email application for sending and receiving emails from your Exchange ActiveSync, POP3 or IMAP, and webmail accounts. And in order to help you make the most of your phone’s stock email application, we offer you this complete guide on how to set up and manage both your personal and corporate email accounts.
Here’s the list of the topics you can find in this post. Click on the link to jump to a section…
- Set Up a Personal Email Account
- Add more email (POP3/IMAP) accounts
- Setup an Exchange ActiveSync email account
- Access and Manage Exchange ActiveSync Settings
- Select a Default Email Account
- Compose and Send Email
- Open and View Emails
- Delete an Email Account
- Sort and Delete Email Messages
- Add Priority Senders
- Find Email Settings
How to Set Up a Personal Email Account on your Galaxy S6 Edge Plus
The Galaxy S6 Edge Plus supports different types of email accounts. You can set up multiple email accounts at one time. The following steps will help you set up your personal email (POP3/IMAP) account manually, and use your phone for checking emails wherever you may be.
Note: Be sure to secure necessary information such as the username, password, and server settings beforehand, so you can get set up successfully.
- Go to the Home screen.
- Touch Apps.
- Touch Email to continue.
- If an Email shortcut is available on the Home screen, just tap it to open the Inbox right away.
- On the next screen, enter your email address on its designated field.
- Touch the Password field and then touch Next to proceed.
- Enter the correct password for your email account.
- Touch Sign In.
- Read and review the permissions and touch the Accept button to continue.
- On the next screen, you may opt to set up your email account manually or automatically. To manually set up your email, touch Manual Setup. Otherwise, touch Next.
Note: If you touch Next, your phone will automatically attempt to set up your email account by finding your email server settings.
- To proceed with this guide, touch Manual Setup instead and continue to step #10.
- You will then be prompted to select the account type for your email. Touch POP3 Account.
- Enter your incoming server settings (email address, username, POP3 server, security type, port, etc.), and then touch Next to continue.
- Wait for your phone to connect to the incoming server using the settings you’ve provided.
- If it successfully connects, you will be prompted with the Outgoing server settings screen. Enter your outgoing server settings and touch Next. Continue to step 13.
- If the incoming server settings you’ve provided are incorrect, you will be asked to review your settings and retry.
- Allow your device to connect to the outgoing server using the settings you’ve entered. It it successfully connects to the server, you will be prompted with the Sync settings screen. Make your selections and touch Next. Proceed to step 14.
- If the information you’ve entered for your outgoing server settings is incorrect, you will be asked to review your settings and retry.
- Enter a name for the email account, and enter your name (signature) as you want it to display on your outgoing messages.
- Touch Done to complete the setup process. By then you should start receiving messages for that email on your phone.
How to add more email (POP3/IMAP) accounts on your S6 Edge Plus
You can add multiple email accounts directly from the stock email application on your phone, even if you’ve already set up another email account. Here’s how:
- Touch Apps from the Home screen.
- Touch Email to open the email inbox.
- Touch More to view more options.
- Scroll to and touch to select Settings.
- Touch Add account on the Email settings screen.
- Follow the onscreen prompts to complete the account setup.
- When the email account is successfully added, you will start getting email for that account on your device.
Alternatively, you can use the Galaxy S6 Edge Plus Settings menu to add an email account. Here’s how:
- Touch Apps from Home.
- Touch Settings.
- Scroll to and touch Accounts.
- To add an account, touch the Add account icon.
- Scroll to and touch Email to open the Email accounts set up screen.
- Enter the email address and password for the email account you want to add.
- Touch Next to proceed with the regular setup. Doing so will let your phone automatically test the incoming and outgoing servers.
- If you opt for manual setup and have all required custom settings to configure, touch Manual setup and enter your server settings such as mail type, username, password, server, security type, etc.
- Choose your preferred sync settings and then touch Next.
- Enter a name for your account and a display name for your outgoing messages.
- To complete the setup, touch Done. You will then start getting emails for the account you’ve added.
Important Notes:
- You will be prompted to enter more details if the account type you want to set up is not in your phone’s database. In this case, you should get all pertinent information for the email account before you proceed.
- To avoid email setup errors due to incorrect settings, please contact your service provider or network carrier for your incoming and outgoing server settings verification before you proceed with manual setup.
How to Set Up an Exchange ActiveSync email account on your Galaxy S6 Edge Plus
If you want to keep posted with all the latest at work even when you’re at home or somewhere else, then you should set up your work/corporate email on your new smartphone. Follow these steps to sync your corporate email including calendars, contacts, and tasks to your S6 Edge Plus using the Microsoft Exchange ActiveSync server.
- Touch Apps from the Home screen to get started.
- Touch Settings.
- On the Settings screen, touch Personal to view more options.
- Scroll to and touch Accounts.
- Touch Add account on the Accounts screen.
- You will be prompted with a list of account types available. Scroll to and touch Microsoft Exchange ActiveSync.
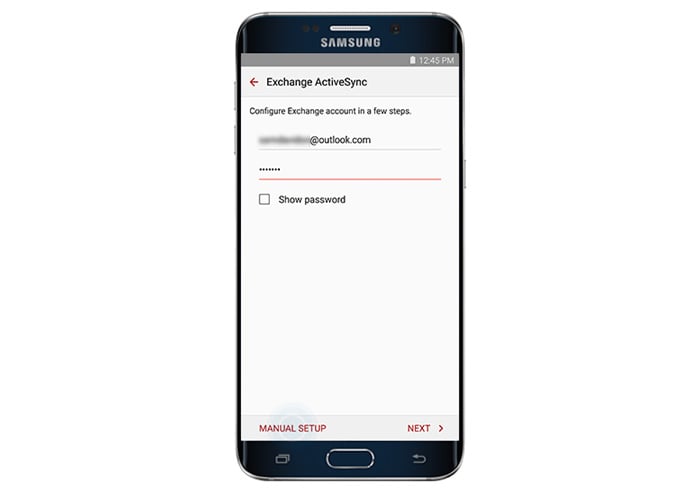
- On the next screen, you will be asked to configure your Exchange account. Enter your email address and password.
- Touch Next – if you want to proceed with the regular setup. This option will let your device attempt to connect to your Exchange server settings automatically. Follow the onscreen instructions to complete the setup process.
- Touch Manual Setup – if you want to proceed with manual setup.
- To proceed with this guide, touch Manual Setup.
- When prompted with the Activate Email screen, read and review the information, and touch OK to proceed.
- Enter your Exchange server settings and touch Next.
- You will be prompted to confirm your settings and retry entering all required settings if your phone won’t be able to find additional required details to complete the process.
- If necessary, please contact your corporate network administrator for your Exchange server settings information.
- Configure your sync settings as you desire and touch Next to continue to the next screen.
- Enter a name for your account and touch Done to complete the setup process.
Your Exchange ActiveSync email is now set up so you should already start getting work emails in your inbox. Just wait for your phone to retrieve new emails.
Access and Manage Exchange ActiveSync Settings
There are a number of Exchange ActiveSync Email features you can configure on your phone. Here’s how to set options for your corporate Exchange ActiveSync email messages, such as sync options, out-of-office messages, account settings, and more:
- Touch Apps from Home.
- Touch Email.
- Touch More on the Inbox screen.
- Scroll to and touch Settings.
- Touch the Exchange ActiveSync account name you want to view options from.
- Tap to select any of the options you want to configure for the selected email account. Among the available options include Sync account, Account name, Always Cc/Bcc myself, Signature, Show images, and Sync schedule, to name a few.
How to Select a Default Email Account on your Galaxy S6 Edge Plus
If you have set up multiple email accounts on your phone, you need to choose a default email account. The default account will be the one that’s used when you write and send emails. Here’s how to set a default email for your phone:
- Touch Apps from Home.
- Touch Email.
- On the Inbox screen, touch More.
- Touch Settings to continue.
- Touch Set default account.
- Touch the email account you want to use as default.
- Touch Done to save the changes.
How to Compose and Send Email on your Galaxy S6 Edge Plus
Now that you’ve already set up your email account(s) on your device, you can start composing and sending email using your default account or any of the accounts set up. You can include photos, videos, or documents as attachments to your email messages to increase your productivity. Here’s how:
- Touch Apps from Home.
- Touch Email to open the inbox screen.
- Touch the account name on top of the screen if you want to switch to a different email account.
- To view multiple inboxes at once, touch the account name at the top of the screen and then touch Combined inbox to view messages from all the email accounts you’ve set up on your phone.
- Touch Compose to open the email composition screen to type your message.
- Specify the message recipient(s), subject, and compose your message.
- Touch Attach, and then touch to select a file to attach to your message.
- To view more options when composing email messages, touch More and select an option.
- When you’re done composing your message, touch Send to send it.
How to Open and View Emails on your Galaxy S6 Edge Plus
You will know if an email arrives when you see the New Email icon appears in the status bar. Here’s how to open and view new email messages on your device.
- Open the notification panel by dragging the status bar down.
- Tap the new message to open from the notification panel.
- If you have more than one new email messages, tap the notification to open the email inbox and then tap a message to open and read it.
Here’s another way to open and read email messages directly from the email inbox.
- Touch Apps from Home.
- Touch Email to open the inbox screen.
- Tap the message you want to view.
- To reply to the message, tap Reply or Reply All.
You can use any of the following options to manage email messages in your inbox:
- Resetting Mail as Unread – this option is used to mark any emails you’ve opened as unread. To mark a message you’ve read as unread, touch and hold the message and then touch More, then select Mark as unread.
- Deleting Email – this option is used to remove any unwanted email messages or messages that are no longer needed on your inbox. To delete a message from the Inbox, touch and hold the message, select any additional messages (when necessary), and then tap Delete->Delete, to confirm deletion. Alternatively, you can just tap the trash icon, and tap Delete when reading an email.
- Replying to Email Messages – this option is used to compose your reply message. To use this open, open an email message, and then tap Reply or Reply all, start composing your reply message and then tap Send when done.
- Forwarding Email Messages – this option is used to forward a message to another recipient. To use it, open an email message, tap Forward, enter a recipient, and enter additional message (if necessary), and then tap Send. The message will then be forwarded to your specified recipient(s).
How to Delete an Email Account on your Galaxy S6 Edge Plus
If you no longer wish to receive messages for a specific account, then just delete that email account from your phone. If you need help, here’s how to do it:
- Touch Apps from Home.
- Touch Email.
- Touch More to view additional options.
- Scroll to and touch Settings.
- Touch the account name you want to delete.
- Touch Remove -> Remove to confirm deletion of the selected email account.
How to Sort and Delete Email Messages
Follow these steps to sort email messages in your inbox:
- Open your email inbox.
- Tap More to view more options.
- Scroll to and tap Sort by.
- Configure options for sorting email messages according to your preferences.
To delete email messages, follow these steps:
- Open the email account inbox.
- Touch and hold the message you want to delete. Tap to select more emails to delete if necessary.
- Touch Delete.
You may be prompted to confirm the deletion by tapping Delete, depending on your settings.
How to Add Priority Senders
You can also tag messages from priority senders if you want. All emails from priority senders will automatically be displayed first on your email inbox. A Priority Senders icon will show in their email’s subject line.
Here’s how to add priority senders on your Edge Plus:
- Open the email inbox.
- Touch Priority senders on the inbox screen.
- Touch the Tap to add priority senders icon.
- Choose a contact you want to tag as a priority sender. Alternatively, you can go to the Contacts tab and select one or more contacts to add, and then tap Done.
- If you want to view only emails from priority senders, just open the email account inbox, and then tap the Priority senders All messages to show are from only from priority senders.
How to Find Email Settings on your Galaxy S6 Edge Plus
Follow these steps to find email settings you want to configure on your new phone:
- Touch Apps from Home.
- Touch Email.
- On the Inbox screen, touch More to view more options.
- Scroll to and touch Settings to get to the Settings menu.
- Tap the email account.
- Scroll to and tap Incoming server settings. The incoming email settings will then be displayed. Review your settings and make some changes if necessary.
- Touch Done when you’re finished making changes on your email settings.
Connect with us
We are always open to your problems, questions and suggestions, so feel free to contact us by filling up this form. We support every Android device available and we are serious in what we do. This is a free service we offer and we won’t charge you a penny for it. But please note that we receive hundreds of emails every day and it’s impossible for us to respond to every single one of them. But rest assured we read every message we receive. For those whom we’ve helped, please spread the word by sharing our posts to your friends or by simply liking our Facebook and Google+ page or follow us on Twitter.