How To Fix Dns_Probe_Finished_Bad_Config Error In Google Chrome
There have been reports from Windows 10 users not being able to access websites on Chrome browser but instead gets the error dns_probe_finished_bad_config. Although the error often appears in other browsers other than Chrome or regardless of the operating system. It is a common error that simply means the DNS or Domain Name System server is unable to resolve the IP address. In this latest installment of our troubleshooting series, we will talk about the recommended troubleshooting solutions that you can try to fix dns_probe_finished_bad_config on Google Chrome in Windows 10.
Fix Dns_Probe_Finished_Bad_Config Error
There are several factors that can cause this error message to appear such as problems with the internet connection (network settings), issues with DNS servers, conflicts with antivirus or firewall to a corrupt system file. If you are getting dns_probe_finished_bad_config error and cannot access a website, try the following solutions below to fix it.
Solution 1: Restart Router
The very first thing that you need to do with dns_probe_finished_bad_config error is to restart the router. This action refreshes and reset the IP settings and network connection.
To do this:
- Disconnect or unplug router from power source
- After about 5 minutes, reconnect or plug router again to power source.
After router start up finishes the process, check if dns_probe_finished_bad_config error in Windows 10 still occurs.
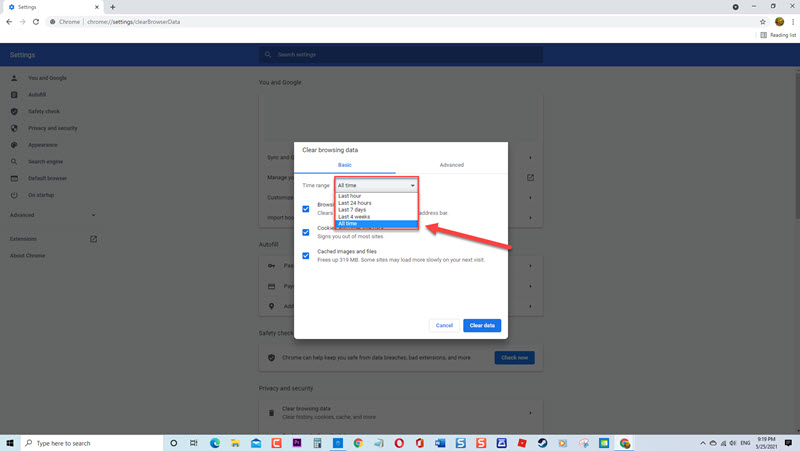
Solution 2: Clear Browser cache
Although this solution is not related to a DNS error, clearing browser cache might somehow help in fixing issues relating to Google chrome browsers. If there are more data stored on browser’s cache it can lead to a slower browsing or users will be unable to access a website thus causing error dns_probe_finished_bad_config . Therefore, try to clear browser data cache.
To do this:
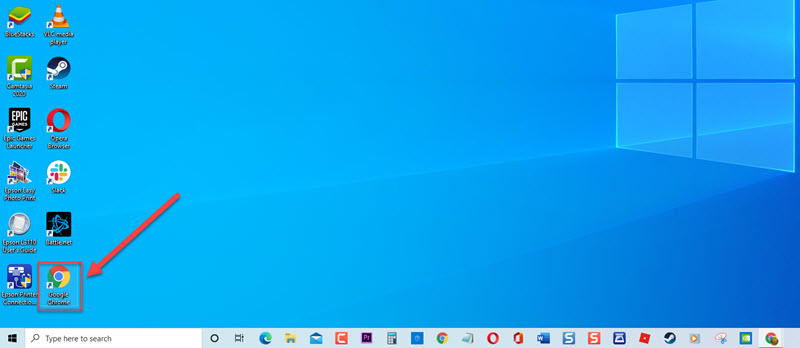
- Open Google chrome

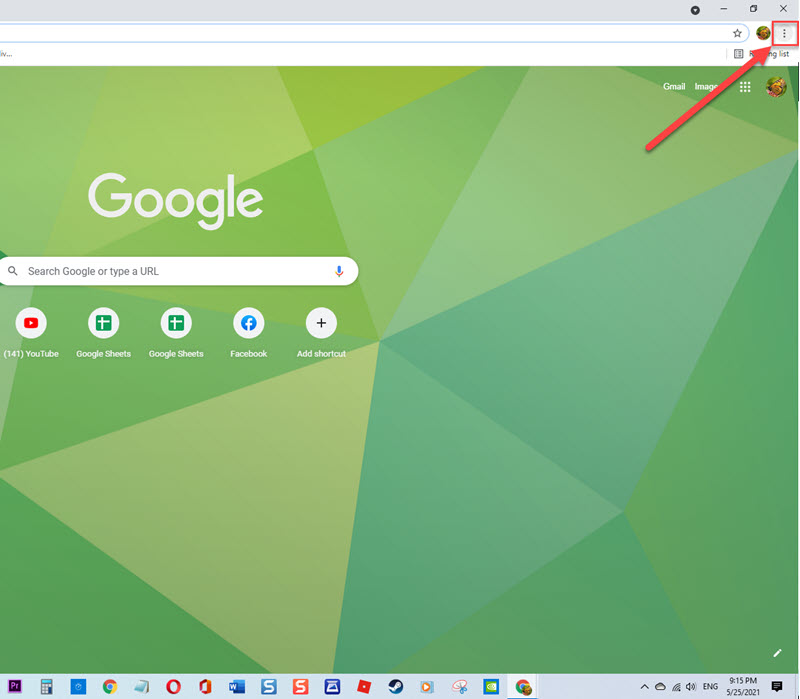
- Click on the 3 vertical dots located at the upper right.

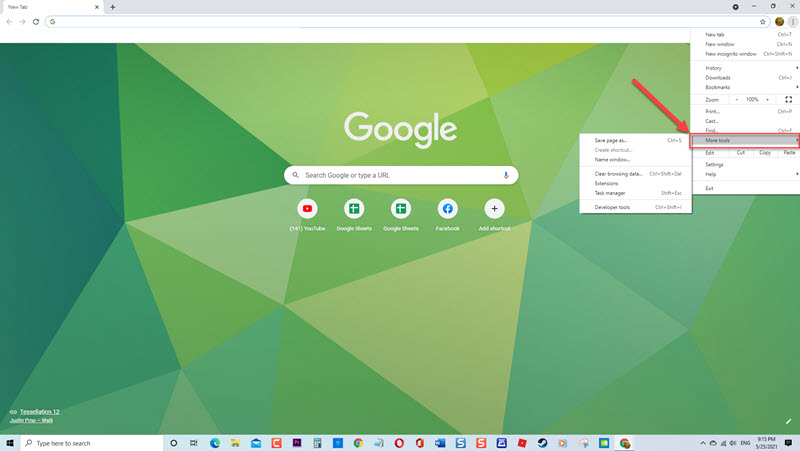
- Click More tools from the drop down menu.

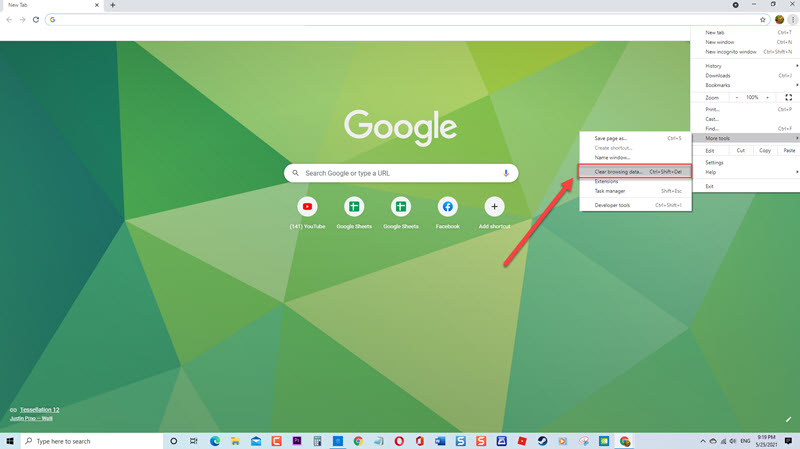
- Click Clear browsing data from the drop down menu, a new window opens

- At new window, you can choose the Time range from when computer started to experience the error. Or you can choose ALL time option.
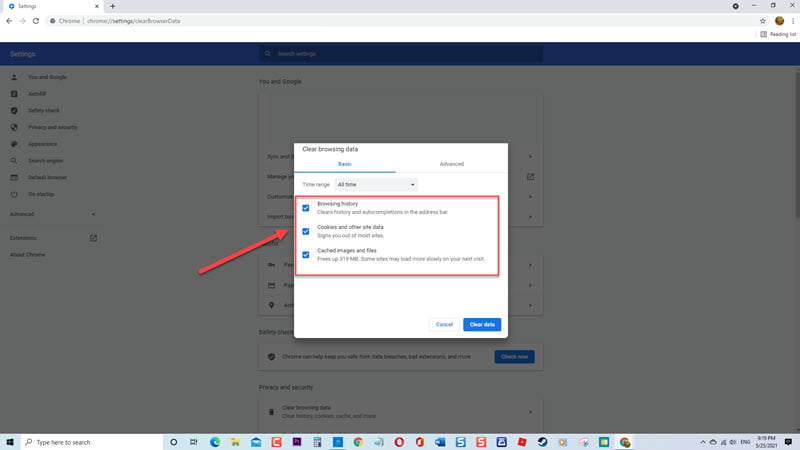
- Make sure all options below time range are checked

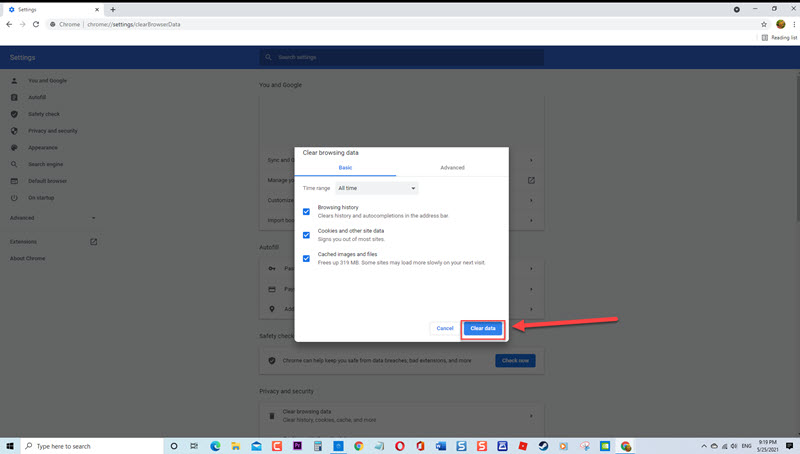
- Click clear data to start clearing browser cache. wait for it to complete.

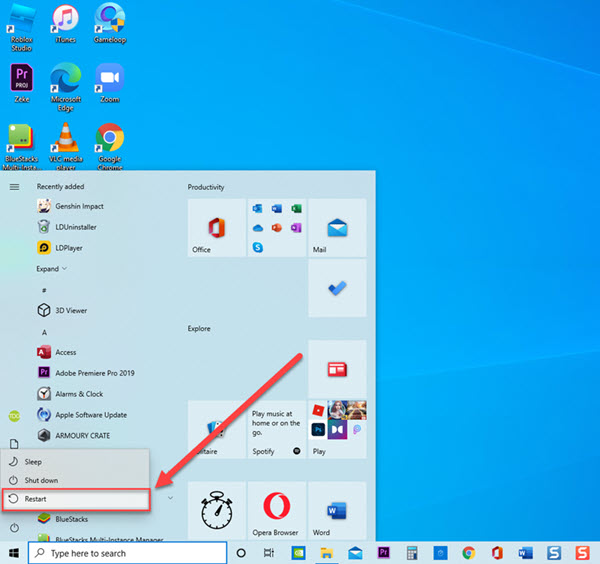
- Restart computer.

Once computer completely reboots, relaunch Google Chrome again and then check if dns_probe_finished_bad_config error in Windows 10 still occurs.
Solution 3: Flush DNS
Since the error dns_probe_finished_bad_config is most likely related to the DNS servers, try to flush DNS cache. This actions refreshes and clears the IP addresses on your computer which can in turn fixes not only DNS server issues but security and internet connection issues as well.
To do this:
- At the search bar located at the lower left, type Command Prompt
- Right click on Command prompt result and click Run as Administrator from the drop down menu. This will open command prompt with administrative access.
- At Command Prompt window, type the following commands and press Enter after each command.
- Type ipconfig /flushdns and press Enter
- Type ipconfig /release and press Enter
- Type ipconfig /renew and press Enter
- Restart Computer
Once computer completely reboots, relaunch Google Chrome again and then check if dns_probe_finished_bad_config error in Windows 10 still occurs.
Solution 4: Change to Google DNS server Manually
Changing the DNS server manually and using Google’s Public DNS server provides users a more faster and secured browsing experience. To fix dns_probe_finished_bad_config error, try to change the DNS settings on Internet Protocol Version 4 (TCP/IPv4) and check if the error will be resolved.
To do this:
- Press Windows key + I on your keyboard to open Windows settings section.
- Inside Windows Settings, click Network & Internet
- Under Advanced network settings of network status, click Change Adapter options. A new window opens.
- Inside Network Connections window, right click on your network and click Properties from the drop down menu.
- Under Wi-Fi Properties, click Networking tab.
- Scroll down and double click Internet Protocol Version 4 (TCP/IPv4) to open it.
- Click on the option “Use the following DNS server addresses”
- Input 8.8.8.8 as Preferred DNS server
- Input 8.8.4.4 as Alternate DNS server
- Click OK to apply changes made
- Click OK to exit Wi-Fi Properties
Relaunch Google Chrome again and then check if dns_probe_finished_bad_config error in Windows 10 still occurs.
Solution 5: Temporarily Disable Antivirus Program
If there instances when the antivirus programs or third party antivirus on your computer can cause conflict with access the website on Chrome or other browsers. To check if this is the culprit, try to temporarily disable antivirus program. If after disabling the antivirus fixes the error, it is then recommended to change to another antivirus program and or reinstall antivirus.
For Windows Defender:
- Click on the Start or Windows logo key located at the lower left
- Click Settings an icon that looks like a gear to open Windows Settings section.
- At Windows settings section, click Update and Security.
- Click Windows security at the left pane.
- Click Virus and Threat protection from the protection areas section. A new window opens.
- At the new window, click Manage settings from Virus and Threat Protection settings.
- Toggle OFF Real-time protection.
- Restart your computer.
For AVG:
- Double-click on AVG icon located at on system tray
- Click Temporarily disable AVG protection.
- Select how long you want AVG to be turned off and whether you want AVG to disable its Firewall too. Click on OK to disable the antivirus program.
For McAfee:
- Double-click on McAfee icon located at on system tray.
- Click Exit.
- A dialog box warning you that McAfee protection will be turned off, click Yes to disable the antivirus program.
For Avast:
- Double-click on Avast icon located at computer system tray.
- Click Avast shields control.
- Locate the options to disable the program – the options are to disable it for 10 minutes, an hour, until the computer is restarted or permanently (until you yourself turn it back on). Select whatever option suits you best and use it to disable the program.
Relaunch Google Chrome again and then check if dns_probe_finished_bad_config error in Windows 10 still occurs.
Solution 6: Update Network drivers
An outdated network drivers can cause issues on your computer such as getting error dns_probe_finished_bad_config . To fix this, make sure you have the latest network drivers by updating.
To do this:
- Press Windows key + R on your keyboard to open RUN dialog box.
- At RUN dialog box, type devmgmt.msc and press Enter or click OK to open the Device Manager window.
- At Device Manager, click Network Adapters to expand it.
- Under Network driver, right click on your driver and click Update Driver from the drop down menu.
- Click Search Automatically for drivers. Windows will now automatically search for available updates for your network driver.
- If after updated drivers are already installed, click Close to exit.
Check if dns_probe_finished_bad_config error in Windows 10 still occurs.
Solution 7: Delete Temporary Files
Since browsers saves temporary files, there are instances when these files gets corrupted thereby causing issues such as error dns_probe_finished_bad_config when trying to access a website. Try to delete the temporary files on your computer.
To do this:
- At the search bar located at the lower left, type %temp% and press Enter.
- Press CTRL + A on your keyboard to highlight everything on Temp Folder.
- Right click on the highlighted entries and click Delete from the drop down menu.
- Exit Temp Window.
Check if dns_probe_finished_bad_config error appears in Windows 10 still occurs.
Solution 8: Update Chrome Browser
Lastly, Update Chrome browser. There’s a possibility that an outdated versions of the browser can cause issues when accessing a website. Therefore it is recommended to regularly check for the latest updates for the browser and install them if there are any.
To do this:
- Open Chrome browser.
- Click on three vertical dots located at the upper right corner. Alternatively, at the address bar of chrome browser, type the following and press Enter “chrome://help”. This step also updates the chrome browser automatically.
- Choose Help from the drop down menu.
- Choose About Google Chrome from the drop down menu.
- At new Window, Chrome will automatically check for updates.
- After chrome finished checking for update and is up to date, Close the browser.
Check if dns_probe_finished_bad_config error appears in Windows 10 still occurs.
After following the solutions mentioned, you will successfully fix dns_probe_finished_bad_config in Windows 10. For more troubleshooting videos, feel free to visit our TheDroidGuy Youtube Channel.
Also read: