How to boot your Samsung Galaxy J5 in Safe mode, Recovery mode and wipe cache partition, do resets [Tutorials]
- Understand the importance of safe mode in your Samsung Galaxy J5 and learn how to actually bring your device to boot to its diagnostic state.
- Learn how to start your phone up in Recovery mode and delete all the system caches so they will be replaced with new ones.
- Learn how to do the Factory Reset and understand how it’s used and when should you do it.
- Lastly, learn how to do the Master Reset, how it differs from the factory reset and what you should do before and after.
As an owner of a phone with decent specs and firmware, it is imperative you know the basic procedures that may help you whenever you encounter problems with it. For instance, if you’re experiencing issues brought about by some of the apps you downloaded from the Play Store, it is imperative you know how to boot your phone in safe mode to isolate the problem right away.
Other procedures I’ve included in this post include how to bring your phone to start in Recovery Mode and what you can do when you’re in it. While there are other things you can do when you’re in Android System Recovery screen, the most popular procedures you can do are wiping the cache partition and doing the master reset. So, continue reading to learn how to do these things and understand why they’re so important.
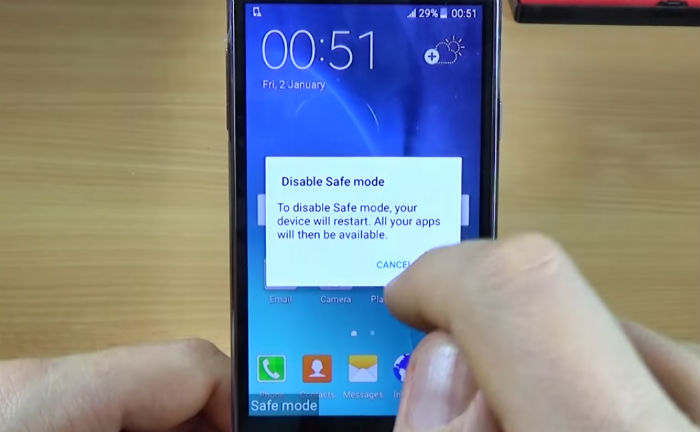
How to enable Safe mode on your Samsung Galaxy J5
Booting your phone in safe mode simply means you’re running the device in its diagnostic state wherein all third-party apps and services will be temporarily turned off. This will immediately give you an idea as to whether the problem is caused by a third-party app or a built-in one. But aside from that, this is also the procedure you should try doing in case the phone cannot boot up successfully. While it rules out the possibility of third-party elements causing issues and conflicts in the system, you can continue using your device as everything works perfectly fine.
There are two ways you can enable safe mode in your Galaxy J5. The first one will be helpful enough if your device isn’t booting up successfully.
- Turn your Galaxy J5 off.
- Press and hold both the Volume Down button and the Power key.
- When the Samsung logo displays, release the Power key but continue holding down the Volume Down button.
- Allow the phone to start up while holding down the Volume Down button; it may take a few seconds to complete.
- When the phone reaches the home screen and you can see “Safe mode” in the lower left corner of the screen, then it’s successful. Otherwise, repeat the steps from the top.
The next one is something you can do when your phone is working fine or can boot up successfully…
- Press the Power key to display power options on the screen.
- Touch and hold “Power off” option until “Restart to safe mode” prompt appears, then release.
- Tap Restart.
- The restart process may take up to 45 seconds to complete.
- Upon restart, Safe mode appears in the lower-left of the unlock/home screen.
If you’re dealing with app-related problems, this is the procedure you should have knowledge about and it should be the first procedure you should do in a bid to determine the cause of the problem or just to work around it.
You will still be able to continue using your apps, even third-party ones, when your phone is in this mode. In fact, you can continue using your phone normally except for some features but when you’re in a situation wherein you badly need to use your phone but it’s having a problem, then this procedure should be able to help you.
How to wipe the cache partition of your Samsung Galaxy J5
Android creates caches for features, services and apps it uses. These files are temporary and deleting them won’t cause any problem or conflict. However, when they become obsolete or corrupt and the system continues to use them, that’s when issues occur.
You don’t have access to individual caches nor would you be able to determine which file is for the specific service or app. Your only way to replace them is to delete all of them at once so that when the phone reboots, new caches will be created to replace them. You can do so by booting up your phone in recovery mode and wiping the cache partition and this is how you do it in your Galaxy J5:
- Turn off your Galaxy J5.
- Press and hold the Volume Up key and the Home key, then press and hold the Power key.
- When the device logo screen displays, release only the Power key
- When the Android logo displays, release all keys (‘Installing system update’ will show for about 30 – 60 seconds before showing the Android system recovery menu options).
- Press the Volume down key several times key to highlight ‘wipe cache partition.’
- Press the Power key to select.
- Press the Volume down key to highlight ‘yes’ and press the Power key to select.
- When the wipe cache partition is complete, ‘Reboot system now’ is highlighted.
- Press the Power key to restart the device.
- It will take a little longer for the phone to reboot after this procedure but wait until it reaches the home screen before using it.
If you are troubleshooting your phone for a possible app-related issue, observe closely if the problem still occurs after this procedure and if so, then you have no other choice but to do the reset.
How to Factory Reset your Samsung Galaxy J5
This procedure will bring your device back to its factory default settings but it also means deleting every bit of personal data and files you may have saved or accumulated after months of use. But that’s not a problem though, all you need to do is backup all things you don’t want to lose.
A reset is very effective in dealing with problems caused by applications or even the firmware. It may even fix issues caused by a minor hardware glitch or failure. However, more often than not, it’s recommended to be the last resort due to the hassle it entails in backing up data and files and restoring them after. Now, this is how you do the factory reset via the Settings menu…
- From the Home screen, tap the Apps icon.
- Tap Settings.
- Tap Backup and reset.
- If desired, tap Back up my data to move the slider to ON or OFF.
- If desired, tap Restore to move the slider to ON or OFF.
- Tap Factory data reset.
- Tap Reset device.
- If you have screen lock turned on, enter your PIN or password.
- Tap Continue.
- Tap Delete all.
If you’re troubleshooting your device, don’t install any apps after the reset. Instead, observe your phone to know if the problem still exists even if it’s running without any interference from third-party elements.
How to Master Reset your Samsung Galaxy J5
The master reset is basically just like the factory reset but it does a thing or two that will thoroughly rid of all possible corrupt caches and data from your phone. It will also delete all your files and data so backing up is always recommended if possible. Also, make sure you know your Google ID and password because if not, you will be locked out of your device after the reset and you may not be able to regain access to it. So, before you actually do this procedure, we suggest you disable anti-theft feature:
- From the Home screen, tap the Apps icon.
- Tap Settings.
- Tap Accounts.
- Tap Google.
- Tap your Google ID email address. If you have multiple accounts setup, you will need to repeat these steps for each account.
- Tap More.
- Tap Remove account.
- Tap REMOVE ACCOUNT.
After this, follow these steps to do the master reset:
- Turn off the device.
- Press and hold the Volume Up key and the Home key, then press and hold the Power key.
- When the device logo screen displays, release only the Power key
- When the Android logo displays, release all keys (‘Installing system update’ will show for about 30 – 60 seconds before showing the Android system recovery menu options).
- Press the Volume down key several times key to highlight ‘wipe data / factory reset.’
- Press Power button to select.
- Press the Volume down key until ‘Yes — delete all user data’ is highlighted.
- Press Power button to select and start the master reset.
- When the master reset is complete, ‘Reboot system now’ is highlighted.
- Press the Power key to restart the device.
Again, in case you’re troubleshooting your device, don’t install anything until you’re satisfied the problem is fixed.
How do I get rid of this “verify account ” after I’ve rebooted to factory mode.Please help me.
How do I reset my device without verifying my account, I did reboot to safety factory but it continues to ask me to verify account. Please help me.
I have a problem with my galaxy j5 )2016(. I tried to root my phone by downloading odin3 3.11.1 and super SU and the file I put was recovery.tar.md5 (on the AP) through my pc, It allowed me ‘PASS’ then I remove my battery and replaced again and I holded Volum Up+Home+Power and release the Power button for access to Recovery Mode but it didnt let me, and now it is just fixing on the logo and no further turn on to the recovery mode. Id like to reset my phone, I already bucked up on Google before the rooting so how can I unlock this problem and reset my phone or continue to the Recovery Mode? thank you for your help
i have downloaded the master start up, got as far as setting my internet, but it will not allow my modem to connect to my phone, please assist me on this problem
Aftte downloading my phone says CANT OPEN FILES why?
hi guys I also master reset my phone as well lost all apps data ect now my phone will not boot uo its stuck in checking network mode ive done the turn on hold power key and volume down button thing and still nothing happening
hi there guys.. I have j5 samsung and I factory reset my phone.. after that it didn’t open again.. i try to hard reset it but it never show.. I even open the down load mode or the software upgrade and its the only one that work.. so i download odin3.11.1 and try to update it.. but it didnt work at all.. so what should i do?
My phone keeps saying not registered on system when I try to make calls and I can’t send texts either, any info please?