Samsung Galaxy Note 5 Camera Guide: Working with Camera Settings, Photos and Videos
In this post, we’ve demonstrated different operations every user can do with the Galaxy Note 5 (#Samsung #GalaxyNote5) camera app and make the best out of it.
The new Samsung Galaxy Note 5 device comes with a 16-megapixel main camera with optical image stabilization (OIS) and a 5-megapixel selfie shooter up front while the rear camera protrudes so slightly at the back of the phone. Both the rear and front cameras now have impressive wider lenses, allowing more light in and is deemed perfect for low light shots. Encompassing such a wide field caters to both casual users and enthusiasts.
Similar to the Galaxy S6, the camera app on the Note 5 highlights two modes — the auto mode and the manual ‘Pro’ mode. With the manual pro mode, you can control the phone’s shutter speed. You can use the usual Quick Launch shortcut by double-clicking the Home key, allowing you to start the camera app from anywhere and start capturing sharp pictures and videos.
- Camera App Controls and Options
- Manage Camera Settings
- Manage Camera Modes
- Download More Camera Modes
- Taking Pictures and Recording Videos
- How to Record a Video
- How to Use Both Front and Rear Cameras Simultaneously
- How to take a Selfie
- How to take a Wide Selfie
- How to Record a Video Collage
- How to search your captured photos and recorded videos
- How to share photos and videos
- How to Broadcast Live Video
If you found this post because you were searching for solutions to your problems, then visit our Galaxy Note 5 Troubleshooting page. It contains a list of issues we already tackled. You may also contact us by filling up this form and hitting submit once finished.
The Galaxy Note 5 Camera App Controls and Options
The viewfinder screen on the Note 5 camera allows you to view your subject and access various controls and options you can use. Among its default sections and items include the shortcuts menu as well as icons to access camera settings, gallery, record video, capture picture, switch cameras and shooting modes.
- Shortcuts menu – this is where you can access frequently-used camera settings to customize captured photos and videos. Below are the camera settings accessible via the shortcuts menu:
- Effect – used for adding a special graphical effect to an image/video
- HDR Auto – used for saving an image in HDR or rich tone only
- Timer – used for taking time-delayed photos or videos
- Flash – can be activated or deactivated if necessary. Flash options you can toggle through the rear camera include On, Auto, and Off.
- Picture size -used for changing picture resolutions. The front and rear cameras also have separate settings available.
- Camera settings – represented by a wheel-like icon. It’s used for opening the rear camera settings menu and allows you to change more camera settings.
- Gallery – used for viewing photos or videos through the Gallery app.
- Record video – used to start recording a video.
- Capture picture – used for taking a picture.
- Switch cameras – used to switch between the front and rear cameras.
- Shooting modes – used to access and select different shooting modes.
Manage Camera Settings on your Galaxy Note 5
You can manage your phone’s camera settings to make it does the way you want. Here’s how:
- Quickly press the Home key twice from any screen. Doing so will open the camera viewfinder screen.
- On the viewfinder screen, tap the Settings icon (wheel-like image) on the lower left corner. The camera settings screen opens. Here you can adjust any of the camera options as you desire.
- To access all available options, scroll to the bottom of the screen.
- If you want to turn on a feature, just tap the slider next to an option to enable it. For this guide, tap the slider next to Voice control to enable voice control while taking pictures or recording videos. Follow the onscreen instructions to complete the process. Do the same on other options to customize how you want your camera to function.
- Tap Reset settings to revert all settings to their default configurations.
Manage Camera Modes on your Galaxy Note 5
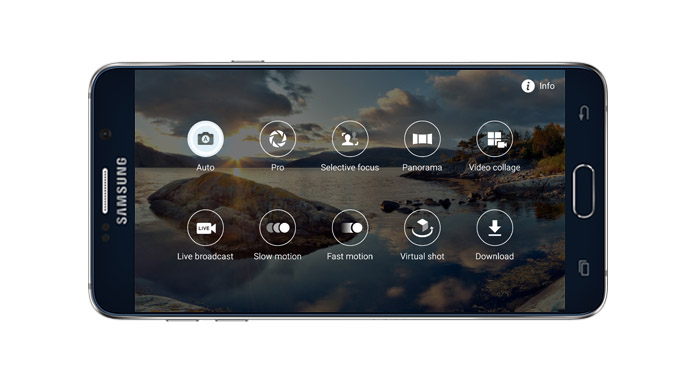
There are many predefined photo shooting modes you can use on your Galaxy Note 5. These modes are existing features of your phone’s camera app. If you want to view descriptions for each mode, just open the Mode menu. Here’s how to do it:
- Quickly press the Home key twice from any screens to open the camera app viewfinder screen.
- Touch Mode icon on the lower-right corner of the viewfinder screen.
- You will be prompted with the different shooting modes on the next screen. Tap the Info (i) icon on the upper-right corner of the screen. The next screen will then display descriptions for each shooting mode.
- Scroll to view the descriptions of each mode.
- To return to the Mode menu, tap the Back key.
- Tap a mode to select it.
Download More Camera Modes for your Note 5
If you are not satisfied the pre-installed camera mode effects, you can download other modes to your device. Follow these steps:
- Open the Camera app viewfinder screen by quickly pressing the Home key twice from any screen.
- Tap the Mode icon.
- Tap Download.
- Scroll to and tap to download the desired mode.
- Tap Install to proceed with download and installation of the selected mode.
- If prompted, tap Accept and Download to proceed.
- Wait until the installation is complete.
- Once finished, double-tap the Back key to go back to the camera viewfinder screen.
- Tap the Mode icon.
- Scroll to and tap the camera mode you’ve recently installed to use it.
Taking Pictures and Recording Videos on the Galaxy Note 5
The pictures captured using your phone’s camera app will be saved as JPEG files (.jpg). Videos on the other hand are saved as MPEG4 files (.mp4).
Capturing photos with the Galaxy Note 5 built-in camera is as usually easy as choosing a subject, aiming your phone, and touch the Camera shutter button.
- Tap Camera from the Home screen. The camera viewfinder screen opens.
Hint: If you want, you can also select a shooting mode first by touching Mode and then select the desired shooting mode. By default, it is set to Auto mode.
- Aim the camera at your subject. You can zoom in or out by pinching on the screen.
- Tap the Camera button (capture picture icon) on the viewfinder screen whenever you’re ready to take a picture. As the shutter clicks, the picture is captured and stored on your phone. You can touch and hold the Camera shutter button to take up to 30 successive photos if the timer is off.
- Another way to launch the camera is through Apps->Camera. You can also quickly press the Home key from any screen twice.
- To launch the camera from the lock screen, just swipe the camera icon up from the lock screen.
- If you want to have an overview of your phone’s camera features, you can access the phone settings menu through Apps->Camera->Settings->Help. Just tap to select a topic to learn more.
How to Record a Video on your Galaxy Note 5
Your Galaxy Note 5 can capture videos for you to enjoy and share like videos sized specifically for multimedia messages. Here’s how:
- Tap Apps from Home, or quickly press the Home key from any screen twice.
- Tap Camera to launch the camera viewfinder screen.
You can capture a video at several resolutions. If you want to change the video resolution, tap the Settings icon, tap Video size (rear), and then choose the desired resolution or recording mode.
- To restrict the video size, tap to select VGA and then tap the Back key to go back to the camera viewfinder screen.
- Position your device at the subject.
- Tap the Video capture button to start recording.
- Tap the Stop button to end the video when you’re done.
- Aim the camera at your subject.
- Whenever you’re ready, tap the Record icon to start recording high-quality videos.
- To pause recording, tap the Pause icon.
- To resume a paused recording, tap the Resume Video Recording icon (black circle with red dot at the center).
- To end the recording, tap the End Video Recording icon. The camera will then stop recording and the video is captured and saved to your device.
How to Use Both Front and Rear Cameras Simultaneously
The Galaxy Note 5 also features dual camera — a photo shooting mode you can use to capture a picture postcard with both the front-facing and rear-facing camera simultaneously. Here’s how to use this feature:
- Quickly press the Home key twice from any screen to open the camera viewfinder screen.
- Tap the Mode icon.
- Scroll to and tap Dual Camera.
- In case, Dual Camera mode is not available, you can download it from the Galaxy Apps. Just scroll to and tap Download from the Mode menu and follow the prompts to complete the download and installation process.
- You will see a thumbnail view taken from the front camera and the border choices are displayed at the bottom of the camera viewfinder screen. Just tap a desired thumbnail to select it.
- To hide the border choices, simply tap the arrow down.
- Tap and drag the selected thumbnail to move it to a new location and then release it.
- When a white frame shows around the thumbnail, tap and drag a corner of the white frame to reduce or enlarge the size of the thumbnail.
- When you are satisfied with the size, tap anywhere outside the thumbnail to exit the edit mode and proceed with taking a picture.
- Position your phone at the subject and tap the Camera shutter button to capture the image.
How to take a Selfie on your Galaxy Note 5
Selfies are now becoming a trend in social networks especially on Facebook. If you haven’t yet tried it on your new Note 5 device because you’re new to Android interface, here’s a quick guide for you.
- Open the camera viewfinder screen by quickly pressing the Home key twice from any screen.
- On the viewfinder screen, tap the Switch camera icon to switch between the front-facing and rear-facing cameras.
- You will then see a yellow circle on the screen, indicating that the primary face(s) in the selfie are in focus. To capture the photo, tap anywhere on the screen.
- Alternatively, you can touch the heart rate sensor on the back of the phone to capture a selfie photo.
How to take a Wide selfie on your Galaxy Note 5
Your phone’s camera app also features a wide selfie mode for you to fit more people into your selfie. With this feature, you can take wide-angle shots, allowing you to pan your phone right and left to capture more of the scene. In case you need help, here’s how to take a wide selfie on your Note 5:
- Open the camera viewfinder by quickly pressing the Home key twice from any screen.
- Tap the Switch camera icon on the viewfinder screen, to switch between the front-facing and rear-facing cameras.
- Tap the Mode icon to proceed.
- Tap Wide selfie to enable it.
- Position your phone at the subject.
- Tap the Camera shutter button when you’re ready.
- Now, pivot your phone slowly to the right.
- When you’re done, tap the Stop button. If you’re not satisfied with the output, you can repeat the same procedure until you get the best output.
How to Record a Video Collage on your Note 5
You can use your Note 5 device to capture up to four successive videos in Video collage and utilize them to make short collages along with slow-motion videos to share through your social networking accounts. Here’s how:
- Quickly press the Home key twice from any screens to launch the camera viewfinder screen.
- Tap the Mode icon.
- Tap Video collage from the available camera modes.
- Position your phone at the subject, and then tap the Video capture button to start recording your video.
If you need to pause while recording, tap the Pause button or wait six seconds until all four successive videos are captured.
To start recording each new video clip, you need to tap the Video capture button.
- Once you’re done, tap Save to save your video collage. It will be saved to your phone’s Gallery in the Camera album.
To add the date and time across the video collage, tap End tags. To add background music to your video collage, tap the button to the right of BG music.
- To go back to the camera viewfinder screen, tap the back arrow on the upper left of the screen.
How to search your captured photos and recorded videos on your Note 5
All of the photos and videos taken using the camera application are stored on the My Files app, thus, this is where you should go if you want to access your previously saved photos and videos. Here’s how to get to this directory.
- Tap Apps from the Home screen.
- Scroll to and tap My Files.
- Tap Images to view all the photos and Videos to view all available videos on your phone.
- For this guide, tap Images.
- A new screen that contains all stored images on your phone will show. Tap Search to quickly search for your desired photo. Enter a keyword and then tap a photo filename to view it whole.
- Do the same steps when searching for videos.
How to share photos and videos on your Note 5
If you think you’ve perfectly captured a significant scene or record an impressive video and you want to share it to others, you can do so using various applications on your Note 5. Photos and videos received in messages, as well as those downloaded from other sources can also be shared from your phone. Here’s how:
- Open the camera viewfinder screen by quickly pressing the Home key twice from any screen.
- Position your phone at the subject and tap the Camera shutter button to capture a photo.
- To view your photo, tap the Gallery icon.
- Tap the Share icon beneath the screen.
- Swipe to the left and tap the app you want to use for sharing your photo.
- Follow the onscreen instructions to complete the photo/video sharing process.
How to Broadcast Live Video using the Galaxy Note 5 camera app
The Note 5 camera app also allows you to broadcast your video recording live over YouTube via Live broadcast mode. With this mode, you can share the link to your broadcast with anyone in your contacts list for them to watch your video in real time. In case you want to give this interesting feature a first try on your new phablet, here’s how:
- Open the camera viewfinder screen by quickly pressing the Home key twice from any screens.
- Tap the Mode icon.
- Scroll to and tap Live broadcast. You will be required to use your Google account to sign in to Live broadcast. Review the disclaimer and tap Agree to proceed.
- Tap the Invite icon on the mid-left corner of the screen. Doing so will let you select people from your contacts list who will get a link to your live broadcast.
- Tap to select the contacts you want to add as recipients and tap Done.
- To start the broadcast, tap the Live button.
- To end the broadcast, tap the Stop button.
- If you want to use the front-facing camera and microphone to narrate the live broadcast with your real-time image and commentary, just tap Rear.
- To share the recorded broadcast via apps such as Messages and Email, tap the Share button.
- Swipe to the left and tap the app you prefer to use for sharing your photo/video.
- Follow the onscreen instructions.
- To share your live broadcast again, tap Share, or tap the X button to exit the Live broadcast mode.
- Tap the Auto button to confirm exit from Live broadcast mode.
More Tips
To produce a perfect photo, you can combine multiple photos at different exposures using the HDR or High Dynamic Range setting. It will help you balance out harsh lighting conditions, backlit photos, high contrast, as well as make the final photo less dark. To use this feature, open the camera app viewfinder screen and tap the HDR icon to toggle between On, Off, and Auto. After that you can start taking a photo to use with HDR on or off. Try it and see how it works in the darkness of the photos.
Connect with us
We are always open to your problems, questions and suggestions, so feel free to contact us by filling up this form. We support every Android device available and we are serious in what we do. This is a free service we offer and we won’t charge you a penny for it. But please note that we receive hundreds of emails every day and it’s impossible for us to respond to every single one of them. But rest assured we read every message we receive. For those whom we’ve helped, please spread the word by sharing our posts to your friends or by simply liking our Facebook and Google+ page or follow us on Twitter.