How To Post Nintendo Switch Screenshots To Facebook/Twitter
Showing off your amazing game screenshots from your Nintendo Switch to your friends has always been easy. Especially most if not all gaming consoles have the feature where you can just conveniently share game highlights through social media accounts such as Facebook and Twitter. This comes in handy particularly for those who already have a collection of shots that they’ve been wanting to share online. If you haven’t tried using this feature yet, then continue reading to learn the steps.
How to Capture and Access Screenshots on Nintendo Switch
For Nintendo Switch user who wanted to learn how to take game screenshots in order to share their game levels or high scores on the web, here’s how to do it:
- Go to the screen you want to capture.
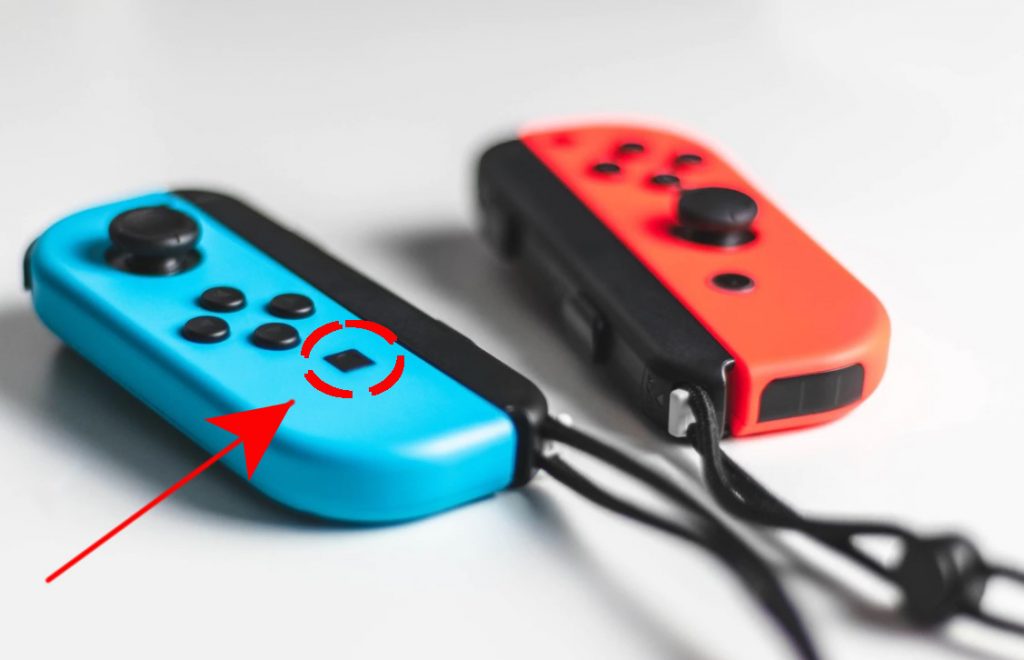
- Press the Capture button found on the left Joy-Con. The screenshot you took will be automatically saved in the Album Folder of your console.
- Access the Home Screen of your Switch
- Select the Album icon located near the System Settings..
- Select the screenshot you want to share. You can also edit any of the images found in your Album Editing and Posting on the screen before sharing.
How to Link Your Social Media Accounts on your Nintendo Switch
Before sharing the screenshots from your Nintendo Switch, you need to link your console to your social media account first. Ensure that your console is connected to the internet and then follow this guide to link it to your Facebook or Twitter account.
- Go to the Home Screen of your Nintendo Switch.
- Select the User Profile found on the upper left of your screen.
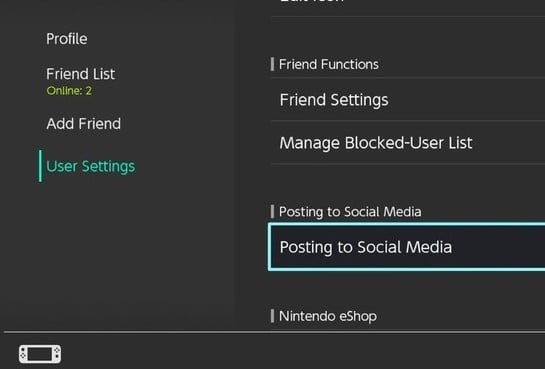
- Select User Settings.
- On the right pane, scroll down and select Social Network Posting Settings.
- Select Link beside Facebook or Twitter.
- Enter the username and password of your Twitter or Facebook account (depending on what social media icon you have selected).
- Select Authorize app to provide permission for your Switch to post images on these accounts. Click Save if you prefer to store your username and password. This will be automatically entered in the social media account you have selected moving forward.
Once you have successfully associated your User’s Profile to your account, you can start sharing your saved screenshots any time you want.
How to Share Screenshots from your Nintendo Switch
Now that you have linked your Nintendo Switch to your Twitter and Facebook accounts, you can begin sharing screenshots on the internet.
- Turn on your Switch and select the Album icon from the Home Screen.
- Select the screenshot you intend to post.
- Tap Editing and Posting or press the A button found on the right Joy-con.
- Tap Post on the screen or press the A button.
- Select your Profile.
- Select Twitter or Facebook whichever you want to post the screenshot. Once selected, you will be directed to the page and can add a message along with the screenshot.
- Tap the Post to Twitter or Post to Facebook button located at the bottom of the screen.
From there, you should be able to see the images you have posted online.
Transfer Nintendo Switch Screenshots to a Computer
Aside from sharing your Nintendo Switch screenshots to your Twitter or Facebook page, you can also transfer these images on your computer too. This is necessary if you are in a situation where the internal memory of your Nintendo Switch or the microSD card inserted is almost full.
Prepare a microSD card reader in case the computer where you want to transfer the screenshots doesn’t have a built-in microSD card reader. Also, you need to copy the screenshots that were stored from the internal memory to the microSD card first before you can transfer the files to your device.
Transfer Screenshots from Internal Memory to the MicroSD card
You can transfer the screenshots from the internal memory on your Switch to a microSD card one by one or altogether.
Transfer All Screenshots at the same time:
- Go to the Home Screen of your Nintendo Switch.
- Select System Settings.
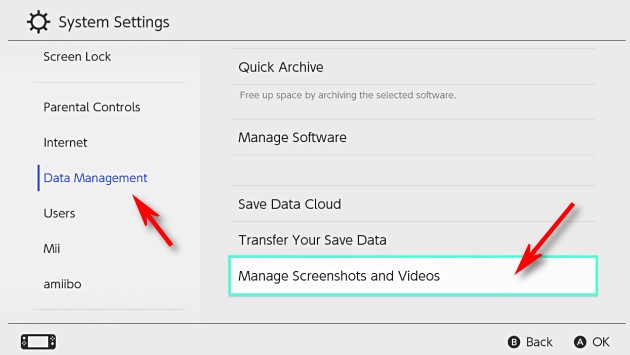
- Scroll down and select Data management.
- On the right pane, scroll down and select Manage Screenshots and Videos.
- Select microSD card as the Save Destination.
- Select System Memory.
- Press the A button on the left Joy-con.
- Select Copy All Screenshots and Video to microSD card.
- Select the A button to complete the process.
Transfer Screenshots Individually:
- Select the Album icon located near the System Settings on your Nintendo Switch.
- Select the screenshot you want to copy.
- Select Copy and the screenshot will now be copied to the microSD card.
How to Transfer Screenshots from your Nintendo Switch to a Computer
Once the photos are already saved on the microSD card, you can now share the files to your computer by taking out the card from your console.
- Turn off the Switch by pressing the Power button for at least 3 seconds.
- Select Power Options.
- Select Power Off. Once the console is completely off, remove the microSD card located at the back of the Switch.
- Insert the microSD card into the card reader that is compatible with your device.
- Once detected in your device, the screenshots should be found at the \Nintendo\Album folder on the card and sorted by dates when the screenshots were taken.
- You can start selecting the images you want to move to your device and then remove the screenshots on your microSD card to save up some space for new images. If you prefer you can edit the photos using your computer’s application system and share the photos in your device.
We hope that we have provided all that you need with regard to sharing screenshots from your Nintendo Switch.
Suggested readings:
- How To Fix FIFA 21 Game Setup Error | NEW 2020!
- How To Add Nintendo Switch Mii (Easy Steps) | NEW 2020!
- How To Fix FIFA 21 DirectX Error | Easy Solutions | NEW 2020!
- How To Fix FIFA 21 Won’t Open Or Launch In Windows 10 | NEW 2020!
Visit our TheDroidGuy Youtube Channel for more troubleshooting videos and tutorials.