How To Fix Samsung Galaxy J3 Wont Charge [Troubleshooting Guide]
Charging issues are among the most common problems any smartphone owners may face regardless of how powerful their devices are. In the case of the #Samsung Galaxy J3 (#GalaxyJ3), there were already reports from owners complaining about not being able to charge completely while others reported their phone just stopped charging at all. It’s very alarming if the device won’t charge or couldn’t detect current flowing through its circuits.
However, it doesn’t necessary mean that if the phone doesn’t charge, it’s damaged already. There are instances wherein the firmware or the hardware glitches and may lead to this kind of problem. Thorough troubleshooting is imperative so that you would know what the problem is all about and when you do, you would know if it can be fixed by you without any intervention from a technician.
Continue reading to understand the Samsung Galaxy J3 not charging issue and learn how to troubleshoot the device if it won’t respond anymore if you plug the charger in. The troubleshooting steps I presented here are basic and safe, however, things may happen while you’re following them so please proceed at your own risk.
Troubleshooting Galaxy J3 that won’t charge
We technicians have our own way of probing and troubleshooting specific issues. We often follow a systematic, deductive procedure to arrive at something that may tell us what the real issue is. When that happens, we can easily work around the problem or even fix it. So, if you’re one of the owners who encountered issues while charging their devices, try the following steps.
Step 1: Verify the problem isn’t caused by a firmware crash
Contrary what many believe that the charging process is being carried out by the charger and the battery only, the firmware actually plays a great role in allowing the right amount of current flow through the circuits to the battery. When the firmware also detects the battery is full, it’s responsible in doing “trickle” charging so as not to overcharge that battery.
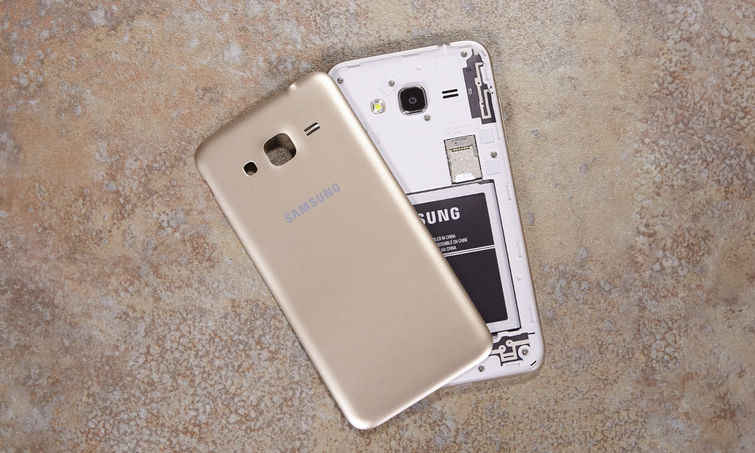
That being said, if the firmware crashes, freezes or hangs, the phone may neither charge nor responds. So, to verify that it’s not the issue that’s causing the not charging problem, open the back panel of your Galaxy J3 and pull the battery out, then press and hold the Power switch for a minute to drain stored electricity in the capacitors. After a minute, place the battery back in, then the back cover and then try to turn the phone on and then charge it. If it still refuses to charge, the next step might be able to help you.
Step 2: Check the charger or power adapter
You don’t have to be a technician to be able to determine if the charger or the power adapter is damaged or not, all you need is common sense.
Look into the port of the charger to find out if there are debris, lint or corrosion. You may use tweezers to pull the debris out or compressed air to blow away corrosion.
You may also try to hold the charger close to your nose to see if you can detect burnt smell; some components may have been burnt inside.
Using a different charger may tell you immediately if it’s a charger issue or not because if the device charges with other power adapters, then you really have to buy a new charger. You may also try to connect your phone to a computer to see if it charges because if it does, then at least, you can rest assured that the phone is fine.
Step 3: Check the cable for breaks and irregularities
Run your fingers from one end of the cable to the other end to detect some lumps or breaks or scraping of the insulation. Any irregularities will immediately translate to the cable being broken or something. Also, try to check both ends of the cable for debris and corrosion. Unlike the charger or your phone, you can actually wash the cable and use brush to clean both ends but make sure you dry it up before using. Moreover, try to use a different cable with the same specification. If the phone charges with other cables, then it’s clear as the day what the problem is.
Step 4: Check the phone’s USB / charging port
Also look for debris, lint, corrosion and bent connectors. As to the case of bent pins, try to use a toothpick to straighten them. Or you can bring the phone to a local shop and have it fixed if such is the case.
However, if the problem started after the phone fell or got wet, then it’s either physical- or liquid-damage that caused the problem. There’s nothing much you can do about hardware issues and you cannot also claim warranty over those incidents.
After this step and the problem still persists, you have no other choice but to seek assistance from a tech. You may bring the phone back to the store or request assistance from Samsung.
I hope this guide helps.
Hello, I’m a proud owner of a Galaxy J3 Emerge for 11 months now. Unfortunately I dropped my J3 Emerge (J327P) in the snow and freezing weather of 6° and the screen did crack. I didn’t notice any water damage or signs of moisture but I powered it down.
I then turned it on probably 20-25 min later roughly. I noticed the screen on the lower half had a great deal of darkness with lines all over thru the screen.
Of course, she insisted on trying to use the phone up to the point where the phone WILL POWER ON , but HAS A SOLID BLACK SCREEN. The solid black screen is all the phone has at his point. It will vibrate when powering up. Give it 5 seconds I can tap the power button, then tap vol button, vol does chirp when tapping up/down, but screen is still solid black and does not flicker nor glitch at any point… I have tried to remove batt, hold pwr off for a min, install batt n pwr on but no luck. Even tried holding pwr off for several min and then installed battery but still NO luck! I’ll continue to try safe mode , and if no luck , guess I’ll move to clean out cashe and if no luck there I plan on calling it quits!!!
I DO NOT wish to factory erase or reboot the whole system at this point, unless there’s NO other options, cause I hate to lose ALL data and pics if there’s any chance of saving them. I can’t remember when the system was last backed up! PLEASE! IF ANYONE can help me, It would be GREATLY APPRECIATED!!!
I hope I have explained with as much detail as I possibly could to provide the best information as possible. Thank you so very much for all who reads this and tries to help and hopefully this gets resolved / answered , so that it can help anyone else out there with the same technical difficulties….
A Special “Thank You” to the Technical Support Team
for all the hard work and effort put forth into helping individuals like myself.
Y’all Keep On Rocking!!!!
Benjamin Todd
How do you remove battery from Samsung j3 2017
This worked, my girlfriend’s daughter’s Samsung wasn’t charging and wouldn’t come on! Once I had removed the battery and pressed Power for a minute, not only would the battery charge, but it also had 82% charge already!
Another suggestion that once worked on a Samsung S3 with intermittent charging problems for me… I cleaned the USB socket using a sponge makeup Q-tip, using some ultra-strong vodka that someone had given me, and I was never going to drink. But quite a few solvents, including distilled water, might have worked. Important that the battery is out for this, and not replaced until everything is dry. You should have seen how much dirt there was on the Q-tip!
Hello my Samsung j3 2017 isn’t working anymore the thing is that I tried turning it on but it turns on and stays on the black screen with “Samsung” on it I waited and waited and it does not turn on the normal apps area or anything
Removing the battery and holding the power button for a minute did work when my son’s two week old Samsung galaxy J3 2017 wouldn’t charge. Thank you!!