How To Change PS5 DNS Settings in 2026
Are you a PS5 gamer frustrated by slow internet speeds, lag, and connection issues that are ruining your online gameplay? The problem likely lies with your DNS settings.
The Domain Name System (DNS) acts as the internet’s phonebook, translating domain names into IP addresses. But if your default DNS servers are slow or unreliable, it can significantly degrade your PS5’s performance.
Fortunately, with a few simple tweaks to your DNS settings, you can optimize your network connection and take your PS5 gaming to the next level.
In this guide, you will learn the best PS5 DNS settings that you can do. Improve your internet connection, gaming speed, and online gaming experience with our guide.
In this complete guide, you’ll learn:
- What DNS is and how it impacts your PS5
- The benefits of changing your DNS settings
- How to easily change DNS settings on your PS5
- The best and fastest DNS servers for PS5
- How to test your new settings to verify improvements
Let’s get started – your lag-free, supercharged PS5 gaming experience awaits!
What Is DNS and Why Does It Matter for My PS5?
To understand how DNS affects your PS5, you first need to know what DNS is and what it does.
DNS stands for Domain Name System. It’s the internet’s directory that translates domain names like “google.com” into the numerical IP addresses that computers need to load websites and services.
Every device connected to the internet uses a DNS server to look up and connect to these sites. By default, your PS5 will use the DNS servers provided by your Internet Service Provider (ISP).
Unfortunately, your ISP’s DNS servers are often overloaded, poorly optimized, or located far away from you geographically. This can lead to slow performance, lag spikes, and connection problems with your PS5.
Manually changing your DNS settings allows you to use alternative DNS servers that offer faster speeds and improved reliability. It’s an easy way to enhance your online gaming experience.
The Benefits of Changing Your PS5 DNS Settings
Changing your PS5’s DNS settings to faster third-party servers provides several advantages:
- Faster download speeds: Downloads from PSN, game updates, and DLCs will be quicker.
- Reduced lag and latency: Less lag means fewer hitches and smoother online multiplayer gaming.
- Improved stability: A reliable DNS server minimizes connection drops and errors.
- Enhanced security: Alternative DNS providers may provide greater protection against phishing websites and malware.
- Easier access to blocked content: Unblock websites and services that may be restricted by your ISP.
- Parental control options: Some DNS providers allow custom filtering and blocking.
As you can see, the right DNS settings can make a big difference in optimizing your PS5’s performance and online gaming experience.
How to Easily Change Your PS5 DNS Settings
Changing your PS5 DNS settings only takes a minute. Follow these steps:
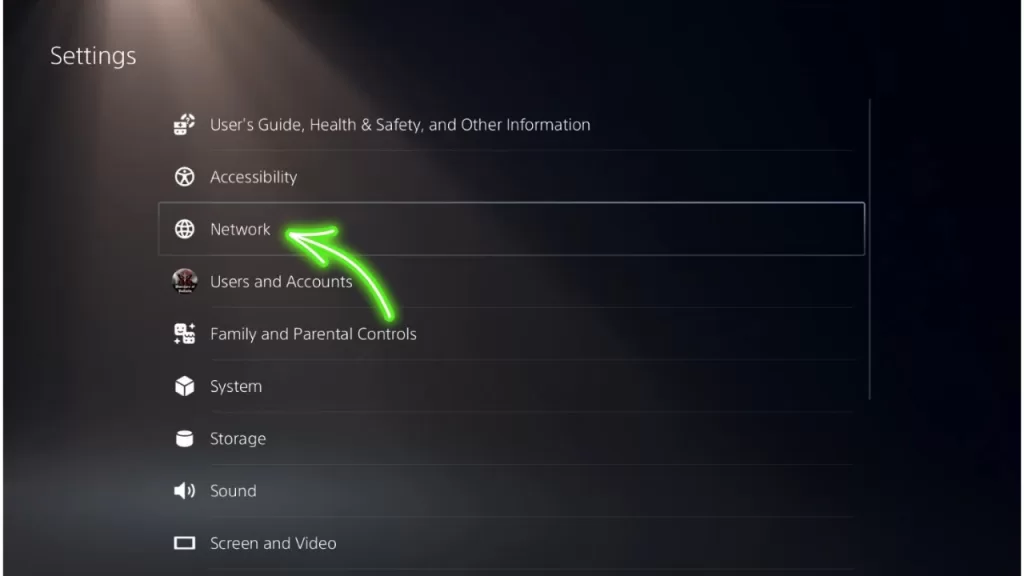
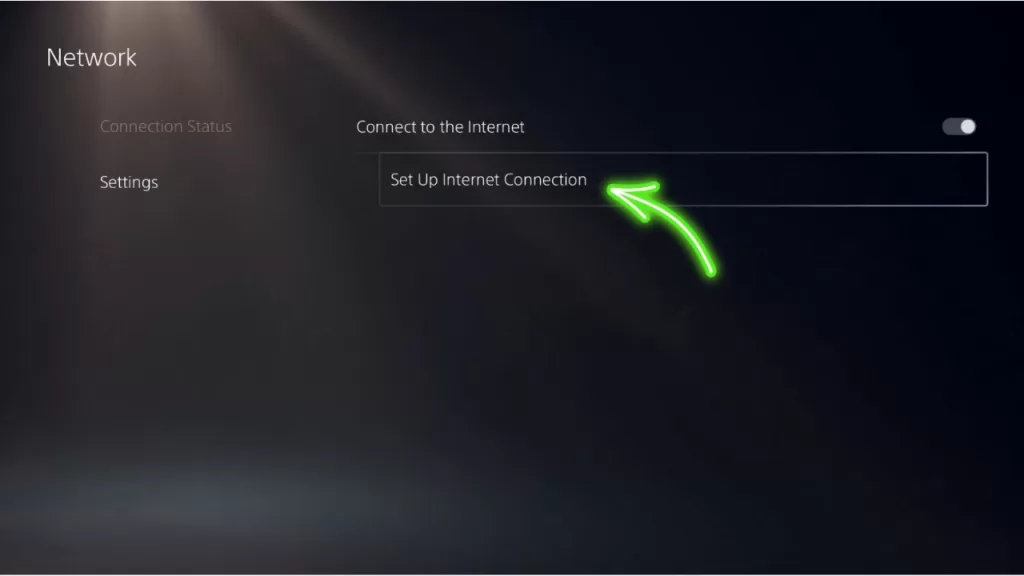
1.From your PS5’s home screen, go to Settings > Network > Set Up Internet Connection.
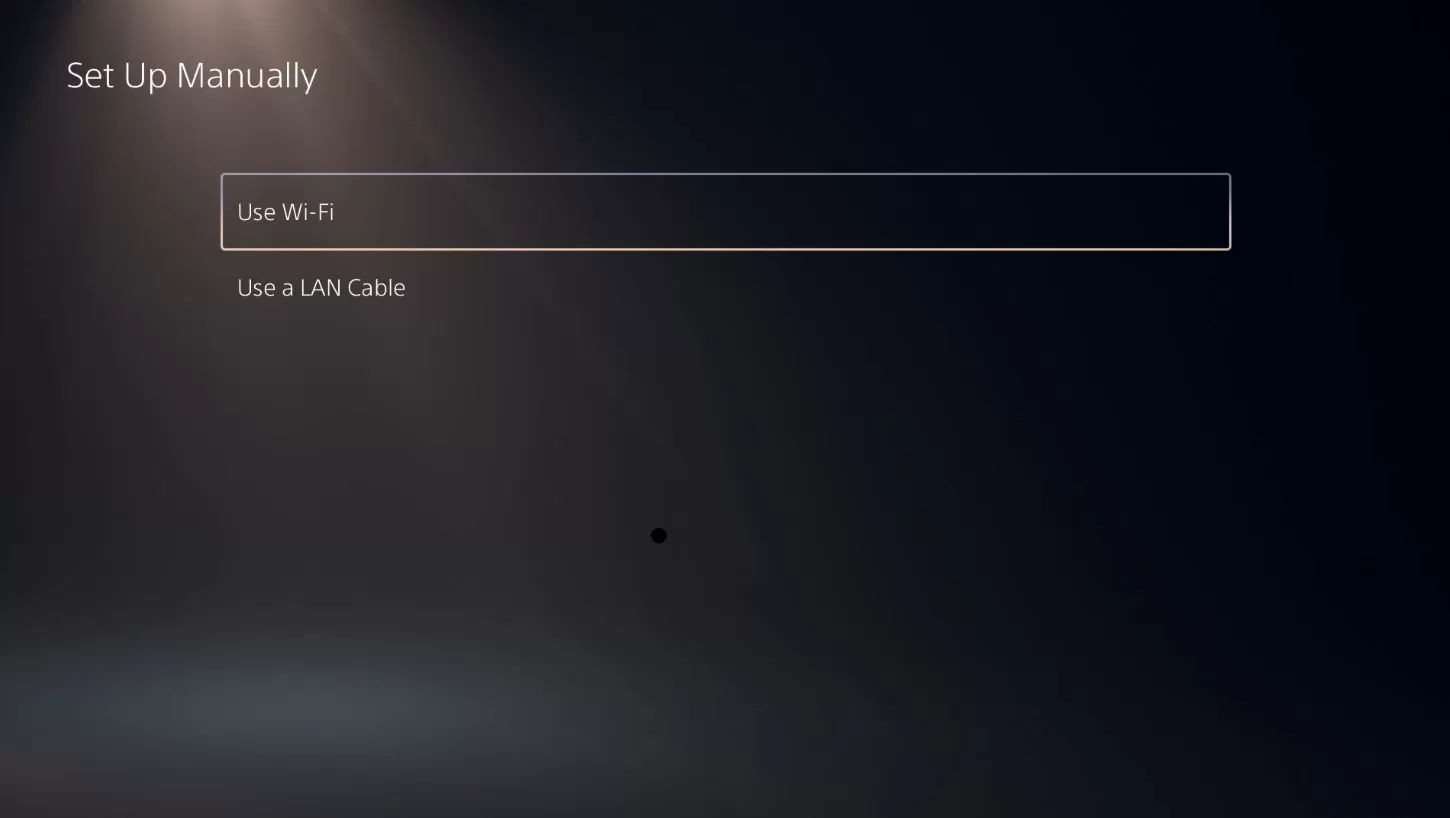
2.Select your internet connection – either Use Wi-Fi or Use a LAN Cable.
3.Choose Custom instead of Easy.
4.Select Automatic for your IP address settings.
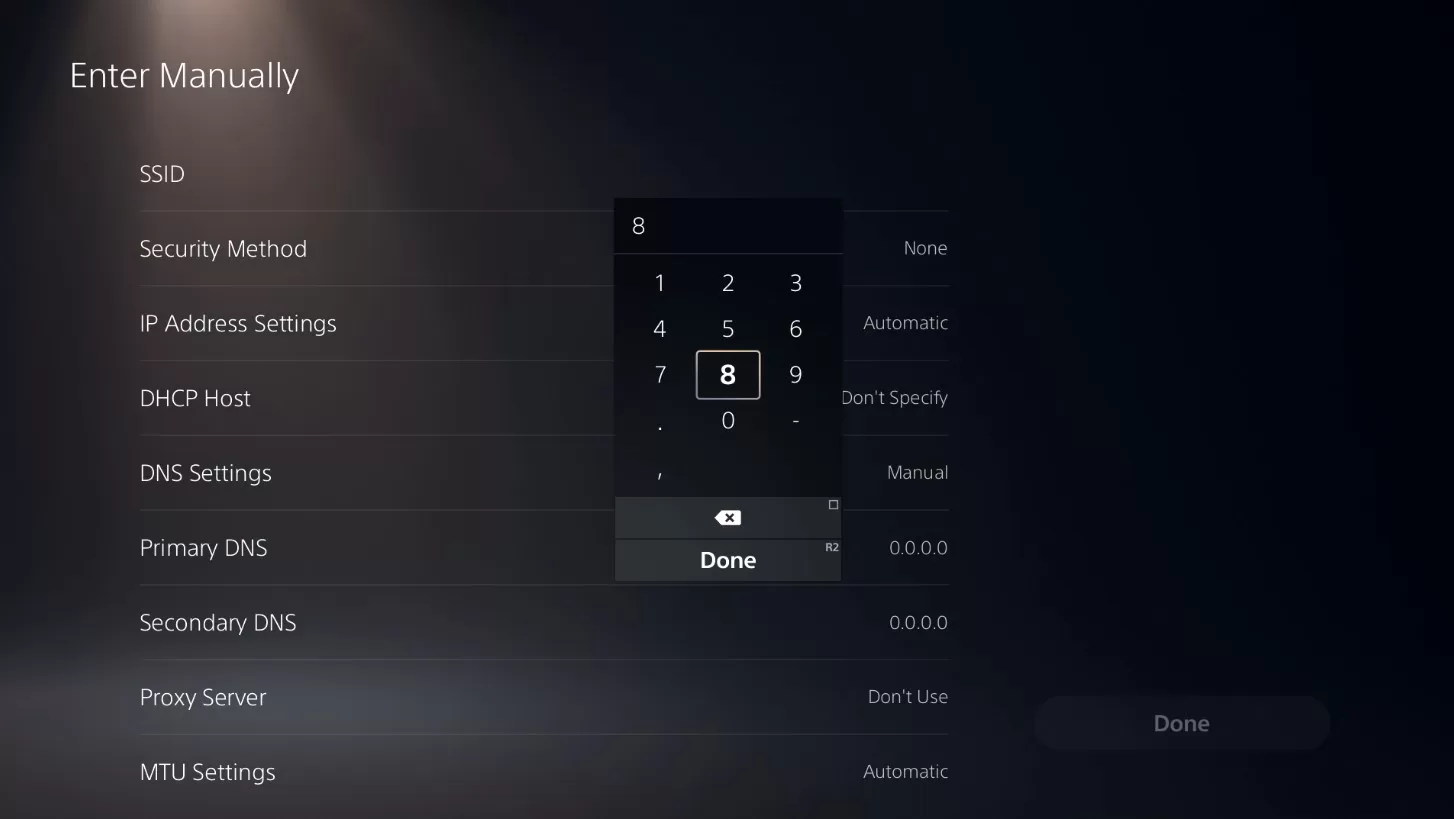
5.For DNS settings, choose Manual.
6.Enter your preferred DNS server addresses in the Primary DNS and Secondary DNS fields.
7.Select Next to complete setup.
That’s all there is to it! Your PS5 will now use the new DNS servers you provided. Be sure to test your connection to confirm the improvements.
The Best and Fastest DNS Servers for PS5
Choosing the right DNS servers is key to getting the fastest speeds and best gaming performance. Here are top options:
Google DNS
- Primary DNS:
8.8.8.8 - Secondary DNS:
8.8.4.4
Google Public DNS is a popular choice due to its speed, reliability, and worldwide server locations. It’s completely free to use.
Cloudflare DNS
- Primary DNS:
1.1.1.1 - Secondary DNS:
1.0.0.1
Cloudflare DNS focuses on speed and privacy. It also has servers located around the globe. Like Google DNS, Cloudflare is also free.
OpenDNS
- Primary DNS:
208.67.222.222 - Secondary DNS:
208.67.220.220
OpenDNS offers enhanced security features like phishing protection and content filtering. It has free and paid tiers available.
The fastest DNS varies based on your location. We recommend testing a few to see which provides the lowest ping times for you.
Check Your New DNS Settings with a Network Test
Once you apply new DNS settings to your PS5, it’s important to verify they are working properly and improving your network connection.
You can easily do this by running a network test on your PS5:
- Go to Settings > Network > Test Internet Connection.
- Your PS5 will test your connection speed and ping.
- Check that your download and upload speeds have increased compared to before changing DNS settings.
- Lower ping times also indicate your new DNS servers are providing reduced latency.
If your network test shows little to no improvement, try switching to different DNS server addresses until you find the fastest option for your location.
Conclusion: Faster Gaming Awaits with Optimized PS5 DNS Settings
Are you ready to eliminate lag, get faster downloads, and have a smoother online gaming experience on your PS5? Optimizing your DNS settings makes it possible.
It’s quick and easy to switch to faster third-party DNS servers like Google or Cloudflare. Just enter new DNS addresses under your PS5’s network settings.
Be sure to run a network test to confirm your new settings are providing improved speeds and latency. With optimized DNS configured, you can finally enjoy ultra-responsive PS5 gaming without performance-killing lag and interruptions.
Game on!
Frequently Asked Questions
Why should I change my DNS settings on PS5?
Changing DNS can speed up your internet connection, decrease lag, and improve stability for a better overall PS5 gaming experience. Your ISP’s default servers are often subpar.
Is it safe to change DNS settings on my PS5?
Yes, it’s 100% safe to change DNS settings. There are no risks involved, and you can revert back at any time.
What are the best DNS servers to use for my PS5?
Top choices like Google, Cloudflare and OpenDNS generally offer the fastest speeds. The best for you depends on your location.
How can I test if new DNS settings improved performance?
Use the “Test Internet Connection” option on your PS5. Check if your download/upload speeds increased and ping decreased.
Can using a VPN or gaming router help my PS5 connection?
Yes, a VPN or gaming router provides ways to optimize your network in other ways. But changing DNS settings is simpler and often effective enough alone.
Do DNS changes impact other devices on my network?
No, DNS changes only affect the individual device they are configured on. Other devices will continue using your default DNS servers.
What if I’m still experiencing lag after changing DNS?
If lag persists, factors like your broadband plan speed, WiFi signal, or router quality may be the culprit instead. Further troubleshooting may be needed.
Is a wired connection better for PS5 than WiFi?
Absolutely! Using an Ethernet cable instead of WiFi improves speeds, reduces ping, and eliminates wireless interference for a better gaming experience.
Can using public DNS servers impact my online privacy?
Possibly, since traffic flows through third-party servers instead of your ISP’s. But DNS providers like Cloudflare do not log or share any personal data.
Do I need to change DNS settings for each new network I connect to?
Yes, DNS changes are on a per-network basis. When you connect your PS5 to a new network, you’ll want to reconfigure the DNS settings.
Where can I learn more about DNS servers and how they work?
Reading this detailed DNS guide provides great background knowledge about how DNS works and its role in networking.
What if I need to revert my PS5 DNS settings back to default?
Just repeat the steps above, but choose “Automatic” instead of “Manual” for the DNS settings. Your PS5 will resume using your ISP’s DNS servers.
Can using OpenDNS or AdGuard DNS help block malicious sites and ads?
Yes, these providers offer DNS-based filtering features that can block phishing sites, malware, adult content and ads. But they may impact performance.
Are DNS settings only relevant for gaming? What about streaming video?
Faster DNS improves anything you do online – gaming, streaming, web browsing, downloads, etc. Sub-par DNS can bottleneck any internet activity.
Will choosing DNS servers located close to me provide the fastest speeds?
In most cases, yes. DNS servers geographically nearby typically offer lower latency. But it’s wise to still test different providers to be sure. Location isn’t everything.
What are the risks if I accidentally enter invalid DNS addresses?
You’ll simply lose internet connectivity until you fix the DNS settings. No permanent damage. Just double check addresses before applying them.
Can I improve DNS speed without changing settings on my PS5 directly?
On some routers, you can adjust the DNS settings at a network-wide level instead of for each device. This might be an easier approach.
Are DNS changes sufficient, or do I need a faster internet plan?
DNS optimization helps get the most out of your existing plan. But if your internet bandwidth itself is too slow, you may still need a faster broadband package.
Besides Google and Cloudflare, what other leading DNS providers should I consider?
OpenDNS, Quad9, Verisign, and CleanBrowsing are all excellent DNS choices. Evaluate them to see if any outperform your current settings.
How often should I recheck my DNS settings for performance improvements?
Every 6 months or so. DNS server performance varies over time as usage patterns and locations change. Periodic tune-ups ensure optimal settings.
Can I use a custom DNS like NextDNS to filter content and block ads on my PS5?
Yes, NextDNS and other custom DNS providers allow extensive filtering customization. But extra network hops can increase latency.
Will changing DNS settings reduce ping and lag for competitive online multiplayer games?
Absolutely. Fast and reliable DNS keeps latency consistently low for competitive gaming where split-second reactions matter most. Slow DNS hampers your game.
If DNS changes don’t solve my connection issues, what should I try next?
Check for problems like WiFi interference, a faulty network cable, router malware, or an underpowered router. Pursuing a mesh system or upgrading your router may help.
Can I use a free DNS service like DNS.Watch if I don’t mind ads being injected?
Technically yes, but I advise against it. Ad injection creates privacy concerns, security risks, and slower speeds. Stick with a reputable provider instead.
For the best online gaming connection, should I use WiFi, Ethernet, or Powerline?
For minimal lag, you want Ethernet over WiFi whenever possible. Powerline adapters that use your electrical wiring are the next best option if Ethernet isn’t feasible.
What’s the difference between IPv4 and IPv6 DNS settings?
IPv4 (like 8.8.8.8) is the common standard. IPv6 (like 2001:4860:4860::8888) is a newer protocol that provides far more IP addresses as the IPv4 range is almost exhausted.
Can I reuse the same DNS servers I optimized for my PS5 on other devices like my phone?
Absolutely. Using the same fast DNS servers across all your devices provides a consistently improved internet experience. Just enter them into each device separately.
If OpenDNS helps block unwanted sites, are there downsides to enabling it?
OpenDNS filtering forces all DNS lookups through its servers even when accessing unblocked sites. This can increase latency if you aren’t located near its data centers.
What DNS server options do I have if I want to avoid any private data logging concerns?
Non-logging providers like Cloudflare, Cleanbrowsing, and Quad9 are excellent choices. They avoid logging personally identifiable DNS queries.
Can my broadband provider detect if I switch to using third-party DNS servers?
Typically no. DNS queries are not usually monitored closely. As long as you pay your bill, your ISP is unlikely to notice or care if you use alternate DNS.
For systems like the Steam Deck, can the same DNS optimization steps improve gaming?
Yes, the Steam Deck and other gaming devices/computers all rely on DNS. Switching to faster DNS servers will provide lower latency and smoother online play.
If I’m tech-savvy, are DIY DNS options like Pi-hole or pfSense worth exploring?
For advanced users, hosting your own DNS server provides ultimate flexibility for ad blocking, custom content filtering, etc. But requires technical know-how.
Can I change my PS5’s MTU along with DNS for an added speed boost?
Potentially! Adjusting MTU tweaks packet size. Combining an optimal MTU setting with fast DNS can maximize throughput and reduce latency. But MTU changes are trickier.
What are the risks of using free public DNS providers instead of paid services?
Free DNS from reputable providers like Google and Cloudflare is totally fine for most users. The main downside is a lack of advanced features that paid services offer.
Will connecting my PS5 to a VPN further improve my online gaming experience?
Possibly. A quality VPN can provide benefits like greater DDoS protection and geo-spoofing to access region-restricted game servers. But evaluate speed impacts first.
Can Sony detect or ban my PSN account if I use third-party DNS servers?
No, Sony does not prohibit using custom DNS providers. As long as you aren’t cheating or hacking, DNS tweaks to improve connection speed are perfectly allowed.
If I’m getting slow speeds over WiFi, should I upgrade to a 802.11ax router before changing DNS?
Try DNS optimization first since it’s free and easy. Upgrading your wireless router hardware is the next step if you still need faster WiFi throughput afterwards.
For the best PS Remote Play experience, is switching to fast DNS also beneficial?
Absolutely! Smooth Remote Play gameplay requires minimal lag. Optimizing your home and remote network’s DNS settings keeps latency consistently low and avoids intermittent delays.
Besides gaming, how else can faster DNS improve the user experience on my PS5?
Faster downloads from the PS Store, smooth 4K video streaming, responsive web browsing, and lag-free chat/messaging all benefit greatly from speedy DNS lookups.
Can custom DNS help circumvent restrictions like regional PSN blocks or school/work network filters?
Potentially yes, but beware that bypassing geographic restrictions or filters may violate terms of service. Proceed with caution and consider a VPN instead.
If my router has DNS settings too, which should I prioritize changing?
Ideally, tweak both your router and PS5 DNS in sync. But device-specific settings often take priority, so focus on optimizing your PS5 first if needed. Test to confirm.
For the best DNS on my PS5, is there any advantage to using 1 server over 2?
It’s wise to define both a Primary and Secondary DNS for redundancy if the first is down. Two functional DNS servers ensures uninterrupted failover reliability.
How can I convince my roommates/family to change DNS and improve internet speed for our shared PS5?
Show them hard evidence like speed test comparisons. Dramatically faster downloads and reduced lag makes a compelling case. Better shared gaming will help persuade resisters.
If I’m getting intermittent lag spikes during PS5 gaming, could bad DNS be the issue?
Absolutely. Unreliable or overloaded DNS servers are a common source of micro-stutters and lag spikes. Optimize your DNS settings to clear up intermittent delays.
Are browser extensions like OpenDNS Guide or DNS Jumper useful for testing different servers?
Yes, browser add-ons provide an easy way to quickly compare various DNS providers. But Chrome-only extensions can’t tweak your full system DNS like doing so directly on the PS5.
For mobile gamers, will changing DNS settings help improve connection speeds for mobile titles?
Yes! Mobile games rely on DNS too. Faster, more reliable DNS improves the gaming experience across all platforms – mobile, desktop and consoles. Reduce latency everywhere.
If I’m getting slow DNS even with OpenDNS, would switching to DNSCrypt or DNS over HTTPS help?
Possibly. Encrypting DNS queries (DNSCrypt) and using HTTPS transport can boost privacy, security and circumvent ISP throttling. But additional processing overhead may increase latency. Test first.
Can I safely use the same custom DNS on my home and work networks for consistency?
This is not advisable for privacy and security reasons. Keep your work and personal DNS separate. Furthermore, different networks may require different settings for optimal speed.
For networks with captive portals, is changing DNS still beneficial?
Unfortunately not as much, since captive portals typically force DNS routing through the local network first regardless. Still, it may help some. Confirm by testing after authenticating.
If DNS changes don’t help should I next try adjusting MTU size or MAC address cloning?
Maybe. Jumbo MTU helps throughput for very fast connections. MAC cloning bypasses some ISP restrictions. But risks make them harder recommendations before more likely fixes.