How To Fix SteelSeries Arctis 7 Mic Not Working | NEW in 2026
Are you having mic issues with your SteelSeries Arctis 7? One of the common issues for this headset is about the microphone refusing to work. In this troubleshooting, we’ll show you the fixes that you can try if your SteelSeries Arctis 7 mic is not working on your Windows 10 PC.
What are the causes why your SteelSeries Arctis 7 mic is not working?
The reasons why your Arctis 7 mic stops working can vary. For most people, the real reason why their mic may appear to have stopped working can be as simple as microphone positioning while others may experience troubles due to the settings in their PC. In some rare instances, the mic may stop working due to a bad firmware.
How to fix SteelSeries Arctis 7 Mic not working issue?
There is no single reason why your SteelSeries Arctis 7 mic stops working. You’ll need to perform a number of troubleshooting steps in order to fix the problem. Before you move to the fixes though, make sure that you restart your headset.
The list of solutions below should help you get back to gaming and talking with your friends in no time.
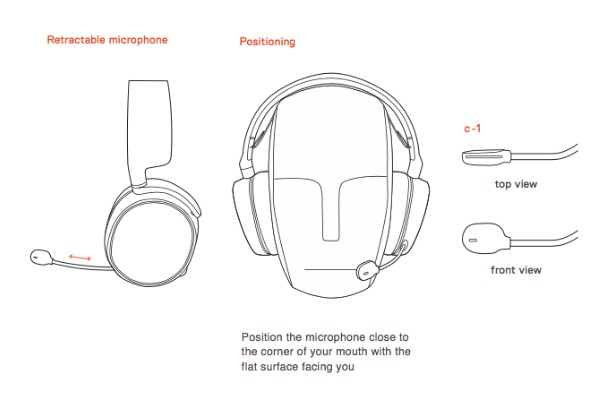
Solution #1: Position the microphone properly.
If your friends complain that they can barely hear you, it’s possible that you may have simply forgotten to properly position the mic. Many players often take for granted the directional design of the Arctis 7 ClearCast mic. Make sure that the flat head of the microphone is facing your mouth when you speak. The recommended distance of the mic head from the corner of your mouth should be between 1 and 1.5 inches.
Solution #2: Check the microphone settings.
If your mic is properly positioned but your PC is not detecting, or if the sound is too low, the next good thing that you want to do is to ensure that you check a couple of settings.
Allow apps to access the Arctis 7 mic.
- Press the Windows key or the Start button on the taskbar.
- Type in “mic privacy.”
- Click the Choose which apps can access your microphone.
- Make sure that you enable Allow apps to access your microphone.
- Test your microphone to check for the problem.
Use the correct Default Format.
- Press the Windows key or the Start button on the taskbar.
- Type in “control panel”
- Open the Control Panel app.
- Select Hardware and Sound.
- Under the Sound section, click on Change system sounds.
- Click the Recording tab.
- Right click on the microphone that you’re using (should have a green check mark) and click on Properties.
- Click on Advanced.
- Make sure the Default Format is set to 48000 Hz.
- Test your microphone to check for the problem.
Change the Windows mic settings.
- Press the Windows key or the Start button on the taskbar.
- Type in “control panel”
- Open the Control Panel app.
- Select Hardware and Sound.
- Under the Sound section, click on Change system sounds.
- Click the Recording tab.
- Double-click the SteelSeries Headset and select the Levels tab.
- In the Levels tab, make sure to set it to 100.
- Test your microphone to check for the problem.
Fix #3: Update the audio drivers.
If your Arctis 7 mic is still not working after checking all the settings above, it’s possible that the cause of the problem may be old or corrupted audio drivers.
To manually check for your sound or audio drivers, follow these steps:
- Right click the Start button located at the bottom left of the screen.
- Select Device Manager. You can also access Device Manager by accessing the Control Panel.
- Select Audio inputs and outputs and click on the dropdown arrow to see your devices.
- Right click Microphone (2- SteelSeries Arctis 7) and select Update driver.
- Select Search automatically for drivers.
- Wait for a few minutes to complete the process.
- Test your microphone to check for the problem.
Fix #4: Reinstall the SteelSeries Engine software.
If nothing has changed after you’ve updated the drivers, try to delete and reinstall the SteelSeries Engine software. Sometimes, system updates may corrupt and interrupt the normal process of an application. A quick reinstall may help fix the problem for you.
Below are the steps to uninstall the SteelSeries Engine:
- Press the Windows key + R to open the Run command app.
- In the Run dialog box, type in “appwiz.cpl” and click OK.
- In the Uninstall or change a program window, right-click SteelSeries Engine and click Uninstall.
- Follow the on-screen instructions to delete the program.
- Restart your PC then go back to the SteelSeries website to download SteelSeries Engine again.
- After the installation, test your microphone again.
Fix #5: Perform a hardware reset.
The final fix that you can try in this case is to reset the Arctis 7 firmware. This may work if the cause of the problem is a corrupted firmware following an update. Here’s what you need to do:
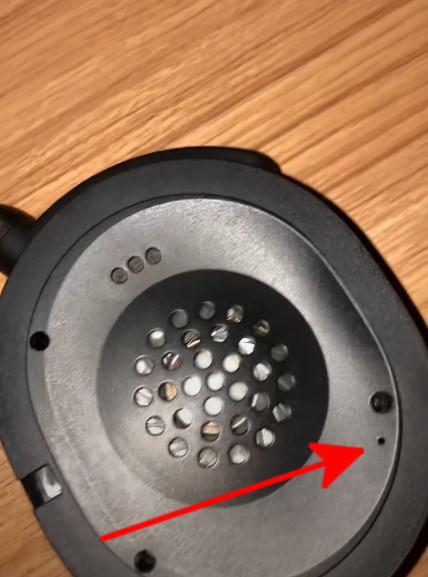
- Disconnect any cable from your Arctis 7 headset.
- Carefully remove the cushion on the left ear cup (the side where the mic is).
- Locate the reset button and press and hold it for 1 second using a paperclip. The reset button is inside a pinhole.
- Once you’ve reset the headset, charge it again for another 10 minutes before attempting to power it back on.
OTHER INTERESTING ARTICLES:
- How To Fix Twitch Unable To Load Error | NEW 2021
- How To Fix Steelseries Arctis 7 Won’t Turn On | Complete Guide 2021
- How To Detect Your SteelSeries Device Using Engine Software | 2021
- How To Stream On Discord | Complete Guide in 2026
Visit our TheDroidGuy Youtube Channel for more troubleshooting videos and tutorials.