How to Fix Project Playtime Crashing Issue
If you experience Project Playtime crashing issues then this article can help you fix the issue. Several factors can cause this such as outdated graphics driver, not meeting the system requirements, graphics settings or corrupted game files. To fix Project Playtime crashing issue, you will need to perform several troubleshooting steps.
Project Playtime is a multiplayer horror game that is free to play and was created by Mob Games. While avoiding the terrible creature that prowls the toy factory, six players attempt to construct one gigantic toy. The monster is controlled by a seventh player, and he or she has only one objective: track down and eliminate everyone.
Fixing Project Playtime Crashing Performance Issues
One of the issue that you can experience when playing this game is the crashing issues. This can be a frustrating situation especially if you want to play this newly release game.
Here’s all the recommended fixes for Project Playtime Crashing issue and performance issues.
Fix #1 Check Recommended System Requirements
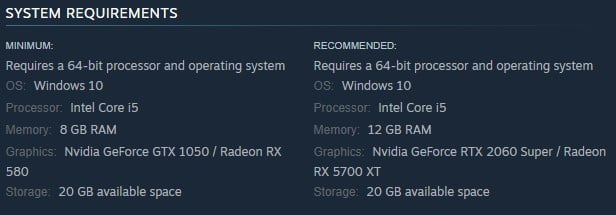
When Project Playtime crashes, the first thing you should do is see if your computer meets the game’s suggested system requirements. You will have performance and crashing issues if your computer does not at least satisfy the minimum requirements.
Minimum Requirements
OS: Windows 10
Processor: Intel Core i5
Memory: 8 GB RAM
Graphics: Nvidia GeForce GTX 1050 / Radeon RX 580
Storage: 20 GB available space
Recommended System Requirements
OS: Windows 10
Processor: Intel Core i5
Memory: 12 GB RAM
Graphics: Nvidia GeForce RTX 2060 Super / Radeon RX 5700 XT
Storage: 20 GB available space
Fix #2 Update Outdated Graphics Driver
Your graphics drivers need to be updated next. If Project Playtime crashing frequently occurs, you might be running outdated drivers. Windows provides an updater for graphic driver software. You can also use the GeForce Experience program if you have an NVIDIA GPU or the Radeon software if you have an AMD graphics card to get the most recent version of the graphics drivers.
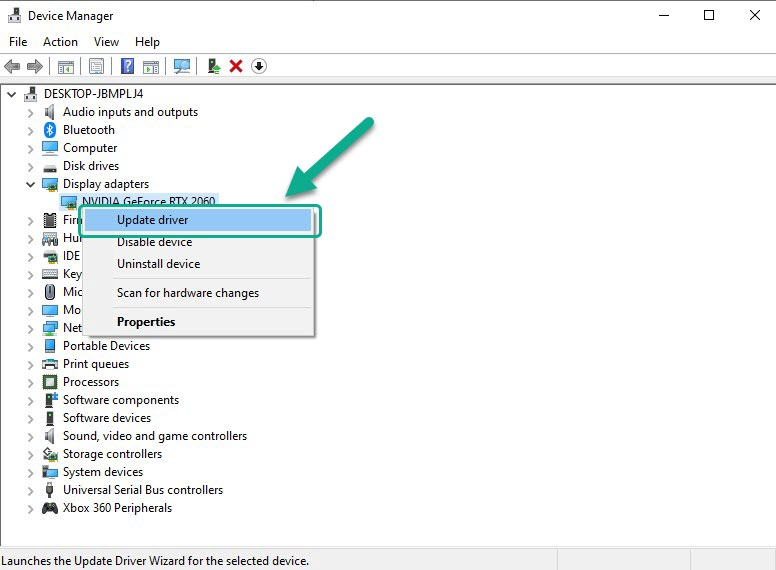
Updating graphics driver
Step 1: Simply type Device Manager in the search bar on your desktop and then click the Device Manager icon that appears in the results. This will open the device manager.
Step 2: Click the Display adapters icon. The list of display adapters will be expanded.
Step 3: Right-click the dedicated graphics card you are using to play the game and then select Update driver. This will allow you to update your driver.
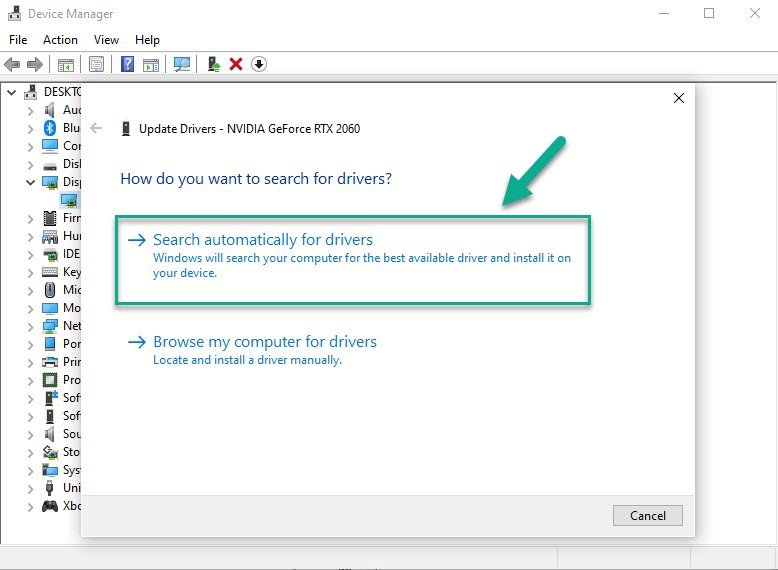
Step 4: Choose Search automatically for drivers. This will search online for any new drivers and install it on your computer.
After you have installed the latest version and correct GPU driver, try to see if it has fix Project Playtime crashing when you update the outdated drivers.
You should also make sure that the video card is your preferred graphic processor when playing High on Life. NVIDIA users can change to their preferred GPU through NVIDIA’s control panel. If you have AMD graphics card, use the Radeon software.
Changing preferred graphic processor
- Open the NVIDIA control panel.
- Navigate to 3D settings > Manage 3D settings.
- Open the Program settings tab and select your game from the dropdown menu.
- Select Preferred graphic processor for this program from the second dropdown menu.
- Save your changes.
Fix #3 Temporarily Disable Antivirus Software
Another reason for the game crashes is because of an antivirus software that constantly scans the folder for viruses then blocking it. You can try to temporarily disable antivirus and try to see if will still crash. If the game does not crash then you can add it to the exclusion list of your antivirus.
Turning off antivirus
Step 1: Press Windows Start menu key.
Step 2: Click Windows Settings.
Step 3: Click update & security.
Step 4: Open Windows Security.
Step 5: Click Virus and Threat protection.
Step 6: Click Manage settings.
Step 7: Turn off real-time protection.
Adding to the antivirus exclusion list
Step 1: Press the Windows key.
Step 2: Click Settings.
Step 3: Click Update & Security.
Step 4: Click Window Security.
Step 5: Click Virus & threat protection.
Step 6: Click Manage setting.
Step 7: Click Add or remove exclusions.
Step 8: Click Add an exclusion.
Step 9: Click Folder.
Step 10: Locate and select the folder.
Fix #4 Close Background Programs
If too there are too manty background programs are running on your computer while you are playing High on Life then this reduces the amount of system resources it can use which can lead to crashing issue with the game. Close these programs in the task manager.
Closing Programs
Step 1: Right click on the Start button. This can be found on the left pane of the screen.
Step 2: Select Task Manager.
Step 3: On the pop up window, Click processes tab.
Step 4: Right-click on the program then select end task. This will allow you to close unused program.
Fix #5 Update Windows System
The next step to do is to update Windows. These updates will usually have improvements, patches, DirectX updates, and bugs fixes that will resolve the crashing issue with Project Playtime.
Updating Windows system
Step 1: Right click the Start button.
Step 2: Select Settings.
Step 3: Select Update & Security.
Step 4: Select Check for updates to update. This will update Windows.
Fix #6 Disable Overlay Apps
Because overlay apps require system resources and operate in the background, they may cause Project Playtime crashing. The crashing problem might be resolved by disabling Xbox game bar option, overlays, third-party overlay programs, including game bars, and other overlay apps.
Disable Steam Overlay
Step 1: Open the Steam client.
Step 2: Click on Steam found on the upper left side of the client.
Step 3: Click Settings.
Step 4: Click In-Game.
Step 5: Uncheck Enable the Steam Overlay while in-game box.
Step 6: Click OK.
Disable Xbox game bar
Step 1: Click the Start button.
Step 2: Click Settings.
Step 3: Click Gaming.
Step 4: Turn off the switch for Xbox Bar
Disable NVIDIA GeForce Experience overlay
Step 1: Open NVIDIA GeForce Experience.
Step 2: Click Settings or the gear icon.
Step 3: Turn off In-game overlay.
Disable Discord overlay
Step 1: Open Discord.
Step 2: Click on the gear icon at the bottom.
Step 3: Click on Game Overlay under User Settings.
Step 4: Toggle off the Enable in-game overlay.
Fix #7 Verify Integrity of Game Files
If you have corrupted or missing files then you will experience crashes. What you need to do is to use the repair tool from the Steam client to repair game files.
Verifying files
Step 1: Open Steam.
Step 2: In your Steam launcher, click Library.
Step 3: Find High on Life then right-click and select Properties.
Step 4: Choose the Local Files tab and click Verify integrity of game files.