Galaxy Note 5 Tutorial: S Pen setup
One thing that sets the new #GalaxyNote5 apart from the competition is the stylus, also known as the S Pen. In fact, it even appears that Samsung is placing greater emphasis on the wonderful functionalities of the Galaxy Note 5 S Pen over its predecessor in this latest commercial. And rightfully so, we believe.
The S Pen has evolved over the years and this year demonstrates Samsung’s continued effort in making it even better. For one, the new Galaxy Note 5 S Pen has become your ubiquitous pen–common, familiar, and feels like the real thing it tries to emulate. Using the new S Pen is effortless and writing on the screen doesn’t feel strange at all. Together with Air Command, the stylus (#GalaxyNote5SPen) offers an efficient way to get around the screen, open apps, and do other S Pen-related activities.
If you are trying to figure out how your S Pen works in your new Galaxy Note 5, below are the easy steps to do it.
- How to remove the S Pen from the Note 5
- Note 5 S Pen’s Air View
- How to use Note 5 S Pen to write something
- How to configure the Note 5 S Pen settings
- What is Note 5 Air Command and how to use it
- Air Command options
How to remove the S Pen from the Note 5
Your Note 4 is all about making your life convenient so why do differently when it comes to S Pen storage. Samsung designed the S Pen to fit snugly inside the phone. To remove it, simply push the S Pen inward and pull it out using its top notch or part.
In inserting the S Pen, make sure that the nib (or the tip) is pointed inward to prevent damaging it and the phone.
Note 5 S Pen’s Air View
One of the best features the S Pen offers is giving the user an accurate way to preview a content on the phone without even touching the screen. This stylus feature is called Air View. Below are some of the things that you can do with Air View:
- preview a video content and navigate to specific scenes by hovering the stylus over the timeline
- preview or enlarge pictures by hovering over a photo album
- preview an email content by hovering over an email list
- View an item’s description or name over an icon
Keep in mind that Air View only works when the S Pen’s pointer shows a solid color.
How to use Note 5 S Pen to write something
Your S Pen can be used to conveniently write something like entering a name and number in your contacts list. To do that, you simply have to pull up a Handwriting window to write the entry instead typing it. Here’s how to do it:
- Hover the S Pen directly over the form field and wait for the Handwriting icon to appear.
- Tap the Handwriting icon so a window where you can write the entry appears.
- Begin writing the entries in the available window. You will notice that the handwritten entries will be converted into text. If you want to edit the written text or entry, simply use the Space and Backspace icons. Changing the position of the cursor can be done by dragging the pointer below the cursor to the desired position. Drawing something can be done by simply tapping the Drawing Mode.
- One you are done writing, tap the Done button.
How to configure the Note 5 S Pen settings
If you want to change your S Pen settings, you can do so by going to Apps>Settings>S Pen.
- Air command allows you to turn Air command feature on or off.
- Air view allows you to turn Air view feature on.
- Direct pen input allows you to change from keyboard input mode to S Pen when entering form fields. This also turns Direct pen input feature on.
- Pointer lets you turn the pointer on. Keep in mind that the pointer only appears on the display when the nib or tip of the S Pen hovers close to the screen. Hovering the pointer to other items may give you a preview of that content.
- Screen off memo lets you create action memos by removing the S Pen even if the screen is off.
- S Pen alerts gives you the option to tell the phone to sound an alarm and show a pop-up if the S Pen is far from the device. This is useful in ensuring that you won’t forget the S Pen.
- Turn off pen detection allows you to turn off the function that detects the S Pen. Doing this saves battery power.
- S Pen sound is an option that allows the phone to sound when you are using or writing with the S Pen.
- S Pen vibration is an option that allows the phone to vibrate when you are using or writing with the S Pen.
What is Note 5 Air Command and how to use it
One of the S Pen’s features allows you to pull up apps you use often more quickly via Air Command. This is done by hovering the stylus over the screen. Learning how to use Air Command is a prerequisite if you wish to use S Pen efficiently.
There are three ways to open Air Command menu:
- by removing it from the S Pen slot,
- by holding the S Pen above the screen, waiting for the pointer to appear, and pressing the S Pen button once,
- by tapping Air Command
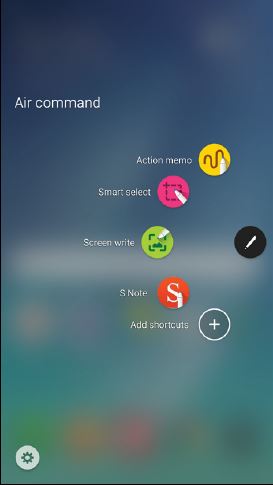
Air Command options
Once you have activated Air Command, you will be given 6 options to choose from. Below are the functions of each one.
Action memo
Action memo allows you to open a Quick Note and associate it to actions. Your action memos are saved directly in your S Note app. If you want a handwritten text transform into actions in your device, you can do so by using action memo. In other words, you can literally tell your Note 5 to do something for you like search for your favorite boutique by launching a memo on a map.
Make sure to tap SAVE after creating a memo to save and close it. An Action memo stays active on the screen as long as you’re using it.
To create a sample Action memo, just follow these steps:
- Open Air Command.
- Tap Action memo.
- Write your action memo by using the S Pen.
- Tap MORE for options like Share, Link to action, Minimize, Pin to Home screen, Edit as S Note file, Change background color, and Discard.
- Tap SAVE when done.
To tell your Note 5 to turn memos or text into actions, you must use the Link to Action option.
- Tap Air Command.
- Tap Action memo.
- Create a new memo.
- Tap MORE.
- Tap Link to action and select your preferred action
- Draw around the content that you want to use for the preferred action. The selected content is highlighted.
- Go to the menu bar that pops up and tap the options presented like Contacts, Phone, Messages, Email, Internet, Map, and Task.
Smart Select
Smart select allows you capture or draw around an area of the display so you can collect it later in the Scrapbook app. This feature gives you an easy way to highlight and capture a content on the screen so you can save or share it later with your contacts. To use smart select, just follow these steps:
- Tap Air Command.
- Tap Smart select.
- Tap a shape on top of the screen. The options include
- Write (lets you add notes to the screen via the S Pen)
- Share (lets you pick a sharing method when sharing your content)
- Save in Scrapbook
- Save in Gallery
Screen write
Screen write lets you capture screenshots on your phone so you can draw or write on them.
- Tap Air Command.
- Tap Screen write.
- Once the current screen has been captured, a pen tool will show and the following options will become available:
- Pen (lets you draw on the screenshot)
- Eraser (allows you to delete drawings or writings on the screenshot)
- Undo (lets you reverse the last action)
- Redo (allows you to redo the last action you’ve undone)
- Once done writing, simply tap one of these options:
- Share (gives you several sharing method)
- Save in Scrapbook
- Save in Gallery
S Note
S Note allows you to edit an Action memo or create a new one.
- Tap Air Command.
- Tap S Note.
Add Shortcuts
Add shortcuts gives you the option of adding up to 3 functions to the Air Command menu.
- Tap Air Command.
- Tap Add shortcuts.
- Look for and tap on the apps or functions you would like to add to Air Command menu.
- Tap Back to save the selected item.
Settings
Settings lets you change or customize Air Command including an option to modify its appearance.
Engage with us
If you are one of the users who encounters a problem with your device, let us know. We offer solutions for Android-related problems for free so if you have an issue with your Android device, simply fill in the short questionnaire in this link and we will try to publish our answers in the next posts. We cannot guarantee a quick response so if your issue is time sensitive, please find another way to resolve your problem.
When describing your issue, please be as detailed as possible so we can easily pinpoint a relevant solution. If you can, kindly include the exact error messages you are getting to give us an idea where to start. If you have already tried some troubleshooting steps before emailing us, make sure to mention them so we can skip them in our answers.
If you find this post helpful, please help us by spreading the word to your friends. TheDroidGuy has social network presence as well so you may want to interact with our community in our Facebook and Google+ pages.