How to fix your Google Nexus 5 smartphone that can’t send and receive text messages and MMS [Troubleshooting Guide]
- Read and understand why your #Google Nexus 5 (#Nexus5) can no longer send and receive text messages or SMS out of the blue. Also, learn how to troubleshoot your device in a bid to fix it without any help from a tech.
- Learn how to troubleshoot your phone that can no longer send and receive MMS messages and know what to do to verify some information that are important to make sure you can use the service.
The Google Nexus 5 has been around for a few years already and we have already received quite a lot issues from our readers and among the most common are texting issues, which cover both SMS (Short Message Service) and MMS (Multimedia Messaging Service). The former is the basic service offered by any cellular phone while the latter requires mobile data as you will be transmitting large amount of data over cellular network.
I will tackle both the sending and receiving issues with the SMS and MMS in this post with the Nexus 5 being the subject of the troubleshooting. If you own this phone and are currently experiencing difficulty sending or receiving text messages, then continue reading below to know more about the problem and learn what you have to do in a bid to solve it.
- How to troubleshoot Nexus 5 that won’t send and receive text messages (SMS)
- How to troubleshoot Nexus 5 that can’t send and receive picture messages or MMS
Before we jump right into our troubleshooting, however, if you have other issues with your phone, make sure you visit our troubleshooting page for we have already addressed some of the most common problems our readers reported with this device. Find issues that are similar with yours and use the solutions we suggested. If they don’t work for you or if you need further assistance, then contact us by completing our Android issues questionnaire and hitting submit.
How to troubleshoot Nexus 5 that won’t send and receive text messages (SMS)
When it comes to SMS issues, here are the things you need to do…
Step 1: Verify your device is getting good reception
Signal is king when it comes to texting and calling and I mean cellular signal. Your device must be connected to the cellular network of your service provider so that it can be provisioned to receive basic services.
By simply looking at the signal indicator at the upper-right portion of your phone’s screen you will know if your phone is getting good reception because if not, it’s possible that there’s a service interruption in your area, flight mode is enabled, the firmware has issues, or your phone has a serious hardware problem affecting radio capabilities.
Try rebooting your device a couple of times and double-check that flight mode is disabled. After doing these, try to see if the device regains reception. You may also try to wipe the cache partition if this issue started after an update, here’s how…
- Turn off the device.
- Press and hold the Volume Down button, then press and hold the Power button at the same time until the phone turns on.
- Press the Volume Down button twice to highlight “Recovery mode.”
- Press the Power button to start recovery mode.
- An Android robot with a red exclamation mark will display.
- While holding down the Power button, press and release the Volume Up button, then release the Power button.
- Use the volume buttons to scroll to “wipe cache partition,” then press the Power button to select it.
- Note: This may take 10 minutes or more to complete.
- Press the Power button to select reboot system now.
You may also want to backup your data and just do the factory reset if your phone is still not getting signal from the tower…
- Back up data on the internal memory.
- From any Home screen, tap the All apps icon.
- Tap Settings.
- Scroll to ‘PERSONAL,’ then tap Backup & reset.
- Tap Factory data reset.
- If your phone is password protected, you’ll be prompted to enter your Pattern, PIN, or Password.
- Tap RESET PHONE.
Lastly, call your service provider and inquire about possible outage or service interruption in your area.
However, if your phone shows it’s getting good signal, the next step might help.
Step 2: Send a text message to your own number
Sending a message to your own number will tell you immediately if the text went through or not and if it did, did your phone receive it? This troubleshooting method is very practical and fast in determining what the problem really is.
So, if the text was sent successfully and you haven’t received it, proceed to step 5. But if the message wasn’t sent at all, proceed to the next step.
Step 3: Make sure you have enough credits and that your account is in good standing
Making sure you have enough credits is necessary especially if you’re on a prepaid plan. You can call your provider about it or do the other methods your provider told you about to have an overview of your account. If you decided to call your provider, however, you may also inquire about the current status of your account to know if it’s barred from using certain services. All these things can be done with just one phone call.
Step 4: For sending issues, verify your phone has the correct Message Center Number
The Message Center Number is necessary so that your device can successfully send text messages and will be received by the network, then relayed to the rightful recipient. Message Center Numbers are pre-set so if they’re changed or deleted, naturally so, you won’t be able to send text messages but may still receive some from other senders.
Step 5: For receiving issues, make sure your phone still has enough storage left
Remember that text messages are being downloaded and saved in your phone’s internal storage so they also take up space. If you’re fond of taking pictures or recording videos, your phone may have already ran out of space that’s why it can no longer download the messages which may appear as though you’re not receiving them.
Delete some files, uninstall some apps you don’t use anymore, or move some of your files to a computer or the cloud. After doing so, try sending a text message to your own number.
Step 6: Backup data and do the Master Reset
Assuming you’ve already done everything there is to do about text problems, it’s time you reset your device. However, make sure you backup everything you don’t want to lose because they will be deleted during the process.
- Back up data on the internal memory.
- Turn off the device.
- Press and hold the Volume down button, then press and hold the Power button at the same time until the phone turns on. Release both keys when it does.
- Press the Volume down button twice to highlight ‘Recovery mode.’
- Press the Power button to start recovery mode. An Android robot with a red exclamation mark will display.
- While holding down the Power button, press and release the Volume up button. The ‘Android system recovery’ menu will display. Release Power when it does.
- Use the volume buttons to scroll to ‘Wipe data/factory reset,’ then press the Power button to select it.
- Scroll down to “Yes – erase all user data,” then press the Power button to select it.
- Once the reset is complete, press the Power button to select Reboot system now.
If all else fails, send the phone in for checkup.
How to troubleshoot Nexus 5 that can’t send and receive picture messages or MMS
MMS is basically an upgrade of SMS as you are allowed to attach a picture, file or anything with your text message. If you are having issues while sending MMS or if you haven’t received an MMS for several days already, here’s what you need to do…
Step 1: Verify your phone is getting good reception
Again, just by looking at the signal indicator, you can immediately tell if the problem has something to do with the reception. Try to follow the same things I suggested in the first problem above to troubleshoot a no signal issue.
Step 2: Make sure mobile data is enabled
Mobile data has to be enabled to be able to send and receive MMS messages. Your phone must be connected to the Internet via mobile data if you’re trying to transmit text messages with attached files. You may have heard that there are already services that allow you to send MMS via Wi-Fi but if you’re using the native messaging app, mobile data is required.
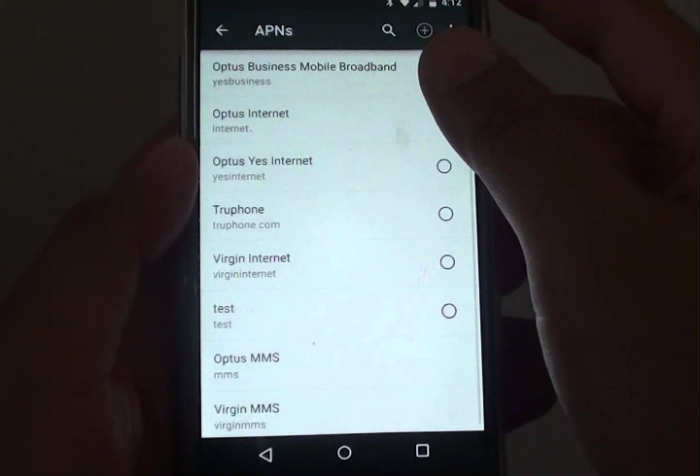
Step 3: Check the Access Point Name (APN) settings
Assuming mobile data is already enabled in your device and you still can’t send and receive MMS, then you have to double-check if the APN settings has something to do with this issue. The APN is just a bunch of numbers and letters that allows your device to connect to your provider’s mobile network and use the service. Without it or if it has been changed, your phone won’t be able to transmit MMS. You may google the correct APN or go straight to your provider’s website.
Step 4: Call provider to verify account status and credits
If you don’t have enough credits, you may not be able to send and receive MMS as well but the thing is even prepaid subscribers nowadays already have unlimited data usage so the problem must be with the status of your account. To verify your account is still in good standing, call your service provider and inquire about it.
Step 5: Do the master reset
Lastly, if all else fails and you don’t know what to do or have been advised to send the phone in for checkup, then you must backup your data and files and then reset your phone. Doing so will bring the phone back to its original configuration or settings and that might just work.
CONNECT WITH US
We are always open to your problems, questions and suggestions, so feel free to contact us by filling up this form. This is a free service we offer and we won’t charge you a penny for it. But please note that we receive hundreds of emails every day and it’s impossible for us to respond to every single one of them. But rest assured we read every message we receive. For those whom we’ve helped, please spread the word by sharing our posts to your friends or by simply liking our Facebook and Google+ page or follow us on Twitter.