How To Change DNS Server On Windows 10 | NEW in 2026
It’s not everyday that one needs to change the DNS server on Windows 10 but it can be one of the important things that you can do if you’re having trouble browsing websites, pulling up certain internet pages, or even when having trouble with some online games.
In this guide, we’ll show you how to access your computer’s DNS settings and change them to fix your network connections problem.
What is DNS?
DNS stands for Domain Name System. This system is a group of computers that handle requests to translate human-readable domain names (such as TheDroidGuy.com) into an IP address. So, if you want to visit our website and type in our domain, it’s the job of DNS servers to translate what you’ve entered into computer-readable values so you can pull our web page. There’s no need to enter the IP address assigned to the server of your website, or any other website.
Why change your DNS server?
DNS servers a vital part to all Internet-related activities and without them, you will have a challenging way to open every website you want to visit as you need to memorize every IP addresses. That said, if DNS servers encounter issues, they can also cause a chain of problems.
One common issue with DNS servers can be slow response time. Your ISP-provided DNS server may be slow or not configured properly for caching, which often manifests in slow loading times when browsing. In some instances, websites may become totally inaccessible if your Internet Service Provider or ISP DNS server is down.
Fortunately, any of these situations can be fixed by using another set of DNS servers. You can do that by going into your computer settings to change the DNS settings.
How to change DNS server on Windows 10
You can also change the DNS server settings using the Network and Sharing Center. Here’s how:
- Press the Windows key on your keyboard.
- Type in “control panel” and open the Control Panel app.
- Click Network and Internet.
- Go to Network and Sharing Center.
- Click on Change Adapter options.
- Right-click on Ethernet network and click Properties.
- In the Ethernet Properties window, click Internet Protocol Version 4 (TCP/IPv4), then select Properties.
- In the Internet Protocol Version 4 (TCP/IPv4) window, select Use the following DNS server addresses:
- For your preferred DNS server, type in: 8.8.8.8.
- For your Alternate DNS server, type in: 8.8.4.4.
- Make sure to enable Validate settings upon exit box, then click OK.
Changing your DNS servers with Windows Powershell
If you prefer to change your DNS settings using a command-line, you can use the Windows Powershell. Here’s how:
- Press the Windows key on your keyboard.
- Type in “cmd” and open the Command Prompt.
- Type in “powershell” and press enter.
- Then, type in “start-process PowerShell -verb runas” and press enter to run the prompt as an administrator.
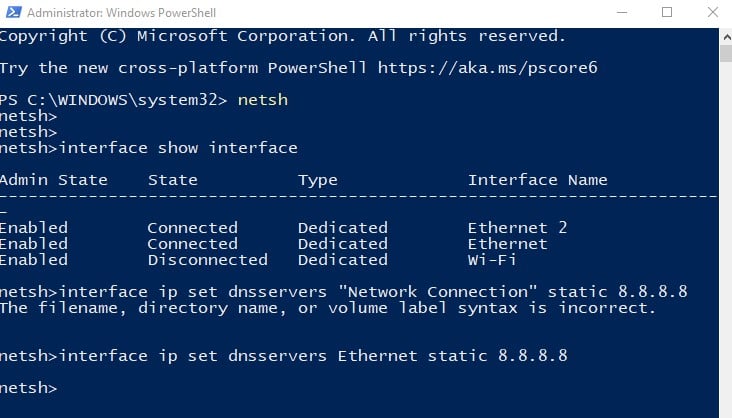
- Once you have the elevated powershell pulled up, type in “netsh” and press enter.
- Type in “interface show interface” and press enter.
- Type in “interface ip set dnsservers Ethernet static 8.8.8.8”. If you’re trying to change the DNS settings of your wi-fi network, then put in “Wi-Fi” instead of the word “Ethernet”
OTHER INTERESTING ARTICLES:
- How To Fix League Of Legends Reconnect Error | NEW 2021
- How To Fix Fortnite Crashing On PS4 | NEW & Updated 2021
- How To Fix World Of Warships Crashing On Epic Games | 2021
- How To Fix Xbox App 0x00000001 Error | NEW & Updated 2021
Visit our TheDroidGuy Youtube Channel for more troubleshooting videos and tutorials.