Starfield Ship Components Decoded: Making Sense of Max Power Requirements
In Starfield, understanding how ship components work is key to building an effective vessel. One of the most important stats to pay attention to is “Max Power”. This stat indicates how much power needs to be allocated to a component for it to reach its maximum effectiveness. Many players have struggled to grasp the implications of Max Power, resulting in less than optimal ship builds. This article will explain what Starfield ship components: Max Power means and how to use that knowledge to decode Starfield ship components.
What Does Max Power Actually Mean?
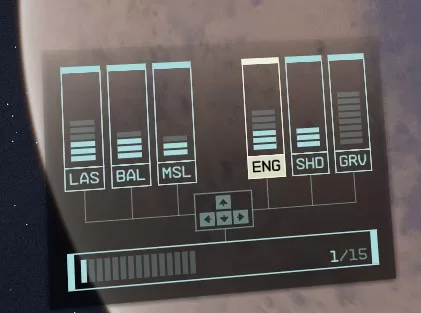
When you look at a ship component’s stats, you’ll see a value listed for Max Power. For example, a shield generator might have Max Power 10. This means that the shield will require 10 pips of power to reach its full shield strength. If you only allocate 8 pips to that shield, it will only reach 80% effectiveness.
The same goes for engines and weapons. Engines with Max Power 5 will need 5 pips to hit top speed. Weapons with Max Power 3 will need 3 pips to reach maximum damage/reload speed. If you under-allocate power, they’ll be weaker.
So in summary, Max Power dictates the power requirement to attain a component’s full listed stats. It’s not a rating of how powerful the component is overall.
Why Lower Max Power Can Be Better
Many players make the mistake of thinking higher Max Power automatically means a better component. But often, lower Max Power equipment can be more efficient and effective depending on your reactor output.
For example, let’s say you have a reactor with 8 available pips. One shield option has Max Power 10 and 1200 strength. Another has Max Power 4 and 800 strength.
Even though the Max Power 10 shield has higher total strength, with only 8 pips you’ll get 800 strength from it. The Max Power 4 shield also gives 800 at 8 pips. So the lower Max Power shield is actually better optimized to your available power.
The same logic applies for engines and weapons. The key is matching power requirements (Max Power) to your reactor’s output. Otherwise you waste potential by underpowering high requirement components.
More Power Isn’t Always Better
Some players think they should stack the highest Max Power components possible. But this isn’t always ideal. High Max Power parts often have downsides:
- Higher mass, reducing maneuverability
- More expensive to purchase
- Require higher class (and more expensive) reactor
- Use up more of your available power
Instead of blindly pursuing high Max Power, do the math and compare efficiency and tradeoffs. Often you can get the same or better performance from lower Max Power components that are optimized for your reactor output.
Starfield Ship Components Weapon Setup
Let’s walk through an example of choosing weapons wisely based on Max Power and your reactor output.
Your ship has a reactor with 14 available pips. You want a weapon loadout focused on DPS. Here are two options:
Option 1
- 2x Rapid Fire Laser Cannons (Max Power 8, DPS 100)
Option 2
- 3x Autocannons (Max Power 5, DPS 90)
At first glance, the rapid fire cannons seem better – higher DPS and damage. However, with your 14 available pips, you can only allocate 7 to each. That means they’ll be running at less than max power.
The autocannons on the other hand can be fully powered with your reactor. And 3 of them at max power provides better total DPS than the partially powered rapid fire cannons. This setup takes better advantage of your available power.
Optimizing Ship Builds
Once you understand Max Power, you can start optimizing your ship builds around your reactor output:
- Add up Max Power values for intended loadout
- Compare to reactor output to find most efficient components
- Adjust loadout or reactor if needed to maximize use of available power.
- Consider crew skills that provide bonus power allocation.
- Upgrade to higher class reactors once affordable to enable more Max Power components.
With some number crunching and testing, you can put together ship builds that take full advantage of your available power. This makes a huge difference in combat performance.
The Key is Balance
Starfield ship building is all about finding the right balance. You can’t just stack the biggest, most powerful components without running into power, mass, and cost problems. Carefully reviewing Max Power requirements is the key to decoding which components will work best together based on your reactor output. Understanding this will help you put together optimized ships as you explore the Settled Systems!
A Redditor’s Story
This reminds me of when I first started tinkering with ship builds after buying my first B-class vessel. I was so excited to deck it out with all kinds of new weapons and upgrades. I spent hours pouring over spec sheets and component stats trying to figure out the perfect loadout.
But when I first took it out for a spin, I quickly realized things weren’t right. My fancy new rapid-fire railguns were taking forever to recharge. The upgraded shield barely seemed better than the stock one. And even with the alleged “top of the line” engines, the old rust bucket could barely break 100 m/s.
After scratching my head for awhile, I finally figured out the problem – I was way overbudget on my power requirements! I had just looked at damage, shield strength and speed stats without really considering power draw. Rookie mistake.
I ended up having to replace half the gear I just bought to get back within my reactor’s output. After properly balancing weapons, shields, and engines for available power, my ship finally started performing like it should. It was a valuable lesson in paying attention to power requirements and not getting too swept away by big numbers. I’m sure many fellow spacers have found themselves in similar situations while learning the ropes of shipbuilding.
The key is realizing every component needs enough power to function properly. Having 12 autocannons on paper doesn’t help much when you can only power 2 of them! So be sure to crunch those numbers and understand Max Power needs for your build. A balanced approach will lead to the best results as you customize your home among the stars. Fly safe out there!
Hi. I’m a little confused about your example of the two Options for the laser cannons and auto cannons. You said the reactor has 14 pips (I’m assuming “pips” are the horizontal lines in each of the ENG, SHD, and GRV columns?) so in option 2, you have 3x autocannons (max power of 5). Doesn’t that mean 3 autocannons at 5 max power EACH? So that’s 3 x 5 which is 15. Your reactor only has 14 so isn’t that not efficient? I mean Option 1 totals 18 which is 4 more over 14, so aren’t they both kinda inefficient? I’m confused still.????