How to Use Uber: A Beginner-Friendly Guide to Ridesharing
Getting around town has never been easier thanks to ridesharing services like Uber. While the technology might seem daunting at first, this guide will walk you through every step of using Uber, from downloading the app to completing your first ride.
Getting Started with Your Uber App
First, you’ll need to download the Uber app on your smartphone. If you have an iPhone, look for the blue “App Store” icon on your screen.
For Android phones, you’ll want to find the “Google Play Store” icon, which looks like a colorful triangle.

Once in the store, type “Uber” in the search bar. You’ll see the official Uber app with its black and white icon. Tap “Install” or “Get” – don’t worry, the app is free to download.
Setting Up Your Account
After installing the app, you’ll need to create an account. When you open the app for the first time, tap “Create Account” and enter your basic information. This includes your phone number, email address, name, and a password of your choice.
Uber will send a verification code to your phone via text message – this is for security purposes. Simply enter this code when prompted, and you’re halfway there.
Adding Your Payment Method
Before you can take your first ride, you’ll need to add a payment method. Look for the menu icon (three horizontal lines) in the top left corner of the app and select “Payment.” Choose “Add Payment Method” and enter your credit or debit card information.
The app securely stores this information, so you won’t need to enter it again for future rides. This also means you’ll never need to handle cash during your Uber experiences.
Requesting Your First Ride
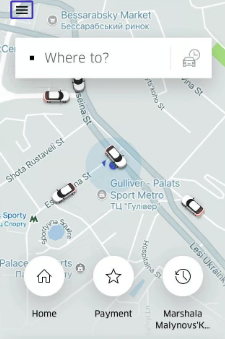
When you’re ready to take a ride, open the app and look for the “Where to?” box at the top of the screen. Type in your destination – this can be a specific address or even just the name of a business or landmark. The app automatically detects your current location as the pickup point, but you can change this if needed.
Next, you’ll see different types of rides available. UberX is the most common and affordable option – it’s a regular car that seats up to four passengers. You might also see options like Comfort (newer, larger cars) or XL (for larger groups).
Each option shows you the estimated cost and how long you’ll need to wait for pickup. Simply tap your preferred option and then “Confirm Uber” to request your ride.
Meeting Your Driver
Once you’ve confirmed your ride, the app will show you important information about your driver: their name, photo, car make and model, color, and license plate number. This information helps you identify the right car when it arrives. For safety, always check that the license plate matches before getting in the car. The driver will typically confirm your name as well.
During Your Ride
Once you’re in the car, you can relax. The driver will follow the GPS navigation to your destination, so you don’t need to give directions. Feel free to chat with your driver if you’d like, but there’s no obligation to make conversation. You can watch your progress on the map in the app, which shows exactly where you are and your route to the destination.
Ending Your Journey
When you arrive at your destination, simply thank your driver and exit the vehicle – that’s it! The payment processes automatically through the app using your saved payment method. You’ll receive an email receipt shortly after your ride ends.
The app will ask you to rate your driver (one to five stars) and give you the option to add a tip. While tipping isn’t required, it’s appreciated – 15-20% is standard, and you can add it right in the app with no cash needed.
Helpful Tips for a Better Experience
Save frequently visited addresses like your home and workplace in the app to make booking future rides easier. If your phone battery tends to run low, consider carrying a portable charger since you’ll need your phone to order and track your ride. You can also share your trip status with family members through the app for added safety and peace of mind.
If you ever leave something in an Uber, don’t panic. Use the “Help” section in the app to contact your driver about lost items. This section is also useful for any other questions or issues you might encounter during your Uber experience.
With these steps and tips in mind, you’re ready to start using Uber confidently. Remember, while the technology might seem complex at first, it’s designed to make transportation easier and more convenient. After a few rides, you’ll likely find yourself wondering how you ever got along without it.
Need help along the way? The app includes a comprehensive “Help” section, or you can ask a family member to walk through these steps with you the first time. Happy riding!
do i just go offline to use the bathroom….there is no coffe mug