How To Fix G-Sync Not Working On Windows 10 | NEW in 2026
If you’re using an NVIDIA graphics card and you have a G-Sync compatible monitor, you should take advantage of the G-Sync technology when gaming. While G-Sync is largely bug free and works as expected for the majority of users, some people may encounter problems with it from time to time. If G-Sync is not working on your Windows 10 machine and you’re looking for a fix, you’ve come to the right place.
What is NVIDIA G-Sync?
G-Sync is an NVIDIA proprietary screen technology designed to lessen or eliminate screen stuttering or screen tearing on certain PC monitors or laptops. This technology only works if the monitor or laptop uses a compatible NVIDIA graphics card. If you don’t have a discrete GPU or if you’re using an AMD graphics card, this technology won’t work even if you’re using a G-Sync monitor.
If you want to take advantage of NVIDIA’s G-Sync technology when gaming, you must have a compatible NVIDIA graphics card as well as an G-Sync compatible monitor.
If you’re wondering how to fix the G-Sync not working issue on your Windows 10 PC or laptop, check out the solutions below.
How to fix NVIDIA G-Sync not working on Windows 10?
There are a number of possible reasons why G-Sync is not working on your machine. To identify what the real issue is, you need to run a series of troubleshooting steps and solutions. This guide will show you how that’s done.
Fix #1: Install the latest updates.
Assuming that the hardware requirements for G-Sync have been met on your system, which means that you have a compatible NVIDIA GPU and G-Sync capable monitor, the most likely reason why G-Sync technology is not working on your PC is likely the software components. If your PC is running an old version of Windows, or if the NVIDIA software such as the NVIDIA Control Panel and NVIDIA GeForce experience are out-of-date, you can still encounter problems.
In order to fix G-Sync issues on your Windows 10 machine, you have to make sure that the Operating System is updated. To do that, you must go to Windows Settings > Update & Security > Windows Update > Check for updates.
Once you’ve updated the Windows OS, you then want to ensure that all your applications including the ones from NVIDIA are running their latest version. For example, if you want to check for the latest NVIDIA Control Panel software, simply open the application, click on Help, and click on About NVIDIA Control Panel.
Fix #2: Update your graphics drivers.
Another important software component that you need to keep updated all the time is drivers, particularly the ones for your graphics. A driver, together with other drivers, work similarly to a mini-Operating System for a hardware component. If a certain driver is outdated, Windows may not work properly when communicating with the hardware it needs like a GPU when it tries to render graphics or run a game. Thankfully, keeping drivers updated has become easy over the years and certain hardware components even have their own special software to ensure that the latest drivers are regularly installed.

For instance, to take care of your NVIDIA driver, you can install the NVIDIA GeForce Experience software. This special software will automatically scan the internet and advise you if there’s a new set of drivers that need to be installed.
If you’re having an issue with G-sync on your Windows 10 machine, be sure to install the latest NVIDIA driver.
Fix #3: Use the right V-Sync settings.
V-Sync or vertical sync, while distinct from NVIDIA G-Sync or AMD FreeSync, works under the same principle — that is to ensure that the frame rate of a game matches that of the monitor’s refresh rate.
If the V-sync setting of your graphics card is off, it might lead to issues with G-Sync as well. Most games also incorporate the V-sync option under their Settings menu. In order to avoid complications, you want to make sure that you turn on V-sync in your NVIDIA graphics card, but disable it within the game settings.
To check if the V-Sync settings are set up correctly, you’ll need to open the NVIDIA Control Panel and ensure that this particular setting is enabled. Here’s what you need to do:
- Go to the lower right portion of the taskbar and click on the arrow.
- Right click on the NVIDIA icon and select the NVIDIA Control Panel.
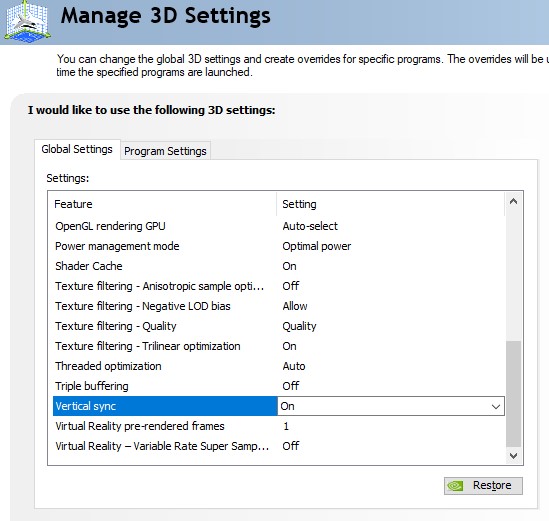
- Select Manage 3D settings.
- Go to the Global Settings tab, and find the Vertical sync option. Make sure that you set Vertical Sync to ON.
- Click Apply to save changes.
- Restart your PC.
If G-Sync appears to be not working when you play a particular game, open the game settings menu and make sure that you turn off V-Sync from there.
Fix #4: Turn off your other monitors.
Some players reported in the past that G-Sync seems to be problematic if they’re using multiple monitors. If you have more than 1 monitor when gaming, try to see if G-Sync will begin working normally when the second monitor is unplugged.
Fix #5: Reset Windows 10.
If G-Sync is still not working at this point, final fix that you need to do is reset Windows 10. Here’s how:
- Press the Windows key on your keyboard at the lower left.
- Click on Settings, an icon that looks like a gear to open Windows Settings section.
- At Windows Settings, click on Update and Security.
- Click on the Recovery tab at the left pane.
- At Recovery section, under Reset this PC option click on Get Started.
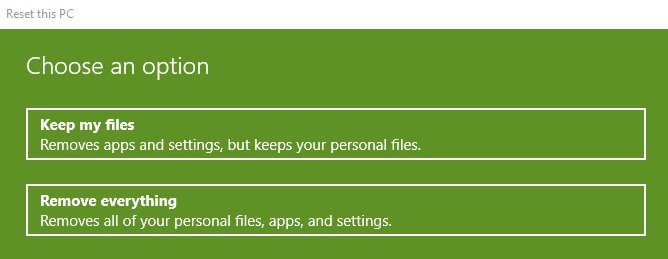
- At prompt message, two options will be presented to you — Keep my files (which only removes programs, application and settings but retains your personal files) and Remove everything (which removes all personal files, programs, application and settings). If you opt to choose the Remove everything option, make sure that you were able to back up your files.
- Follow the on-screen instructions to refresh your Windows 10 PC.