How To Fix Warzone 2 Installing Shaders Optimization [Updated 2023]
Call of Duty: Warzone is a very popular first-person shooter game that needs to be updated regularly to keep working. But optimizing the shader installation process is one of the most common problems players run into.
Installing shaders is essential for improving the game’s graphics and performance, but some players may find it time-consuming and frustrating. In this article, we’ll talk about what you can do to fix the Warzone 2 shaders optimization issue when installing them.
How To Fix Warzone 2 Installing Shaders Optimization
To fix the Warzone 2 installing shaders optimization problem, you can lower the graphics settings, restart shaders optimization,clear the game’s cache, update your graphics card drivers, and make sure your system meets the game’s minimum requirements. By doing these things, you can make the game run better and have a better experience playing.
Fix #1: Check your System Requirements
When trying to fix the Warzone 2 installing shaders optimization problem, it’s important to check your system requirements because the game’s graphics and performance depend a lot on your hardware. If your computer doesn’t meet the minimum requirements, it may have trouble installing and running the game. This could cause problems like shaders that take a long time to install or graphics that don’t work as well as they should.
By checking your system’s specs, you can make sure that it meets the minimum requirements of the game and can run it smoothly. Before trying to fix the shader optimization problem, this is a very important step to take. It will rule out any hardware problems that could be causing the problem.
Here are the minimum requirements needed to play Call of Duty: Warzone 2.
Minimum Specifications:
- OS: Windows 10 64 Bit (latest update)
- CPU: Intel Core i3-6100 / Core i5-2500K or AMD Ryzen 3 1200
- RAM: 8 GB
- Hi-Rez Assets Cache: Up to 32 GB
- Video Card: NVIDIA GeForce GTX 960 or AMD Radeon RX 470
Video Memory: 2 GB
Recommended Specifications:
- OS: Windows 10 64 Bit (latest update) or Windows 11 64 Bit (latest update)
- CPU: Intel Core i5-6600K / Core i7-4770 or AMD Ryzen 5 1400
- RAM: 12 GB
- Hi-Rez Assets Cache: Up to 32 GB
- Video Card: NVIDIA GeForce GTX 1060 or AMD Radeon RX 580
Video Memory: 4 GB
Fix #2: Reduce Graphics Settings Before Installing Shaders
Before installing shaders, it’s best to lower the graphics settings. This makes your operating system work less, which makes the installation process go more smoothly and faster. When you install shaders, you have to pre-compile and cache the game’s graphics assets. This can take a lot of processing power and slow down the installation process.
You can reduce the game’s processing requirements by lowering the graphics settings, making it easier for your system to handle the workload. In turn, this can accelerate the shader installation process and improve the game’s overall performance. Once the shaders have been installed, you can adjust the graphics settings to your preference.
Here are the ideal graphics settings in Warzone 2:
- Launch Warzone 2.0 and click “Graphic Settings or Settings” or the gear icon located at the top right corner.
- Select Graphics.
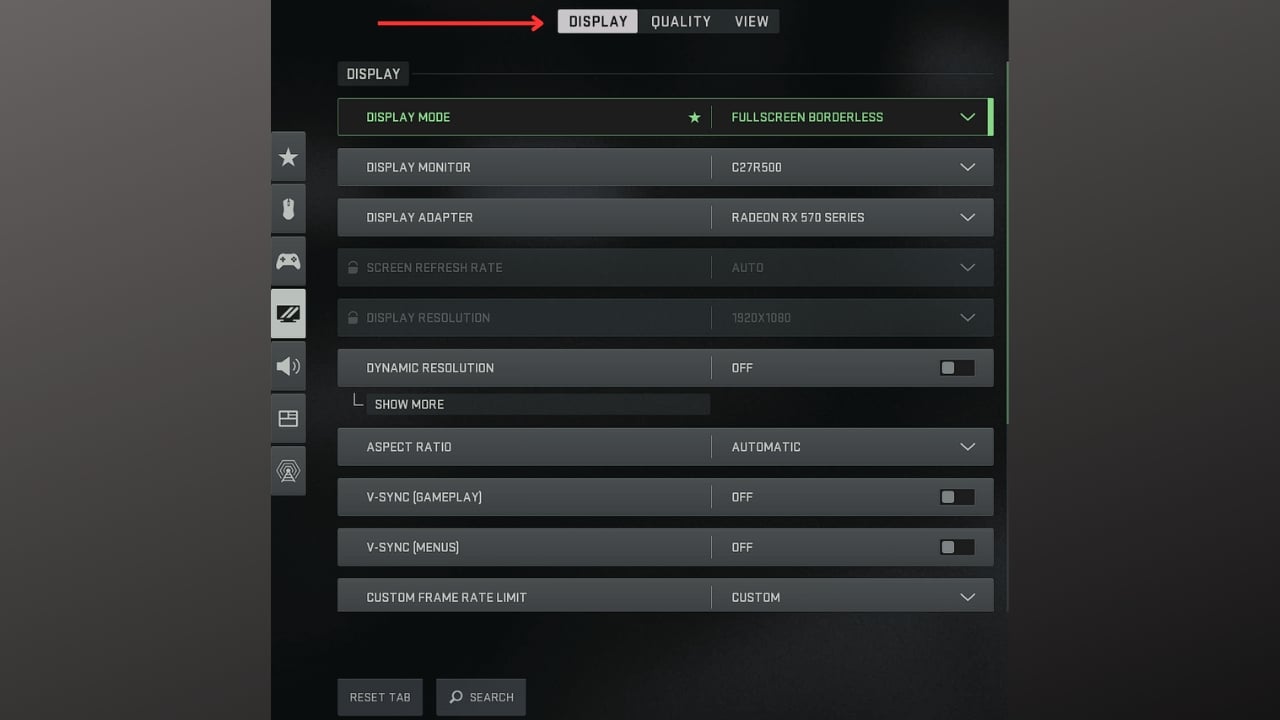
Display
- Display Mode: From Windowed mode, change it to “Fullscreen Exclusive.”
- Display Monitor: Your main gaming display.
- Display Adaptor: Your graphics card.
- Screen Refresh Rate: Adjust refresh rate of your monitor (e.g. 144)
- Display Resolution: Adjust your monitor’s resolution (e.g 1920×1080)
- Dynamic Resolution: Off
- Aspect Ratio: Automatic
- V-Sync (Gameplay): Turn this off in in game settings to prevent flickering.
- V-Sync (Menus): Off
- Custom Framerate Limit: Adjust to “Custom.”
- Gameplay Custom Framerate Limit: Adjust your monitor’s refresh rate (e.g 144)
- Menu Custom Framerate Limit: 60
- Minimized Game Custom Framerate Limit: 15
- Display Gamma: 2.2 (sRGB)
- Brightness: 55
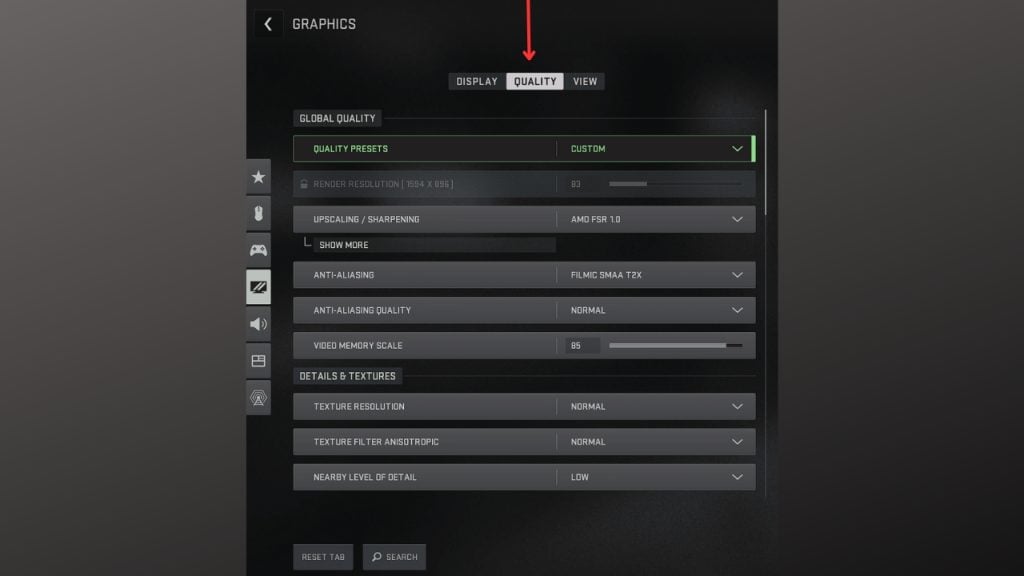
Global Quality
- Quality Presets: Change to Custom
- Render Resolution: 100
- Upscaling / Sharpening: Change to FidelityFX CAS
- AMD Fidelity CAS Strength: 75
- Anti-Aliasing: Filmic SMAA T2X
- Anti-Aliasing Quality: Low
- Video Memory Scale: 90
Details & Textures
- Texture Resolution: Change to Low
- Texture Filter Anisotropic: Change to High
- Nearby Level of Detail: Low
- Distant Level of Detail: Low
- Particle Quality: Change to High
- Bullet Impacts & Sprays: On
- Shader Quality: Change to Medium
- Tessellation: Off
- On-Demand Texture Streaming: On – You can disable this or turn it off if you’re experiencing packet burst
- Streaming Quality: Normal
- Volumetric Quality: Low
- Deferred Physics Quality: Off
- Water Caustics: Off
Shadow & Lighting
- Shadow Map Resolution: Change to Low
- Screen Space Shadows: Off
- Spot Shadow Quality: Change to Medium
- Spot Cache: High
- Particle Lighting: Change to Normal
- Ambient Occlusion: Off
Post Processing Effects
- Depth of Field: Off
- World Motion Blur: Off
- Weapon Motion Blur: Off
- Film Grain: 0.00
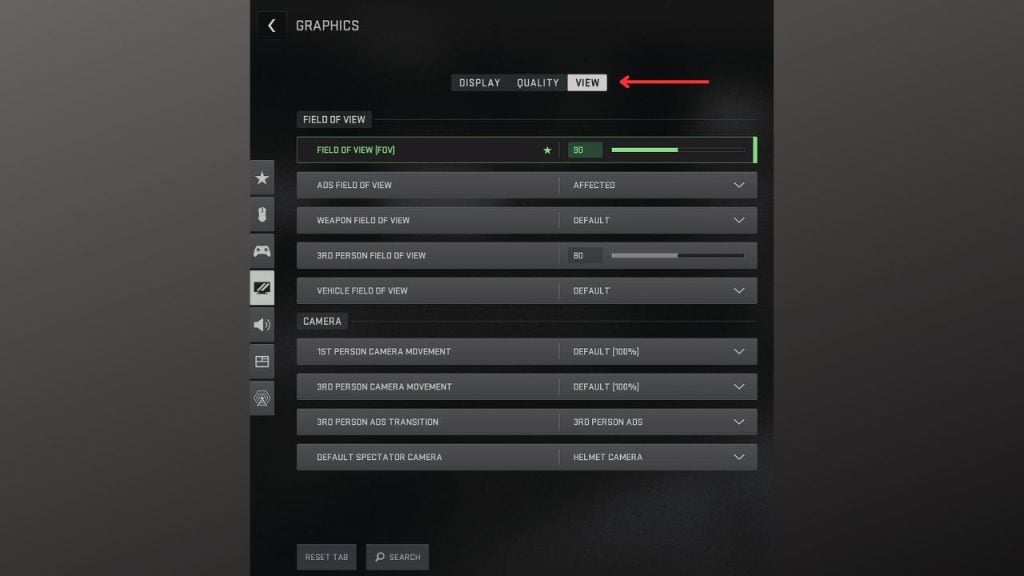
View
- Field of View: Change to 100
- ADS Field of View: Change to Affected
- Weapon Field of View: Change to Wide
- 3rd Person Field of View: Change to 90
- Vehicle Field of View: Default
- 1st Person Camera Movement: Default 100%
- 3rd Person Camera Movement: Default 100%
- 3rd Person ADS Transition: 3rd Person ADS
- Default Spectator Camera: Change to Game Perspective
Fix #3: Restart Shaders Optimization
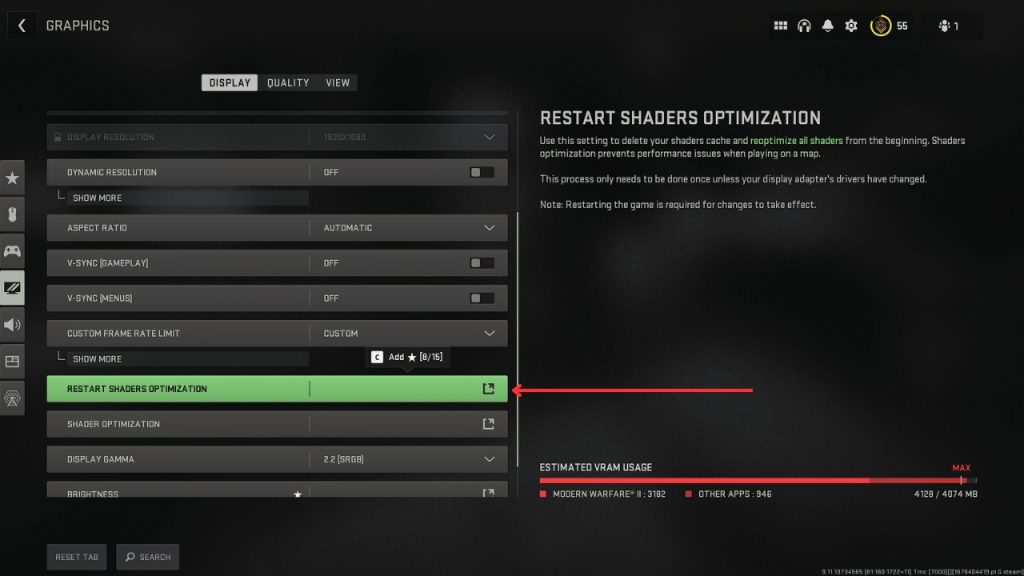
If you are having trouble setting up shaders in Warzone 2.0, you can use the Restart Shaders Optimization option. The installation process can sometimes get stuck or have performance issues, which can make it hard for the game to run well. When this happens, restarting the stuck shader or shaders optimization can help fix the gameplay optimization issues and finish the installation.
When you start the shaders optimization process over again, the game will start over with installing the shaders and shaders cache. This can help make sure that any shader cache or files that are damaged or missing are replaced and that the installation goes smoothly. You can fix problems with the game’s performance and make sure it runs smoothly by starting the optimization process over again.
Here’s how you do it to fix shaders problem:
- Open Steam.
- Click the Play button for Call of Duty: Modern Warfare 2.
- Click Settings or the gear icon.
- Click Graphics.
- On the Display option, scroll down and look for Restart Display Optimization, and click on it to restart and fix the stuck shader problem.
Fix #4: Clear the Game’s Cache
The Warzone 2 shader optimization problem can be fixed by clearing the game’s cache or local files. When you play games like Call of Duty: Warzone, the game makes temporary files and caches to improve performance and response times.
But, over time, these files can add up and become corrupted, which can make the game run poorly. When you clear the game’s cache, these temporary files are deleted. This frees up space on your computer and makes sure the game runs smoothly.
When installing shaders, clearing the game files can help the game start over and speed up the installation process by removing any corrupted or old files that might be in the way. In short, clearing the game’s cache can make the game run faster, make errors less likely, and help fix problems with installing shaders.
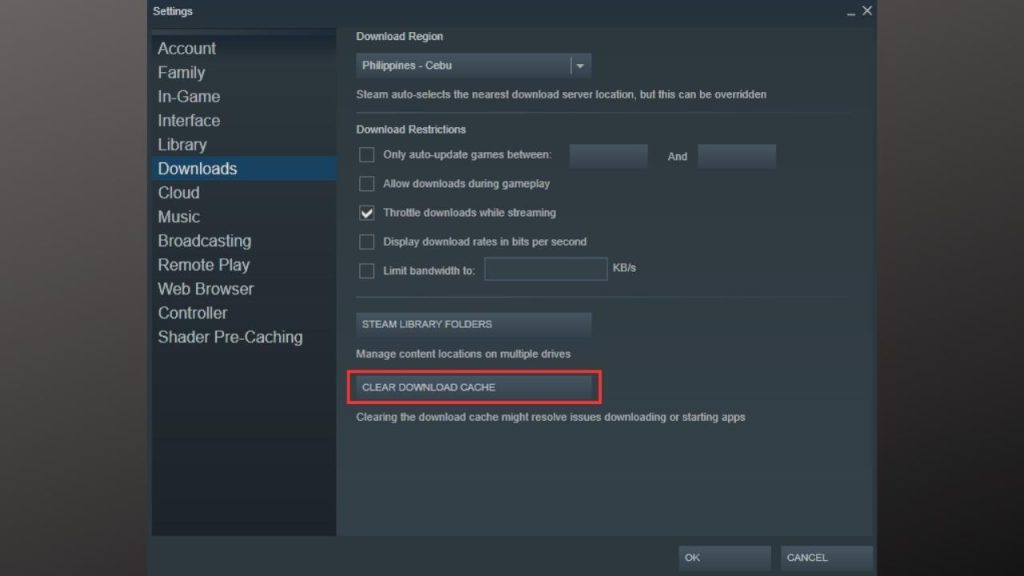
Here’s how to clear your game cache. (Steam)
- Launch Steam client.
- In the upper-left corner, click “Steam.”
- Click “Settings”.
- In the sidebar, choose “Downloads.”
- Click “Clear Download Cache.”
Fix #5: Update Graphics Drivers
Fixing the Warzone 2 installing shaders optimization bug problem involves updating the graphics card drivers, which are needed for the game to run and for the graphics to be displayed. Manufacturers of graphics cards regularly release new drivers that improve performance and stability and fix bugs that could be slowing down a game.
By making sure you have the latest version of your graphics card drivers, you can make sure that your graphics card is running at its best, which can make installing shaders much easier.
When graphics drivers are out of date, they can cause a number of problems, such as slow graphics, crashes, and other errors. So, updating the drivers for your graphics card can help make sure your system is up to date and can run the game smoothly.
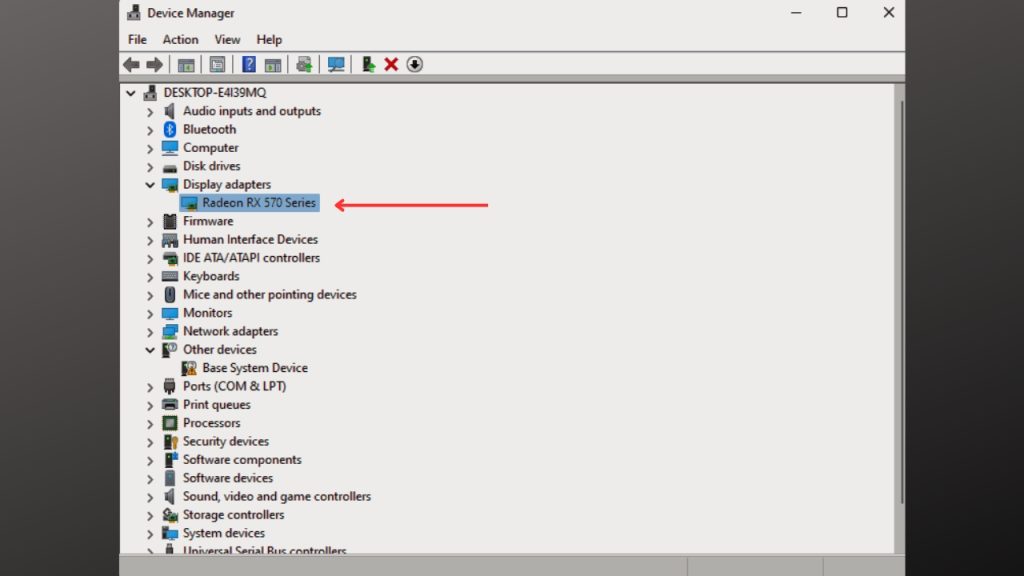
Here’s how to update your driver (Windows PC)
- Simply type Device Manager in the Windows search bar on your desktop and then click the Device Manager icon that appears in the results.
- Click the Display adapters icon.
- Right-click the dedicated graphics card you are using and then select the Update driver.
