How To Transfer Data From Old Phone To Your New Phone
New, hot smartphones are launching all of the time. Most recently, we have the Samsung Galaxy S10 and the Huawei P30 Pro, both excellent smartphones with beautiful designs that everyone is after. That said, everyone always wants to make sure that they have the latest and greatest. And while there’s no problem with that, moving phones on a yearly or less basis can be on the frustrating side, simply because it isn’t a very straightforward process when it comes to moving data from old phone to new phone.

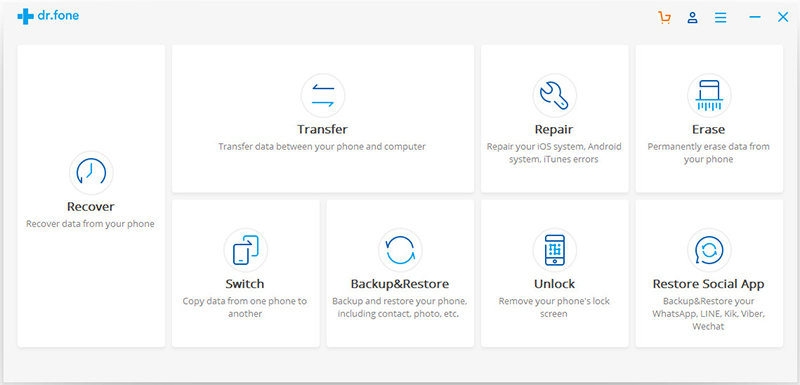
Editor’s Choice
The quickest way to transfer data to your new phone is with dr.fone – Switch. Works with iPhone and Android phones.
But don’t worry — if you follow along with us below, we’re going to show you a couple of ways that you can very easily transfer data from old phone to your new phone. Let’s get started.
How to transfer data
It might seem like a daunting task at first, but there are programs like dr.fone’s Switch Tool that make it easy to move all of your data from your old phone to your new phone. In just a couple of taps, you can quickly and easily move your data from your old, say, Galaxy S8 to your new, say, Galaxy S10.
A new phone is just one scenario why you might want to move your data to a new device. You might also want to switch from Android to iOS for one reason or another. Before, there were very few options that helped you transfer your data from Android to iOS, but now, dr.fone’s Switch is one of the few that can help you move over those most important conversations and personal moments.
Sure, you could move everything over manually, but that would take your potentially hours to move everything over. dr.fone’s Switch tool helps you move things over in just a couple of minutes.
Backups
The first steps is to backup your phone. Before you start messing with a ton of data, it is a good practice to make sure that that data is backed up somewhere else in case you run into corruption, or even any file transfer errors that might delete or corrupt files.
Android does have an automated backup system. If you didn’t enable that when first setting up your old device, you can enable it now by going to Settings > System > Advanced > Backup. Then, simply turn on the backup service. If those steps didn’t work, you can simply search within Settings for “backup.”
As an extra layer, you can download Google Photos on your phone, and then back all of that up the Cloud.
If you don’t want to do a full phone back-up, you can also backup individual files by simply downloading a Cloud storage app like Google Drive, Dropbox, and so on. Then, you can open one of those apps and simply upload that specific file that you make sure that you don’t want to move.
We definitely recommend doing a backup before proceeding, but you won’t be harmed if you don’t. dr.fone’s switch tool promises zero data loss and doesn’t overwrite data — unless you choose so — on the new or old phone. However, it’s always good to have that extra layer of insurance.
After you use dr.fone’s Switch to move your data over, it’s always good to make sure that you employ a good backup system, even after your data is successfully moved over. You never know what accident could destroy your phone, leaving you with a bunch of different lost memories and important data.
With that said, here’s how you can use dr.fone’s Switch app to move your data to your new phone:
Android to iPhone
The first step to transferring your data over to the new phone is to download the Switch app on your Windows computer or laptop, or your macOS-based computer or laptop. You can grab the software here: dr.fone — switch. You can download it for free to your PC, but be sure to check out their price packages and their advantages here.
From there, dr.fone’s Switch app gives you the ability to easily transfer data from Android to iPhone. Once downloaded and installed on your computer, just open up the Switch app on your PC or Mac.
Once open, connect your Android phone and iPhone to the Switch app by connecting those devices to your computer with their respective USB cables.
Next, you’ll want to select the Switch option, right below the option that says Transfer.
The next step would be to select which phone you want to be your destination phone, and which you want to be your source phone. You can switch them around, but for the purpose of switching your data around, you can set the Android device as your source device, and then the iPhone as your destination phone.
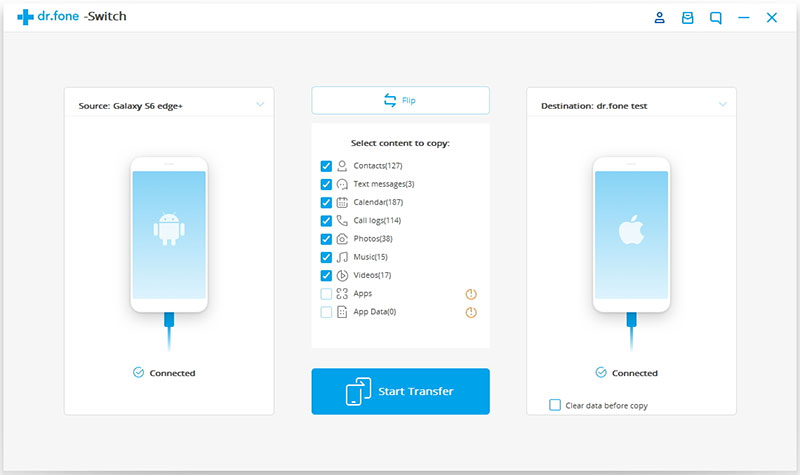
Now, we can choose the files that we want to move to your new phone. You can select which ones you want to move around by checking the boxes. Once you’re satisfied with your choices, you can click on the big blue button in the middle that says Start Transfer.
Next, a dialog box will pop-up, and show you the status of the transfer. Don’t unplug either device from the computer during this process — wait until the transfer is finished, as indicated by the progress bar.
And that’s all there is to it! You should now see all of the data you selected moved to your new iPhone.
iPhone to Android
If you have an iPhone and are trying to transfer data from iPhone to Android, it’s actually just as easy. Open up dr.fone’s Switch tool, and press the Switch button.
Now, in this next area, you’ll want to make sure that you have the iPhone selected as the source device, and then your Android phone selected as the destination device. Once again, check all of the boxes of the content or data that you want to move over, and then press the blue transfer button.
Just like before, the transfer will start, and its progress will be indicated by a blue progress bar. Do not unplug any of your devices during this process. Once the progress bar is finished, you should see a completion screen.
Transfer Contacts From iPhone to Android
We showed you so far how you can transfer all of your data from your old phone to your new phone. But, what if you want to do something as simple as just transfer contacts from iPhone to Android? It’s actually just as simple, but there is a process to it.
First, open up the dr.fone application on your Windows PC or Mac. From there, you’ll want to select the Switch option. Once you tap that, Switch will allow us to very easily move only contacts over.
To do it for iPhone to Android, you’ll want to make sure the iPhone is the source device and the Android handset is the destination handset. If these are mixed up, you can easily tap on the Flip button to switch their spots.
Once you’ve done that, make sure that the Contacts option is the only box that is checked. Then, just press on the big blue Start Transfer button, and Contacts will begin being transferred over to your Android device. Don’t unplug your device during this process, as you could interrupt the process and corrupt or lose important files. Wait until the progress bar completes, and then you can use your device again.
What if you want to move contacts from Android to iPhone? It’s quite easy — just hit that flip button so the Android is the source device and the iPhone is the destination device. Make sure the Contacts button is highlighted, and then press the Start Transfer button.
Through the app
What if you don’t have a Windows PC or Mac that you can use to connect your devices? If you don’t have a computer, you’re not quite out of luck, as dr.fone does have a Switch app. However, it’s worth noting that the dr.fone Switch app is only available on Android — you won’t be able to find it on iOS.
That said, to get started, be sure to grab the Android app for free here. Next, we’ll need to choose the method for transferring data around.
Through iCloud
The first way that you can do this is through iCloud. You’ll want to tap on the iCloud button within the app, and then log in using your credentials. If you have the two-code authentication on, you’ll need to enter in the verification code that appears on your iPhone as well.
And finally, back on your Android phone, the next step would be to select the contents you want to import to Android device. Then, you’ll need to wait until the import process is complete.
From iOS itself
Sure, iOS might not have its own dr.fone Switch app, but you can still transfer data from the iPhone to the Android device. To do that, you’ll need a Lightning cable, a USB connector, and a connector for your Android device. Hook them together, and then follow the steps on the screen.
Then, it’s as simple as waiting for the chosen contents to appear on the screen from your iOS device. From there, select the contents you want to import to Android device, and select the transfer button. Wait for the process to complete before disconnecting anything. Once completed, you should see the content that you selected over on your Android device!
What about social apps?
If you use WhatsApp is your primary method of contact, and want to transfer that type of data over, the above method probably isn’t going to work for you. That said, dr.fone does have a tool for transferring WhatsApp data specifically, and that is their Restore Social App, which allows you to transfer WhatsApp conversation for iOS to Android and Android to iOS, as well as between devices on the same platform.
Their Restore Social App doesn’t just let you move WhatsApp information around, but they let you move data between other apps as well, such as Kik, Viber, and even WeChat. You can grab dr.fone’s Restore Social App for Windows and Mac here.
Here’s how to backup your conversations.
Once it’s downloaded and installed, open the program.
Next, over on your Android or iOS device, make sure that you’re signed into the accounts of the social platforms that you want to transfer data and messages from and to.
Once signed in, back on your computer, check the data that you want to transfer, i.e. WhatsApp & Attachments, Messenger & Attachments, KIK & Attachments, Viber & Attachments, etc.
Once you have those boxes checked, you’ll want to press the Start Scan button at the bottom right of the program.
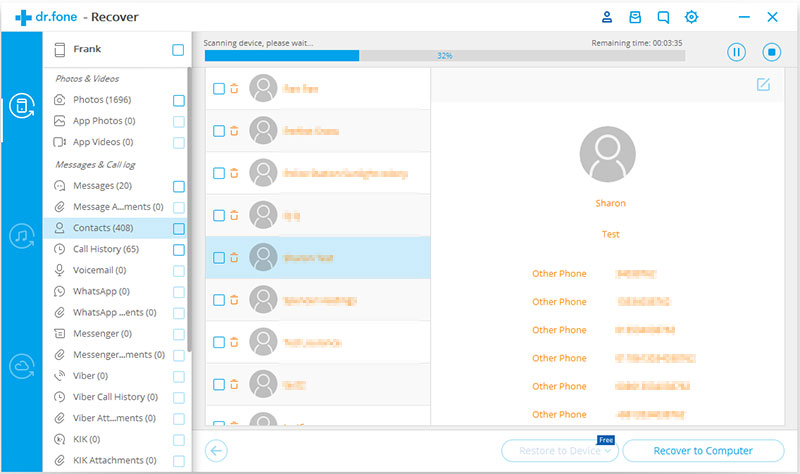
The scan can take quite a bit of time, at least depending on the data that you have on your phone. Once its complete, you should see the screen above.
Next, to transfer the data that we want to, we’ll have to check the boxes on the left navigation pane. If you’re wanting to transfer WhatsApp messages exclusively, you can check WhatsApp and WhatsApp Attachments, and then click Recover to Computer at the bottom right of the screen. This will export them on your computer.
Unfortunately, using this method, it doesn’t appear that there’s a way to export them to your computer, and then to an Android device. This is essentially just a way that you can save important conversations and great memories, without losing all of the data.
Transferring WhatsApp and other social messages to another phone
Now, if you really do want to transfer WhatsApp and other social content from Android to Android, iOS to Android, Android to iOS, and iOS to iOS, you can do so through dr.fone’s Switch app that we downloaded earlier.
Open the program, and you should see the screen above. You’ll want to click on the button that says Restore Social App. Make sure that you connect both of the devices that you want to transfer content from and to to the computer via a USB cable.
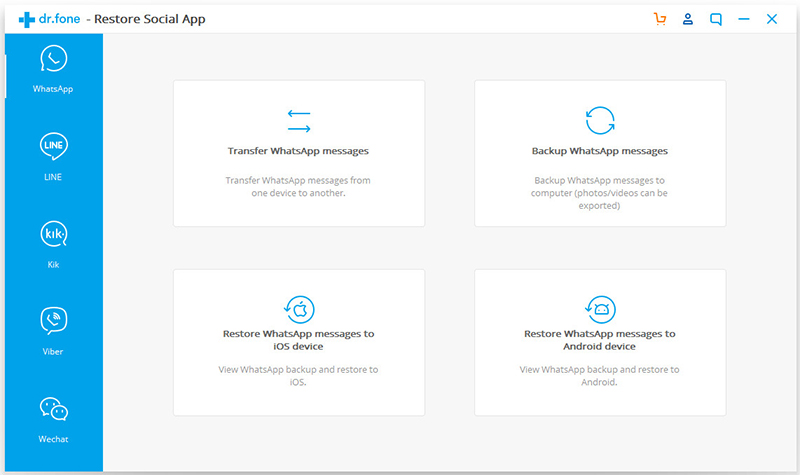
Click on the button for the action that you want to complete. To transfer messages, you can just click the “Transfer WhatsApp Messages” section.
Next, select your destination and source device. You can press the “Flip” button to easily swap them around. Once you have that set up, press the blue Transfer button at the bottom-right corner.
Now, just wait for the transfer to complete. This can take a few moments. Make sure you don’t unplug any of your devices during this process. Once the process is complete, you’ll see a confirmation message letting you know.
The confirmation message will say that the transfer is complete, but will give you some additional instructions. Follow the on-screen instructions, and then your WhatsApp messages will be successfully transferred to your new phone!
Verdict
As you can see, using dr.fone’s Switch application, whether through the computer or with phone-to-phone, it’s extremely easy to move your data around. If you were struggling on figuring out how to move your old data to your new phone, dr.fone helps you get it to the right place in just a couple of quick and simple steps — they actually, specifically says in three minutes or less. Beats the hours that it would take you to move everything over manually.
Did you use dr.fone’s Switch app? How did it go for you? Let us know in the comments section below, and we’ll try and help you figure out any errors to get your data where it needs to be.