How To Fix NVIDIA Overlay Not Working On Windows
NVIDIA is an American company popular in the gaming community as it is considered to be one of the best manufacturers of the best graphics cards available for your computer. Nvidia Overlay is a useful tool that is a part of the GeForce experience used for screen or video recording, viewing frame rate display, taking screen shots capture as well as broadcasting. Although this is a solid software, there are instances where certain Nvidia overlay not working issues that can occur which we will be addressing today. In this latest installment of our troubleshooting series we will tackle NVIDIA Game Overlay Not Working On Windows.
Nvidia Overlay is a useful tool that is a part of the GeForce experience used for screen or video recording, viewing frame rate display, taking screen shots capture as well as broadcasting. Although this is a solid software, there are instances where certain Overlay issues that can occur which we will be addressing today. In this latest installment of our troubleshooting series we will tackle NVIDIA Game Overlay Not Working On Windows.
Fix Nvidia Overlay not working on your Windows PC
There are several factors that can cause Nvidia game Overlay problem ranging from a corrupted or faulty drivers, administrative access to problems with third party services.
Before performing the recommended troubleshooting solutions below for this particular problem I suggest that you try restarting your computer first. This action refreshes the operating system and remove any corrupt temporary data that could be causing the problem to allow the application to work.
But before that make sure that Overlay is enabled. To do this, at GeForce experience click on Settings. Then at General tab, locate In-game overlay option. Toggle the switch to enable games overlay.
Solution 1: Update your Graphics Drivers
One of the reason why Nvidia game Overlay is not working on your PC is because of a corrupt or outdated graphics driver. Make sure to update your graphics drivers to the latest version often fixes bugs that may have caused you to experience the problem. Aside from that, updating to the latest version works by allowing you to experience the best and improved performance your PC.
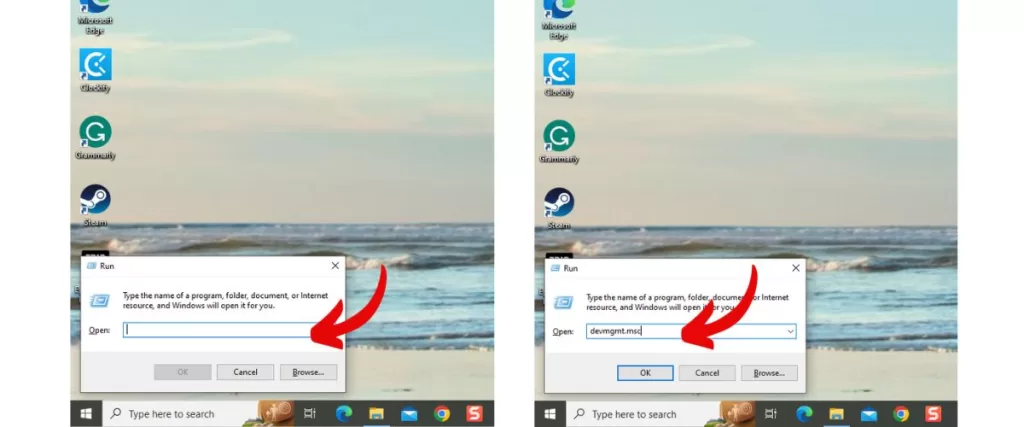
- Open Run Dialog box- Press Windows Key + R on your keyboard to open RUN dialog box.
- At Run Dialog box, type ‘devmgmt.msc”
At Run Dialog box, type ‘devmgmt.msc” and press Enter or click on OK to open Device Manager section.
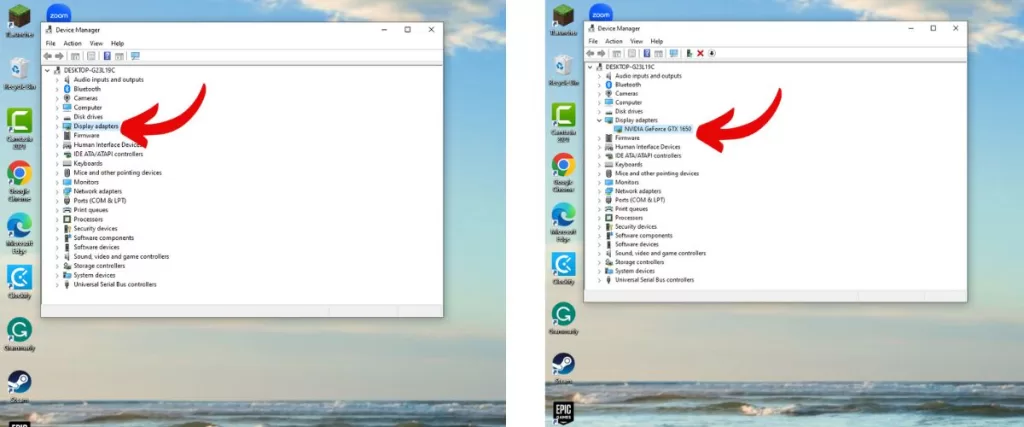
3. Click on Display Adapters
At Device manager results, click on Display Adapters to expand it.
4. Right click on your Graphics Driver and select Update Driver.
Right click on your Graphics Driver and select Update Driver from the drop down menu.
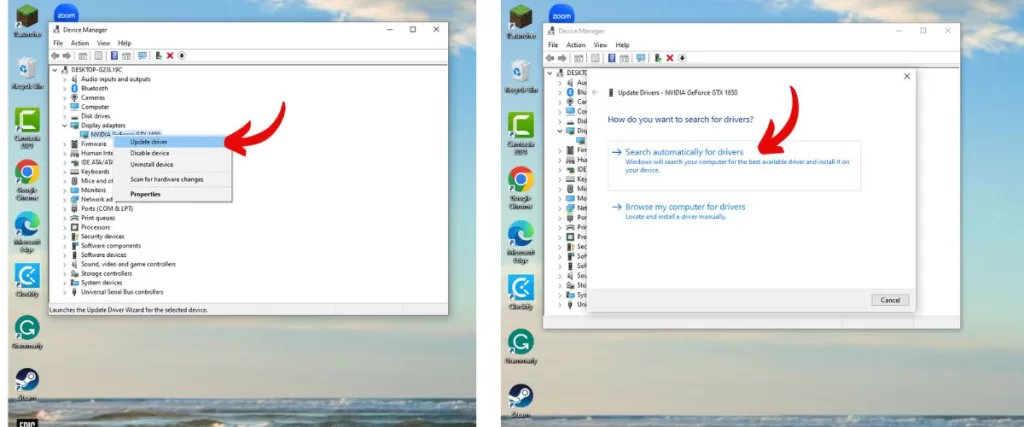
5. Choose “Search Automatically for Drivers”.
Make sure to choose “Search Automatically for Drivers” from the options presented. Windows will search for new update. Wait for the update process to complete.
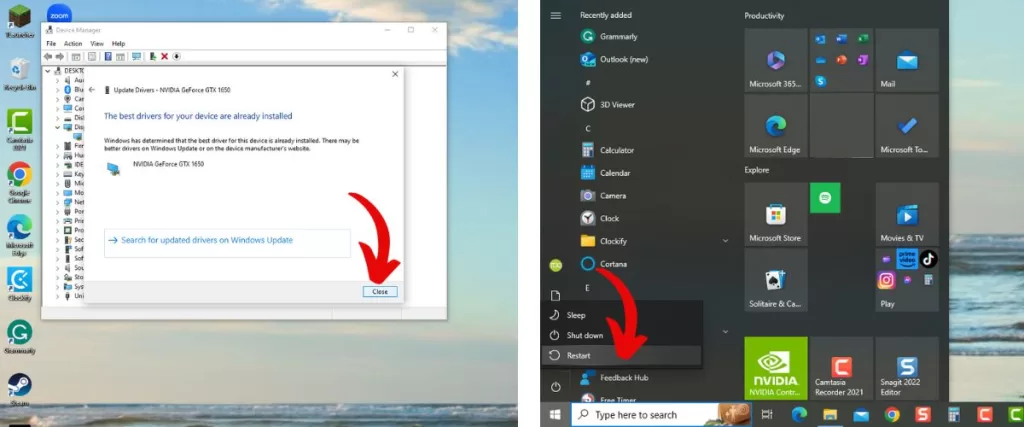
6. Click Close to exit.
Once update is complete and new version of the latest driver is already installed, click Close to exit.
7. Restart your computer.
Restart your computer to apply changes made.
After computer completely reboots, go back and Check if Nvidia game Overlay problem still occurs..
Solution 2: Run GeForce Experience as an Administrator
To be able to access all the files GeForce overlay experience you will need administrative access. Having administrative access is needed to fix problems relating to your applications allowing you to access computer resources that you could not access with the current access level on your computer.
- Right-click on GeForce experience shortcut on your desktop, click on Properties at the drop down menu.
- At GeForce Experience properties, click on compatibility tab.
- Check the box with the option “Run this program as an administrator‘ at the Settings section.
- Click Apply to apply changes made.
- Click OK to exit GeForce experience properties window.
Check if Nvidia game Overlay not functioning issue still occurs.
Solution 3: Enable Experimental Features
Enabling experimental features on GeForce experience allows access to updates and features.
- To do this, simply open GeForce Experience on your computer. It is usually located on your desktop
- Click on Settings, an icon that looks like a gear located at the upper portion.
- Click on General tab located at the left pane.
- At About section , tick the box next to the option “Enable Experimental Features. A GeForce experience may be required”. A short update will be initiated and an update will be installed.
Go back and Check if Nvidia game Overlay is working.
Solution 4: Disable Third-Party Services
There are instances wherein third-party services are preventing it from functioning properly. After disabling third party services and Nvidia game Overlay starts working again, try to enable third party services one at a time at the properties settings to check if it is what’s causing the problem. Make sure that Nvidia services are enabled.
- Press Windows Key + R on your keyboard to open RUN dialog box.
- At Run Dialog box, type ‘msconfig” and press Enter or click on OK to open System Configuration section
- Click on Services tab at System Configuration
- Check the box Hide all Microsoft services located at the lower left.
- Click on Disable All
- Click Apply to apply changes made.
- Click OK to exit System Configuration section.
- Restart Computer.
After computer completely reboots, Check if Nvidia game Overlay not functioning issue still occurs.
Solution 5: Repair Microsoft Visual C++ Redistributable
A platform needed by many application to work and function properly. Repairing these packages can help fix and often resolves application related issues on your computer.
- Press Windows Key + R on your keyboard to open RUN dialog box.
- At Run Dialog box, type ‘control.exe‘ and press Enter or click on OK to open Control Panel section
- Change View by located at the upper right into Category.
- Click Programs tab
- Click on Uninstall a Program
- Scroll down from the list to find Visual C++ Redistributable package. There are times wherein you can see many entries on the list, you can do everything on the same procedure with the rest of the packages. However, you can skip versions 2008 and older if there are any.
- Right click on Microsoft Visual C++ Redistributable and click on change. A new window opens
- At new window, click on Repair option.
- Repair process will now begin. Wait for it to complete.
- After successfully repairing all Microsoft Visual C++ Redistributable on the list, click on Close.
Check if Nvidia game Overlay is working.
Solution 6: Reinstall GeForce Experience
If the above mentioned solutions fails to resolve the problem, reinstalling GeForce Experience sometimes fixes the issue.
- Press Windows Key + R on your keyboard to open RUN dialog box.
- At Run Dialog box, type ‘control.exe’ and press Enter or click on OK to open Control Panel section
- Change View by located into Category.
- Click Programs tab.
- Click on Uninstall a Program
- Scroll down and find Nvidia GeForce Experience.
- Click Uninstall Device from the drop down menu. You need to follow the uninstall instructions.
- Search and Download a new driver from here to get it.
- Open Downloads folder and find Nvidia file . Make sure to follow on-screen instructions to install the file.
- Restart computer to apply changes made.
Try to see if Nvidia game Overlay is working.
After following the solutions mentioned above , you have successfully Fix NVIDIA Overlay Not Working on your PC.
Conclusion
In conclusion, if you are experiencing issues with NVIDIA Overlay not working on Windows, it can be frustrating, but there are solutions available. By following the troubleshooting steps outlined in this article, you can resolve problems with NVIDIA Overlay and regain its functionality. Ensure that your graphics drivers are up to date, check the overlay settings, and consider disabling conflicting software to troubleshoot and fix the issue effectively.